If you’re selling your products through multiple sales channels like Shopify, Etsy, Amazon, or similar platforms, you may want to think about using a centralized order management solution like Order Desk.
Order Desk is a powerful order management app that allows you to automate the order fulfillment process, removing roadblocks and easing the movement of orders between separate channels.
Order Desk is designed as a customizable app that allows you to create a unique workflow that takes into consideration the specific details of your stores, orders, fulfillment services, preferred shipping methods, and any other needs you may have. Because of this, no two Order Desk accounts are alike, and each one will have a variety of uniquely designed settings.
Because of the customizable nature of Order Desk, starting an account can initially be a little overwhelming and confusing. With that in mind, we have created detailed instructions on how to Integrate Gooten with Order Desk and you can find it in this article.
Let's check out how to integrate your Shopify store in more detail here.
- How to connect Shopify with Order Desk
- Creating Products
- Order Fulfillment Automation
- Setting up shipping methods
How to connect Shopify with Order Desk
To connect to your Shopify store from Order Desk, click on Manage Integrations in the left navigation. Under the Shopping Carts tab, enable the Shopify integration.
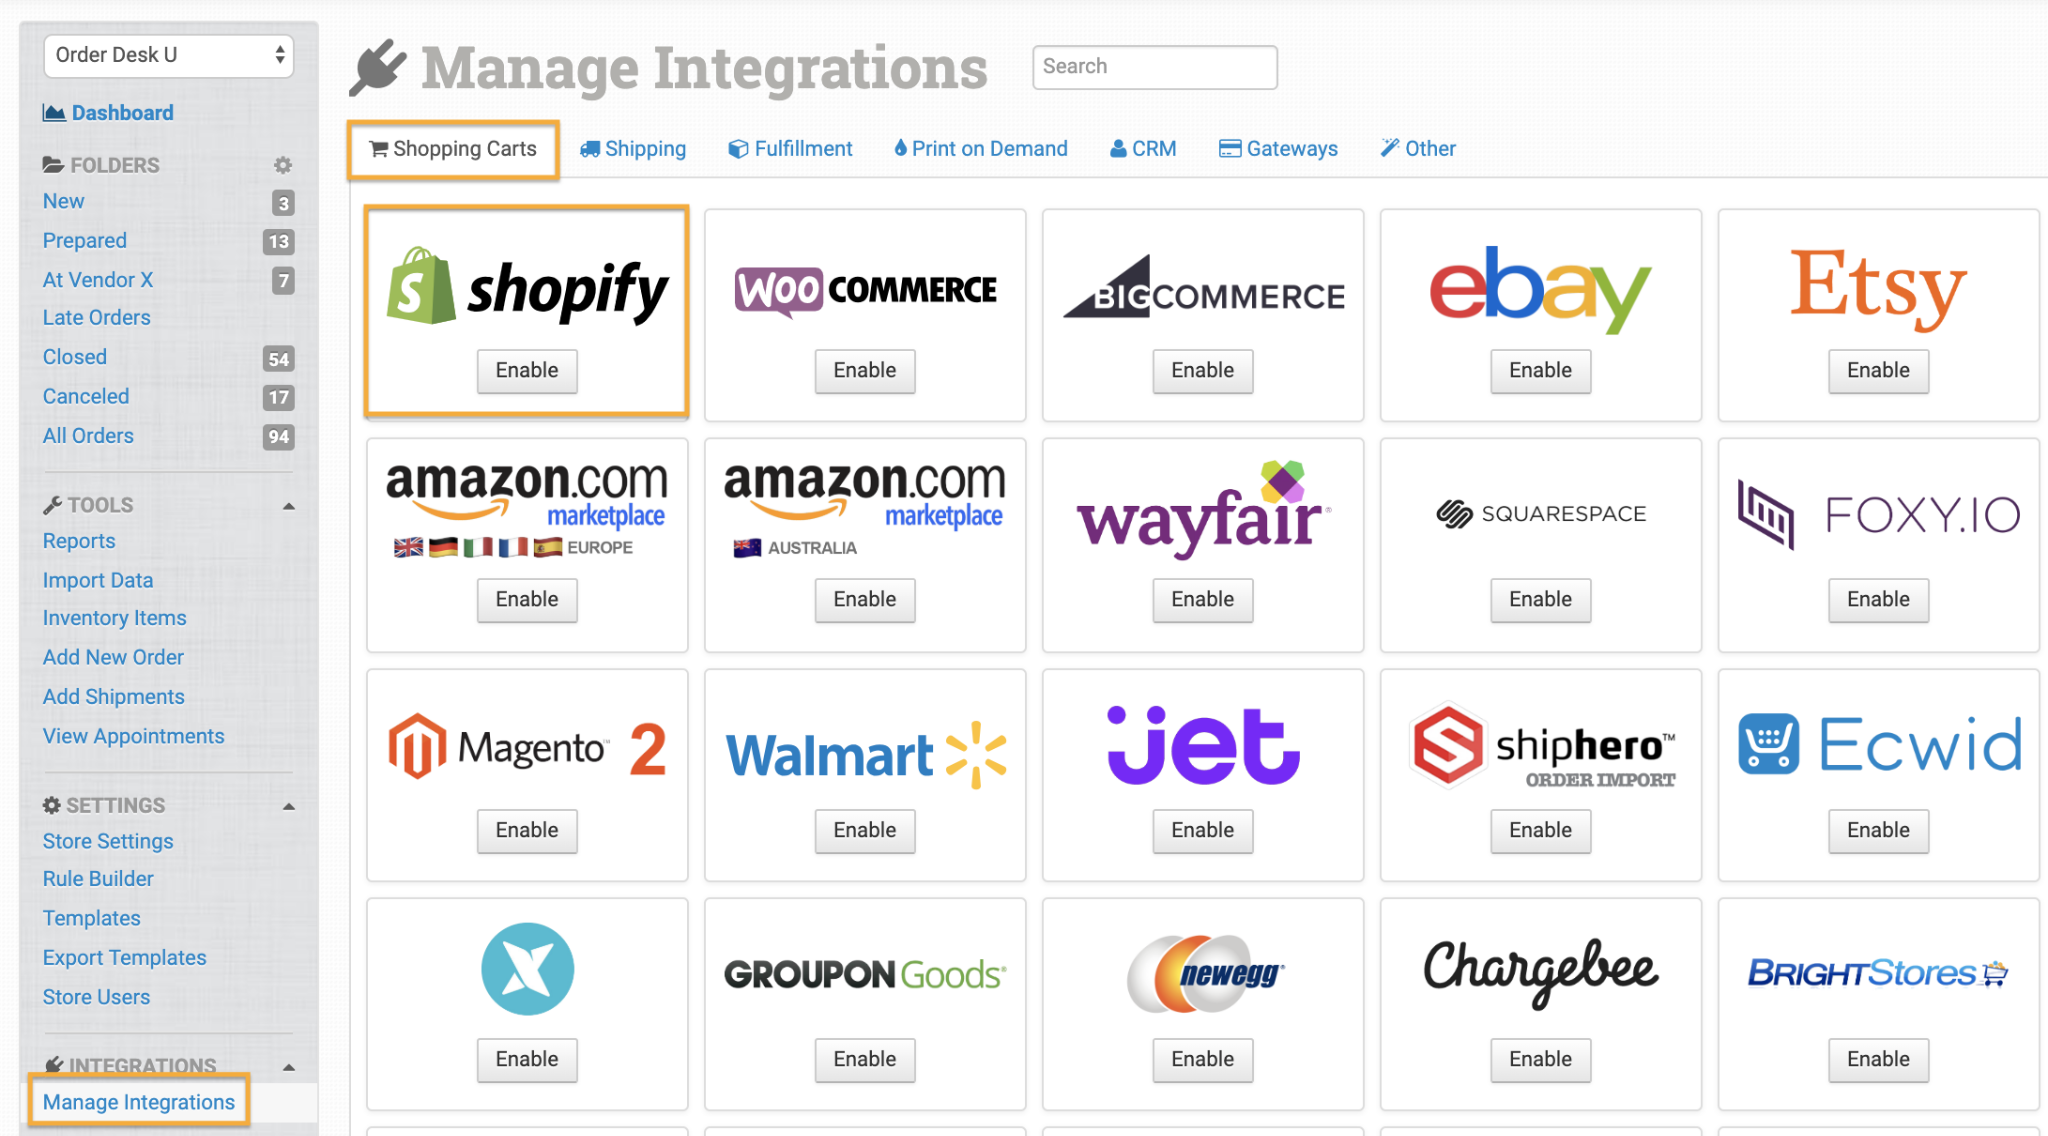
Click the Connect to Shopify button and afterward you'll be redirected to the Order Desk app store listing in Shopify where you can install the Order Desk app. Make sure to follow all the steps for the integration.

Once you install the Order Desk app in Shopify you can go back to Order Desk in order to set your preferences in the Shopify integration section.
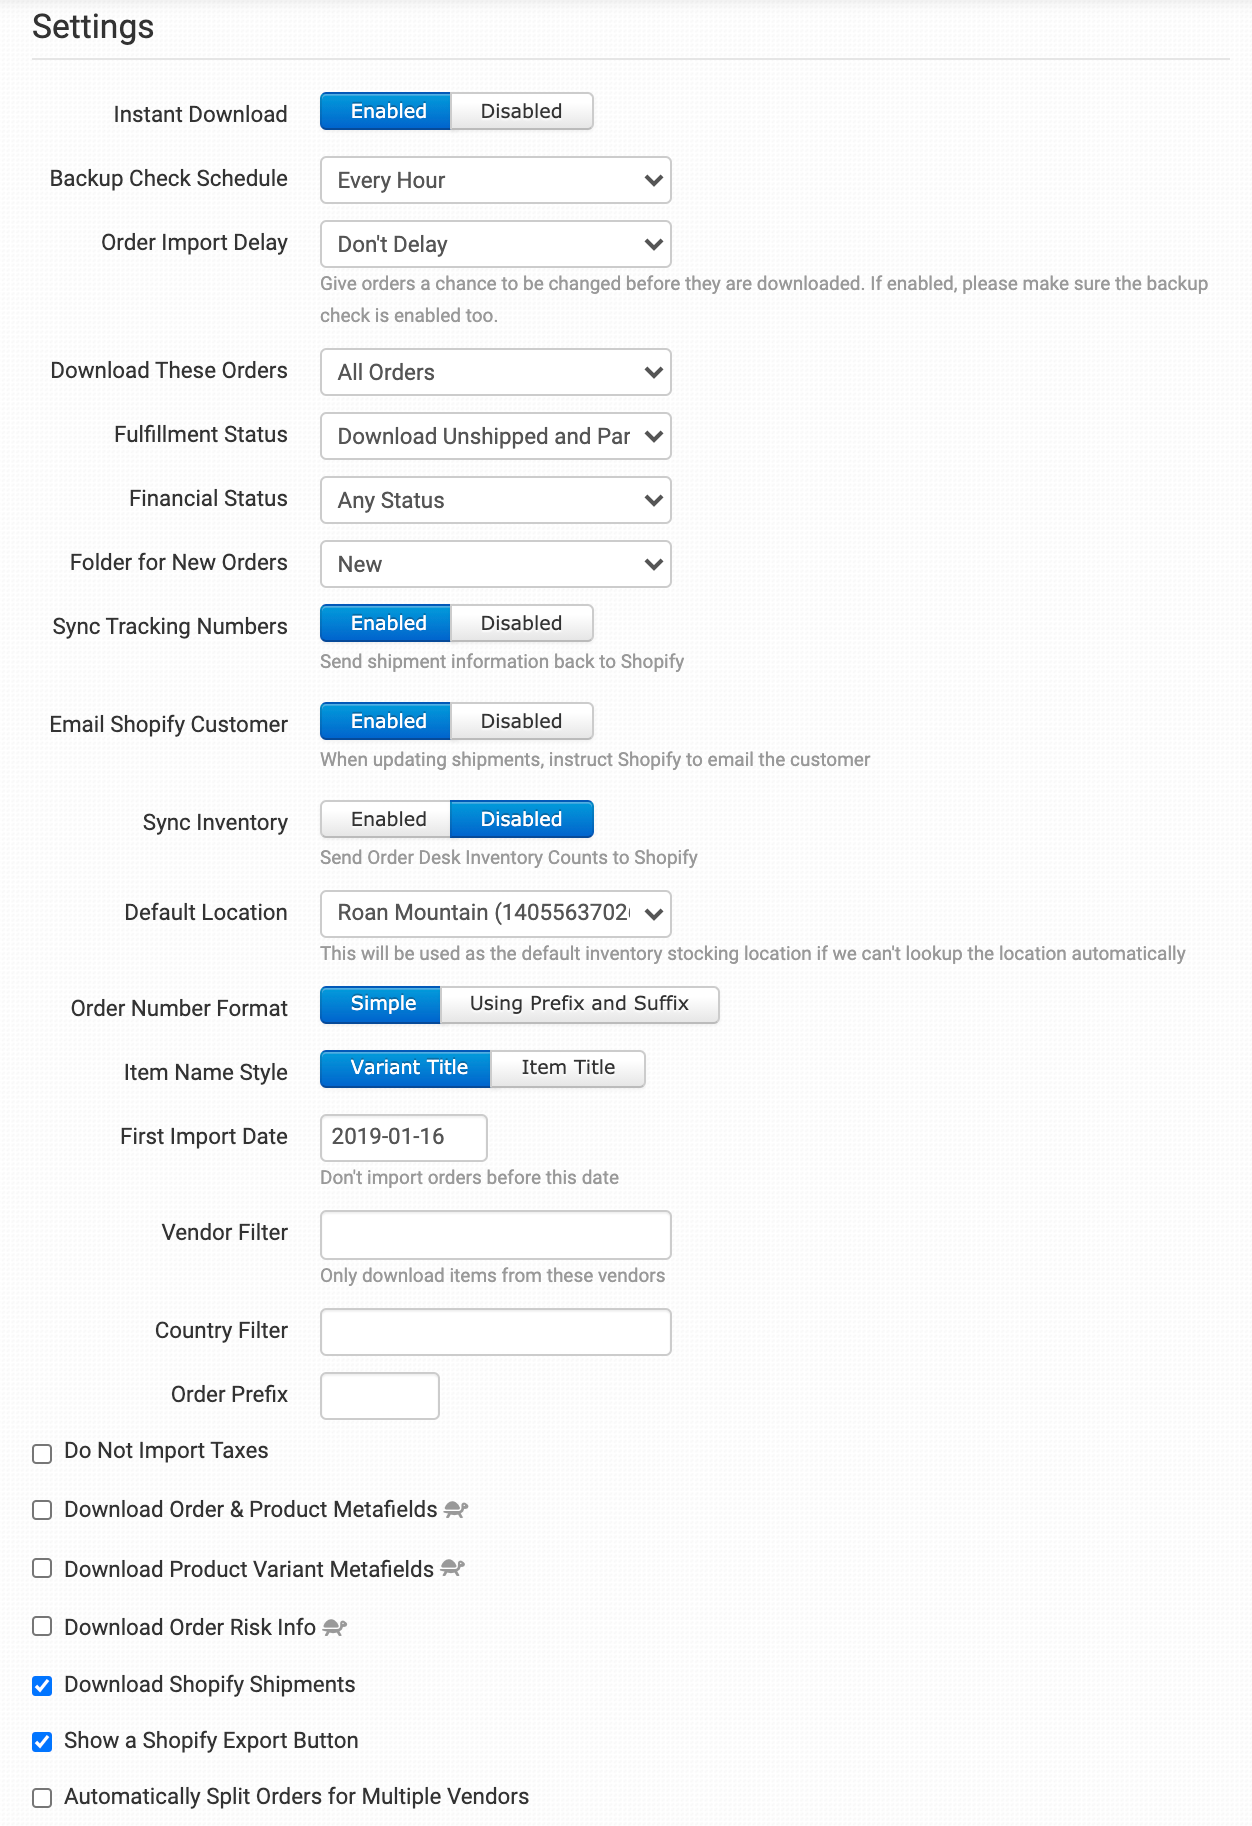
Set up your Shopify Settings in Order Desk
If Instant Download is enabled, your orders will immediately come into Order Desk as they are placed. If this setting is disabled, your orders will not import instantly but can still be brought in on a regular appointment using the Backup Check Schedule.
The Backup Check Schedule will tell Order Desk to check for orders on a scheduled appointment. The options are the following:
- Never, Every Day (once every 24 hours), Every Twelve Hours, Every Six Hours, Every Two Hours, Every Hour.
When this backup check runs, it will look for any orders missed and pull them in. This is also useful for stores that need to disable instant download but still regularly pull in their Shopify orders.
With Order Import Delay, you can choose a timeframe from when an order is received to when it gets downloaded into Order Desk. When an order is created and ready to be imported, it will not download into Order Desk until the set time has expired. This allows you to make any necessary changes to an order before it's imported. Backup Check Schedule should also be enabled when using this setting.
Download These Orders
Choose which orders from Shopify you want Order Desk to download based on their status. You can either download Open, Closed, Canceled, or All orders. The fulfillment and financial status settings will also be applied so that all three criteria must be met for an order to download.
If you choose to download Closed, Canceled or All orders, be careful not to submit them for fulfillment to any of your other integrations, send them to any vendors or export templates unless you specifically intend to.
Fulfillment status
Choose which orders from Shopify you want Order Desk to download based on their fulfillment status. You can choose to download Unshipped Orders, Unshipped and Partially Shipped Orders, Shipped Orders Only, Partially Shipped Orders Only, or Shipped and Unshipped Orders (All).
The order status and financial status settings will also be applied so that all three criteria must be met for an order to download.
Financial Status
Choose which orders from Shopify you want Order Desk to download based on their Financial status. You can choose to download Any Status, Pending, Authorized, Partially Paid, Paid, Partially Refunded, Refunded, or Voided.
The order status and fulfillment status settings will also be applied so that all three criteria must be met for an order to download.
Once the orders are imported from Shopify, you have the option to choose the folder where you want your newly downloaded orders from Shopify to be placed. If you would like to work with your own custom folders, please read this guide.
Sync Tracking Numbers
If you want Order Desk to notify Shopify when orders are fulfilled, enable the Sync Tracking Numbers setting. If tracking details are added to the order, it will be passed back to Shopify immediately and the order will be marked as fulfilled in Shopify.
IMPORTANT NOTE
Make sure your Shopify orders are set to manual fulfillment (not automatic fulfillment) and that your orders remain unfulfilled until Order Desk passes the shipment information back. If any items have already been marked as fulfilled, Shopify will not let Order Desk update those orders. If you have a fulfillment service connected to your products or orders in Shopify, Shopify might ignore Order Desk's fulfillment updates because it is expecting the fulfillment service to update the order instead.
You can also enable the Email Shopify Customer setting if you would like Order Desk to tell Shopify to email your customers when fulfillment information is passed back. If disabled, Shopify will not email your customers as orders are fulfilled.
Shopify integration with Order Desk allows you to even further customize the settings, from syncing the inventory from Order Desk to Shopify, through setting order number prefix or suffix, downloading order risk info, and all the way to importing orders from Order Desk to Shopify. For more details on additional setting options please check this article.
Creating Products
You can set up the Shopify orders fulfillment through Order Desk in two ways:
1. Using products you already have in Sensaria Co-branded Hub
If you choose the first option, you will not have to create the Inventory Items in Order Desk. In that case, you would need to have all the products created in Sensaria > Product Hub > Storage.
If you already have products created in Sensaria Co-branded Hub, all you need to do is make sure that the SKUs on your items in Shopify match precisely with the SKUs for the products you have saved in Sensaria CBH. That means that each variant SKU name in Shopify needs to match the corresponding variant SKU name in Sensaria > Product Hub > Storage.


The order from Shopify would come into Order Desk with the SKUs, which the Order Desk would, in turn, send to Sensaria. If the SKU names match, our system will identify the products in Sensaria CBH that were ordered and fulfill them. This option also saves you the trouble of hosting your image files and keeping them publicly available, which is needed for the second option, creating items in Order Desk inventory.
2. Adding products to Order Desk
If you don’t have any products set up in Sensaria Co-branded Hub or cannot establish a connection as explained in the first case, the best option is to set up Inventory Items in Order Desk without creating any products in Sensaria CBH.
This would also be the option best suitable for large stores with hundreds or thousands of products and the need for quick and efficient product migration.
Shopify to Order Desk Bulk Product Migration
If you don't already have your products set up in Sensaria CBH and want to set the products up in Order Desk instead, then an import spreadsheet would be the way to go.
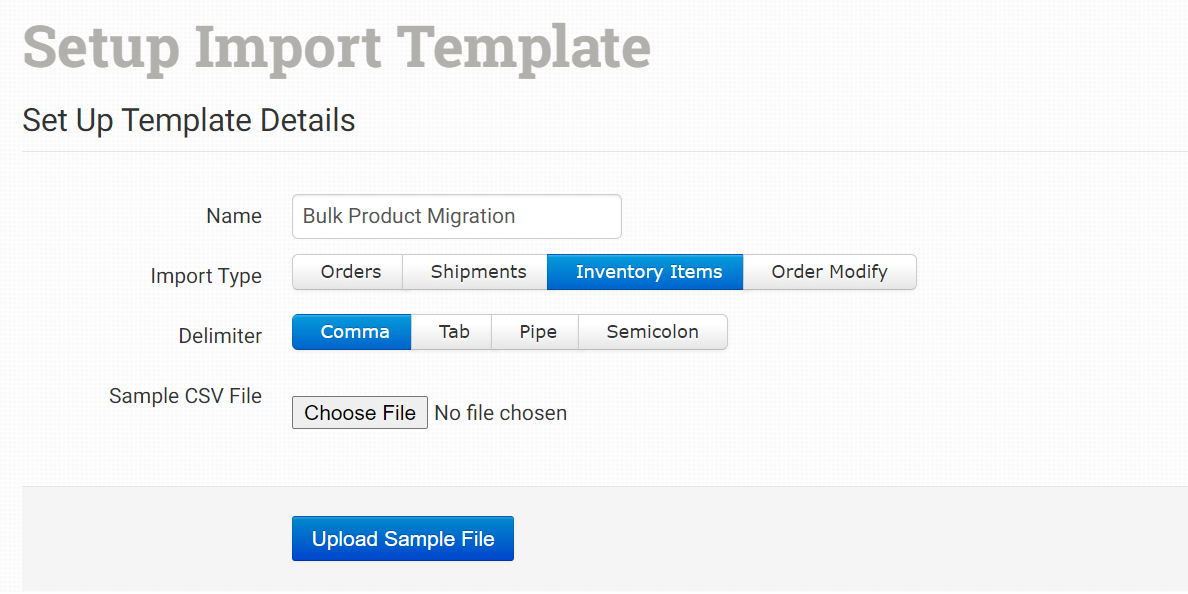
To import data into Order Desk, you will need to have a .csv, .xlsx, or .txt file with your data. You won't be able to import that data directly into Order Desk. However, since each file will be unique per store, fulfillment service, personal preference, etc., you'll first have to create a template to match the information in your specific file so that it can be translated into Order Desk's names for each field.
This Order Desk article explains how to set up an import template.
What you need to do next is to create a spreadsheet with your item details. This spreadsheet should include all the print_details that Sensaria will need to fulfill the orders. So the spreadsheet should have a column for the following details:
-
Item Name: This should be the Item Name in Order Desk and should be unique for each item/variation you want to import to Order Desk.
-
Item Code/SKU: This should be the SKU that you have set up in your Shopify store. Order Desk will be able to identify the items in your orders using the SKU.
-
print_sku: This is the product code (Sensaria SKU) that we use to know what item is in the order. We'll be the ones to provide these to you for your items, or you can fetch these from the Product Hub during product creation.
-
print_url: This is the link to the design that you want to be printed on your items. The Order Desk will pass this link over to Sensaria so that our system can retrieve the design and print it. If your item has multiple images, you can use print_url_1, print_url_2, all the way up to print_url_15 to pass on multiple links.
-
print_preview: This is a link to the preview image for each item - *optional
-
print_location: This is in case you have items with multiple images. If you do, you can specify where each image should be printed.
-
location: This needs to be set as Gooten so that at a later time, you can create a rule in Order Desk for all items that have the location set as Gooten to be automatically sent to our system for fulfillment.
-
Stock: This column will define stock levels for each inventory item you import into Order Desk.
The spreadsheet should have a column for the above details at the minimum. However, you can have columns for extra details such as the Price, Description, or anything similar.
The Order Desk doesn’t have any limit to the number of variations that an item can have. However, you can handle this by treating each variation as its unique item. So each variation should have its own unique SKU. That's what you'll use to know exactly which item is in an order.
In this case, we wouldn't have variants being nested under one parent product. Instead, each variant would be considered its own standalone product in the Order Desk system.
With that in mind, the Item Name will define the item name in Order Desk, and Item Code/SKU refers to the SKU of the variation. Each variation in Shopify should be given its own unique SKU, and then those SKUs are what should be included on the spreadsheet.
The print_sku value will map the corresponding Sensaria SKU to your Shopify SKU/variant. All the print_url files should be publicly available. They shouldn't require any login credentials to access our system to access the design files and print them easily.
You can specify the location for each inventory item by adding a column to the spreadsheet called Location. The value in this column should be "Gooten." When the spreadsheet is imported, all items with this value will be assigned to the "Gooten" location. You can then have a rule that says, "when an order is imported, split all the Gooten items out of the order and automatically send them to Gooten for fulfillment."
Once you have prepared the spreadsheet, you can create an import template to import the spreadsheet. The first step is to upload a sample CSV file to match the item values with the columns in your CSV.
Once you set up the template, you are ready to upload the CSV you prepared for import. All the products would then be stored in Order Desk so that when an order is imported from Shopify, the Order Desk would be able to identify the items in the order using the SKU and automatically sync in all the print details that Sensaria will need to fulfill the order such as the link to the print file. Once those details are synced in, the Order Desk will send the order to Sensaria to fulfill.
You can find an approved example of a CSV import file here:
-
https://docs.google.com/spreadsheets/d/1vPuzsYFcSPBnOX-0rBOjhXGK1ouaLadjOZUp2CHDJUE/edit?usp=sharing
-
Note: We intentionally skipped the print_preview column as it’s not mandatory for product fulfillment and print_location since the SKU we chose has only one print location (Center Front).
You can check a video tutorial on creating an Import Template for your products/inventory items HERE.
Setting up direct image file URLs
As for formatting the shareable image file links in Dropbox, you can follow the steps explained below. Please note that you'll need Dropbox direct links or any other image hosting service (S3/any publicly accessible URL that goes directly to the image file) - the links need to stay “live” forever.
Creating direct links:
-
Navigate to the image file in your Dropbox storage
-
Copy the link created and paste it somewhere where you can easily edit it.
-
Replace the string “www.dropbox.com” with “dl.dropboxusercontent.com” and delete everything after .JPG or .PNG and you'll have a direct download link
You can copy multiple sharing links directly into the CSV and delete the string "?dl=0" after the .JPG or .PNG using the "find and replace" feature (find “?dl=0“, replace with blank).
You can use the same function to bulk replace the string “www.dropbox.com” with “dl.dropboxusercontent.com” in the entire CSV.
Order Fulfillment Automation
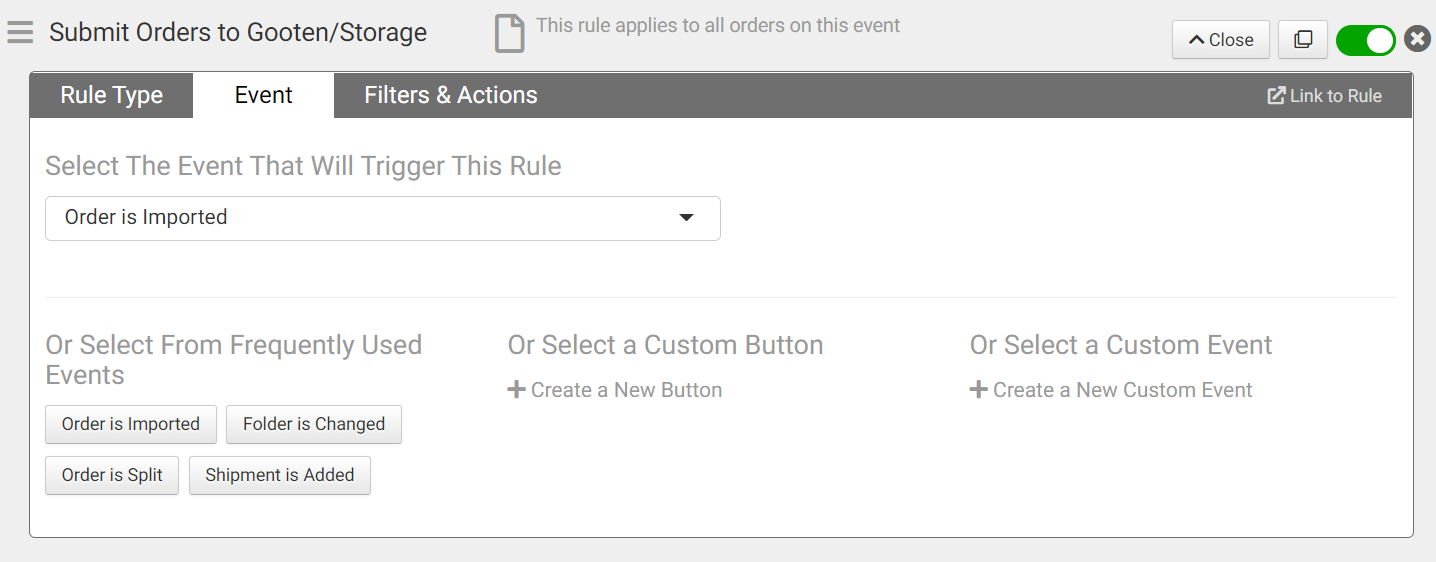
If you chose the first option and decided to create your products in Sensaria CBH, you can automate the order fulfillment by creating and Order Rule in Order Desk. Also, the order rule wouldn't need to be too complicated. It would just be a rule that says, "when the order is imported into Order Desk, send it to Gooten":
-
Rule Type: Order Rule
-
Event: Order is Imported
-
Action: Submit order to Gooten
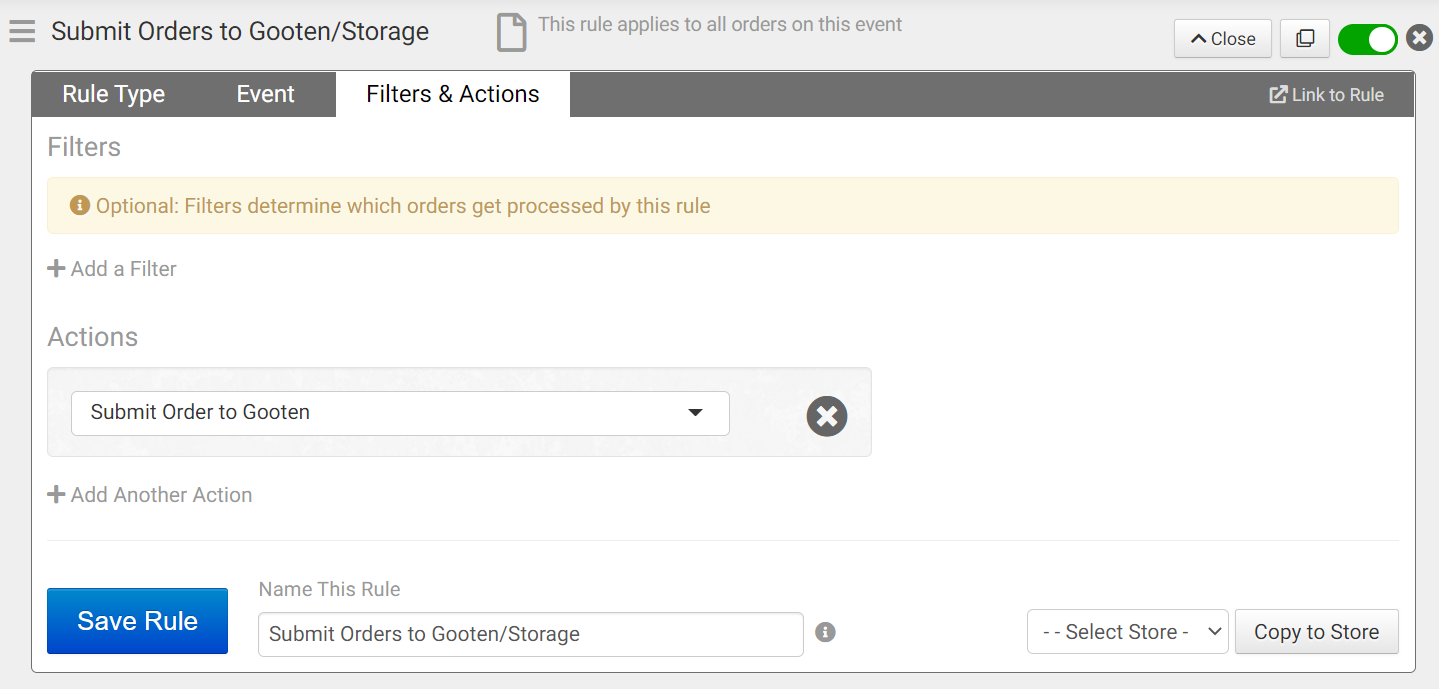
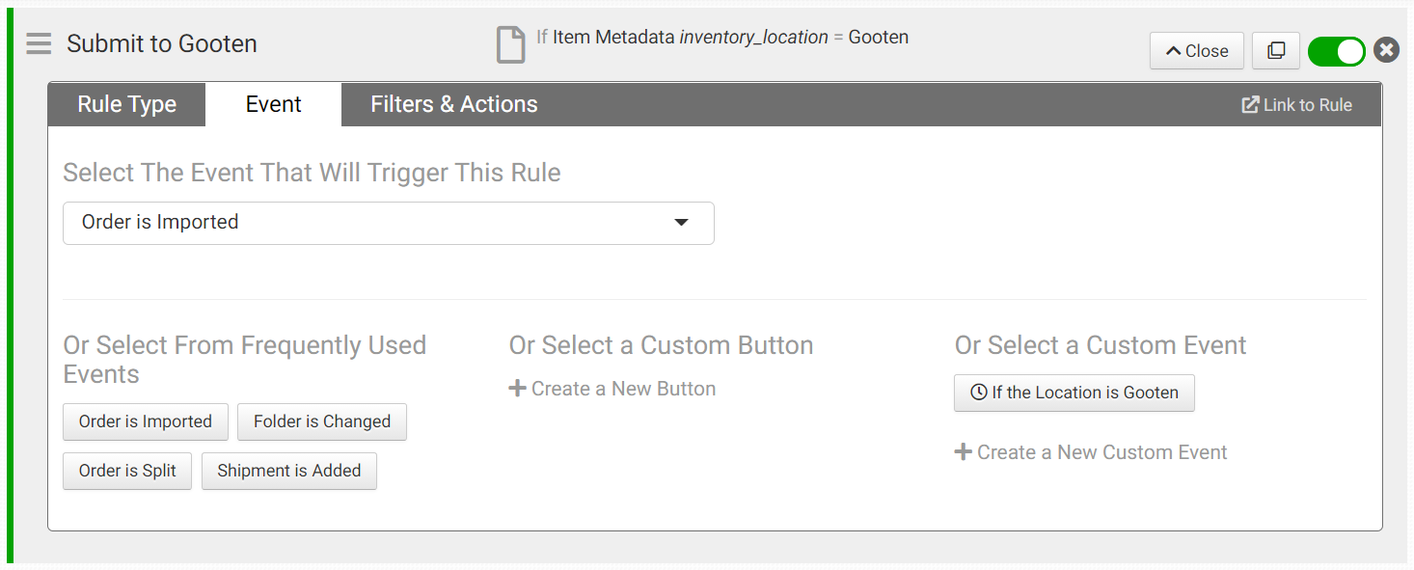
However, if you choose to add your products to Order Desk instead of Sensaria CBH, in order to automate the entire order submission process, you need to set up a Rule in Order Desk that automatically submits all Shopify orders that arrive into Order Desk to Gooten for fulfillment.
The Order Rule would be set up as follows:
-
Rule Type: Order Rule
-
Event: Order is Imported
-
Filter: Item Metadata inventory_location Equals Gooten
-
Action: Submit Order to Gooten
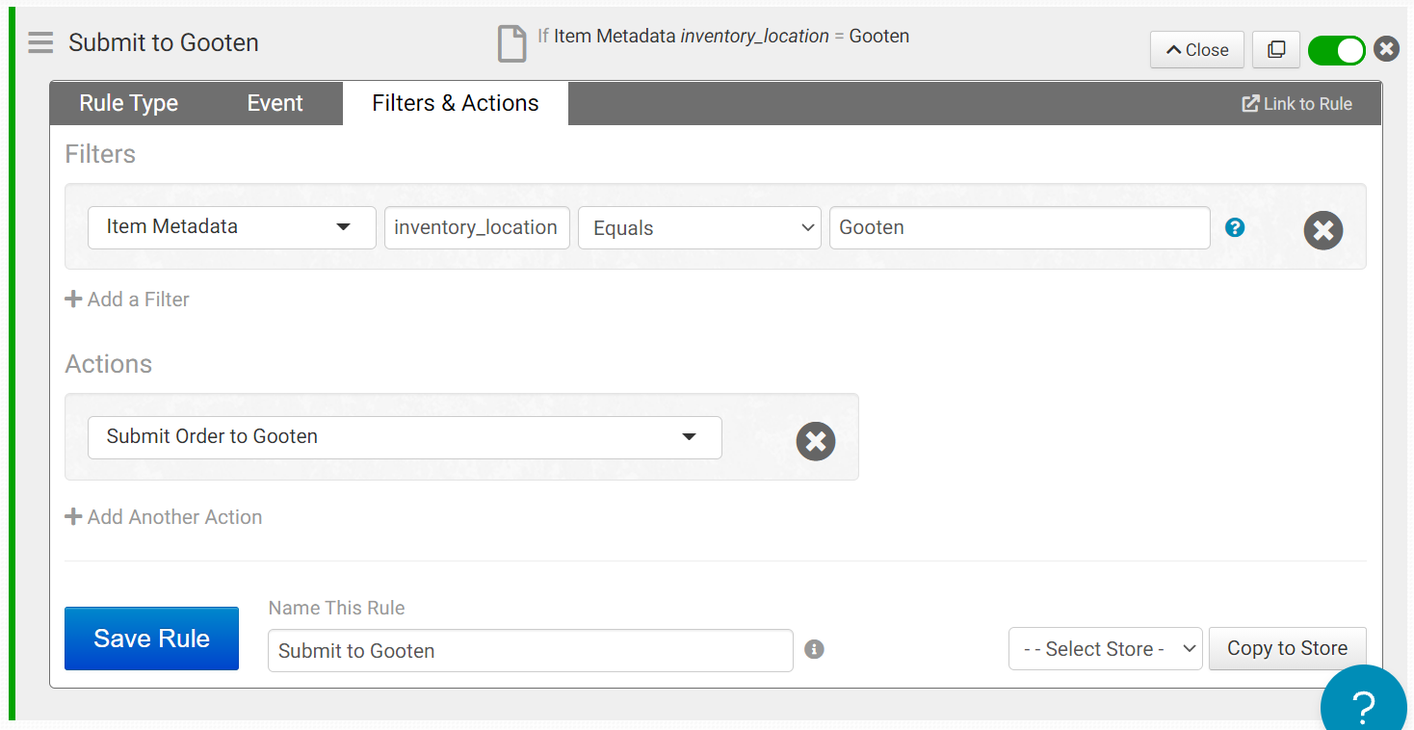
This rule says that when an order is imported if the items have the location set as "Gooten," then the order should be immediately submitted to Sensaria.
An additional option you have with Order Desk is to automate the order cancelation. You can opt to manually cancel the order at the order details page:
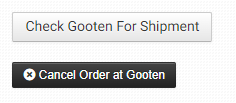
Or you can set a rule that will automatically cancel the order at Gooten whenever it is canceled in Shopify:
- Rule Type: Order Rule
- Rule Event: Order Canceled at Shopify
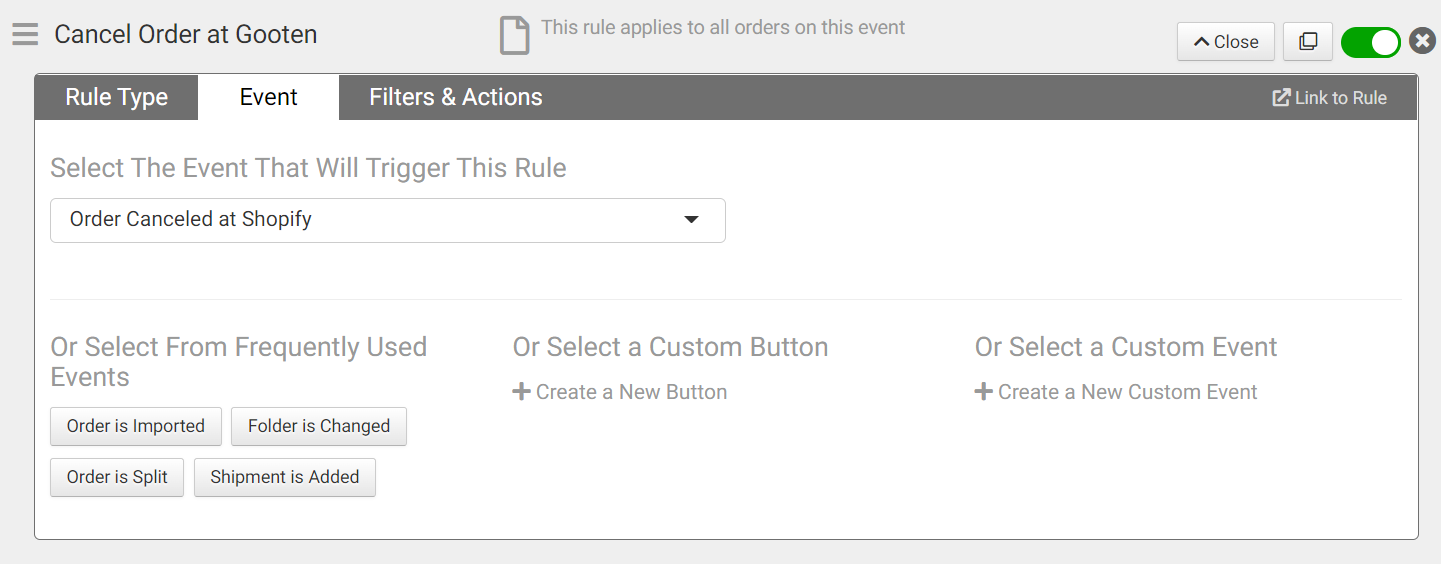
- Rule Action: Cancel Order at Gooten
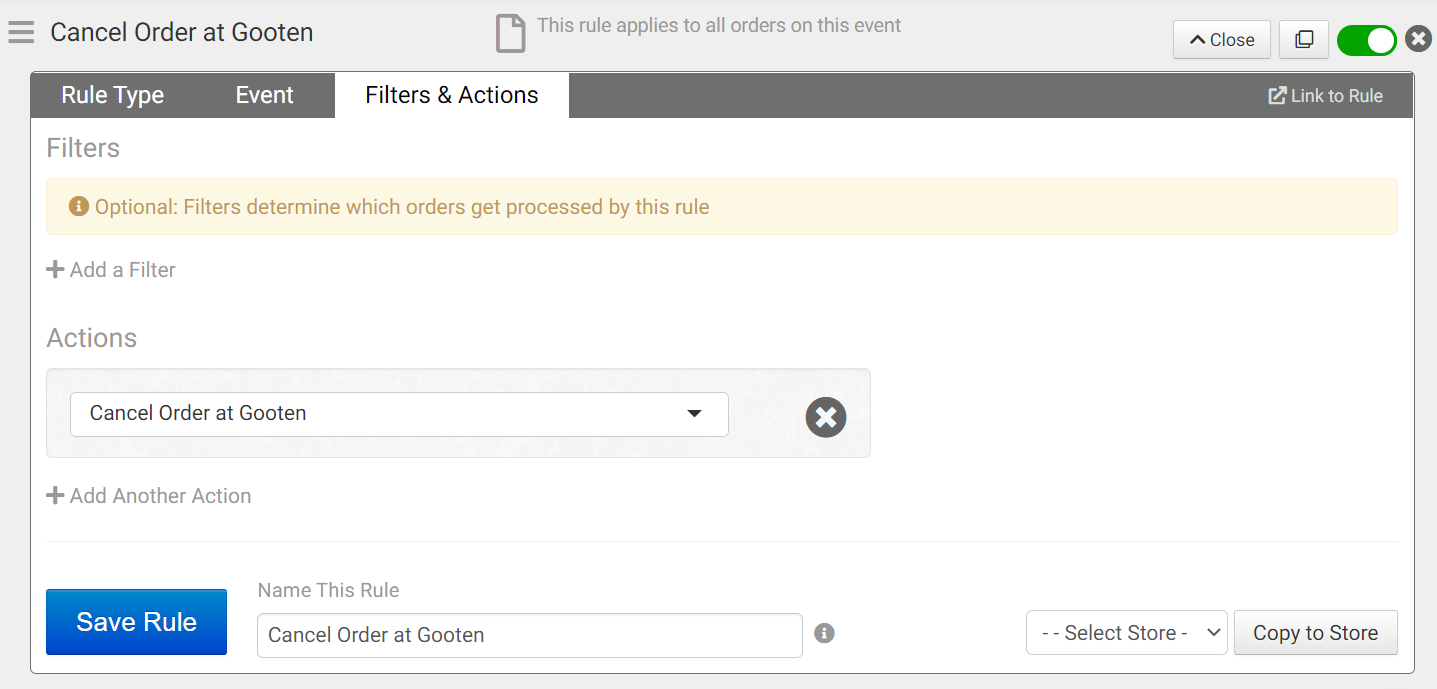
Order Desk relies on Shopify webhooks when receiving the cancelation notification, so this process may not be instant in some cases. However, in the majority of our test cases, the order in the Sensaria Co-branded Hub was canceled almost immediately.
Setting up shipping methods
For the last part, Order Desk supports the following shipping method names from Sensaria:
-
Standard
-
Expedited
-
Overnight
-
Worldwide Overnight.
The problem here is that the shipping methods that will come in with your Shopify orders will not match the shipping methods available at Sensaria; thus, all orders will be imported to Sensaria with the Standard shipping method.
However, two settings help ensure that Order Desk can send the correct shipping method names to Sensaria. The first is the "Default Mail Class" and the second is the "Shipping Class Match."
When placing an order in Shopify, if your customer picks an Expedited shipping method, the shipping method name on this order would be shown in Order Desk as Expedited - 3 business days. However, Sensaria doesn't have that shipping method name as the method is named "Expedited" in our system.
Order Desk doesn't know what shipping method to send to Sensaria. In most cases, it ends up resorting to the Default Mail Class setting in the Gooten integration. You can see this setting by clicking Gooten under the "Integrations" menu in the left-hand sidebar in Order Desk:

In the example above, the setting has been set to Standard, which tells Order Desk, "if an order has a shipping method name that doesn't match any of the shipping method names that Sensaria uses, then use Standard as the shipping method for that order."
To prevent this from happening, you need to use the second shipping setting called the Shipping Class Match. It's used to translate the shipping method names that come in from the shopping cart (from your Shopify store) to the shipping method names used by Sensaria. You can use this setting to say, "when an order has Expedited - 3 business days as the shipping method name, tell Gooten to ship the order using Expedited."
You can add a Shipping Class Match to the Sensaria integration so that Order Desk always knows what shipping methods to use depending on the shipping method names that come in from Shopify. Those settings would look like shown in the screenshot below:

You can check a video tutorial on how to match Shipping Classes HERE.
However, if you can manage to set up the shipping rates in Shopify so the shipping method names in your shopping cart match the shipping method names in Sensaria (Standard, Expedited, and Overnight), there’s no need to match the shipping classes in Order Desk as all orders that come in from Shopify will be imported into Sensaria with the correct shipping method names.
Once the order status is changed to Shipped in the Sensaria CBH, that action will trigger a webhook to update the corresponding order in Order Desk with a tracking number. Since the Order Desk and Shopify part is already automated (Order Desk>Shopify>Email Shopify Customer>Enabled), that action will push the tracking link from Order Desk and update the corresponding order in your Shopify store. The shipping notification email to your customer will also be automatically sent.