Webhooks allow you to receive automatic notifications about changing the order status. It allows for a loosely coupled system-to-system integration via standard HTTP POST requests.
Webhooks are user-defined HTTP callbacks that are triggered when an order status change event occurs. Whenever an order status change event occurs in Sensaria Co-branded Hub, the webhook sees the event, collects the order data, and sends it to the URL specified by you in the form of an HTTP POST request.
This is important as it allows you to get the latest information about your order when an order status is changed in our system so that you can pass it back into your system.
- Webhook setup and ensuring the webhooks communicate properly
- Sample webhook content
- Limitations and troubleshooting scenarios
Webhook setup and ensuring the webhooks communicate properly
To get started with webhooks, you’ll need to build a webhook handler that will receive the webhook requests from Sensaria. The webhook handler will need to accept the POST requests and perform the action with the contents in the request.
To sign up for webhooks, enter the address of your webhook handler on your notifications page on the Gooten site. An example of a webhook handler address is:
https://www.example-partner.com/events/gooten-webhooks/?orderid=
Our backend will send POST requests that look like:
https://www.example-partner.com/events/gooten-webhooks/?orderid=12345
Let's get started!
In our scenario, we’ll be using Zapier but feel free to use any other client for handling webhooks.
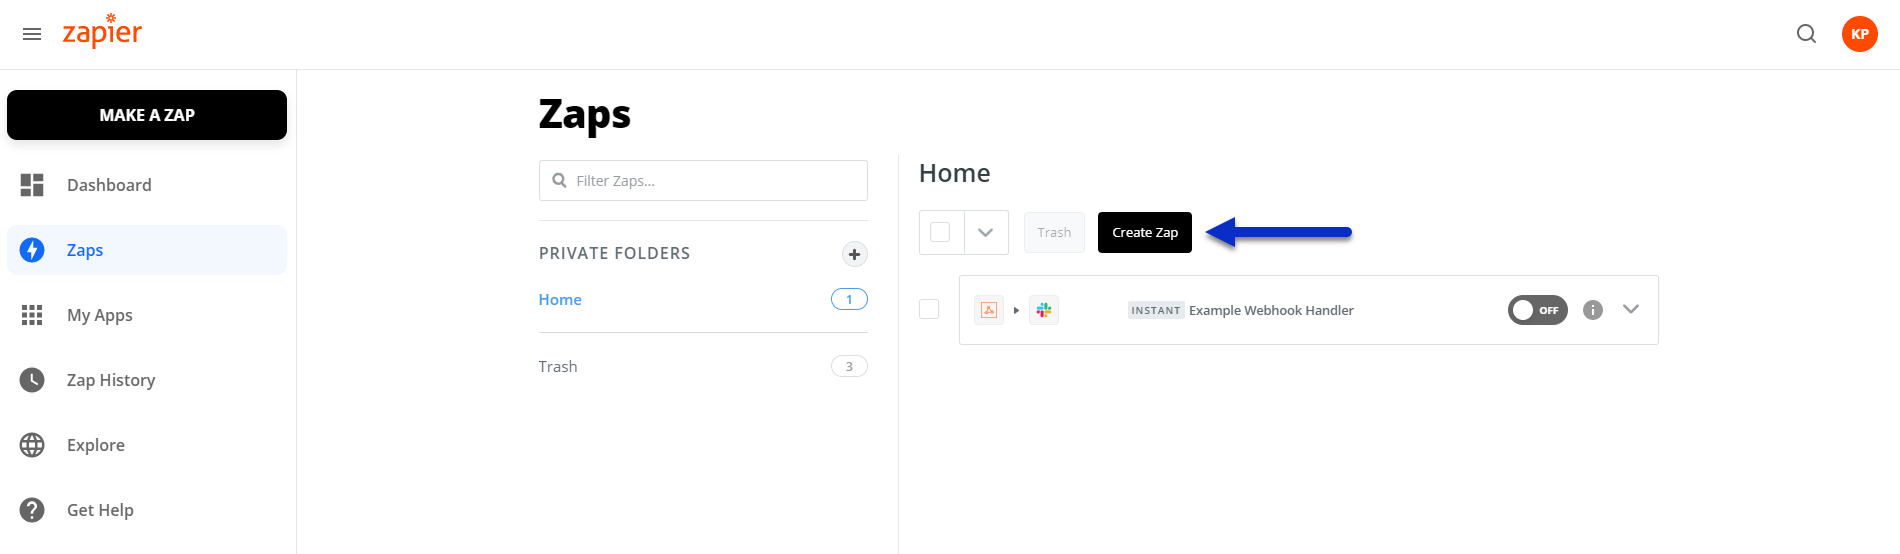
1. You’ll first need to create a webhook handler to accept the POST requests from Gooten. In Zapier, click on the Create Zap button.
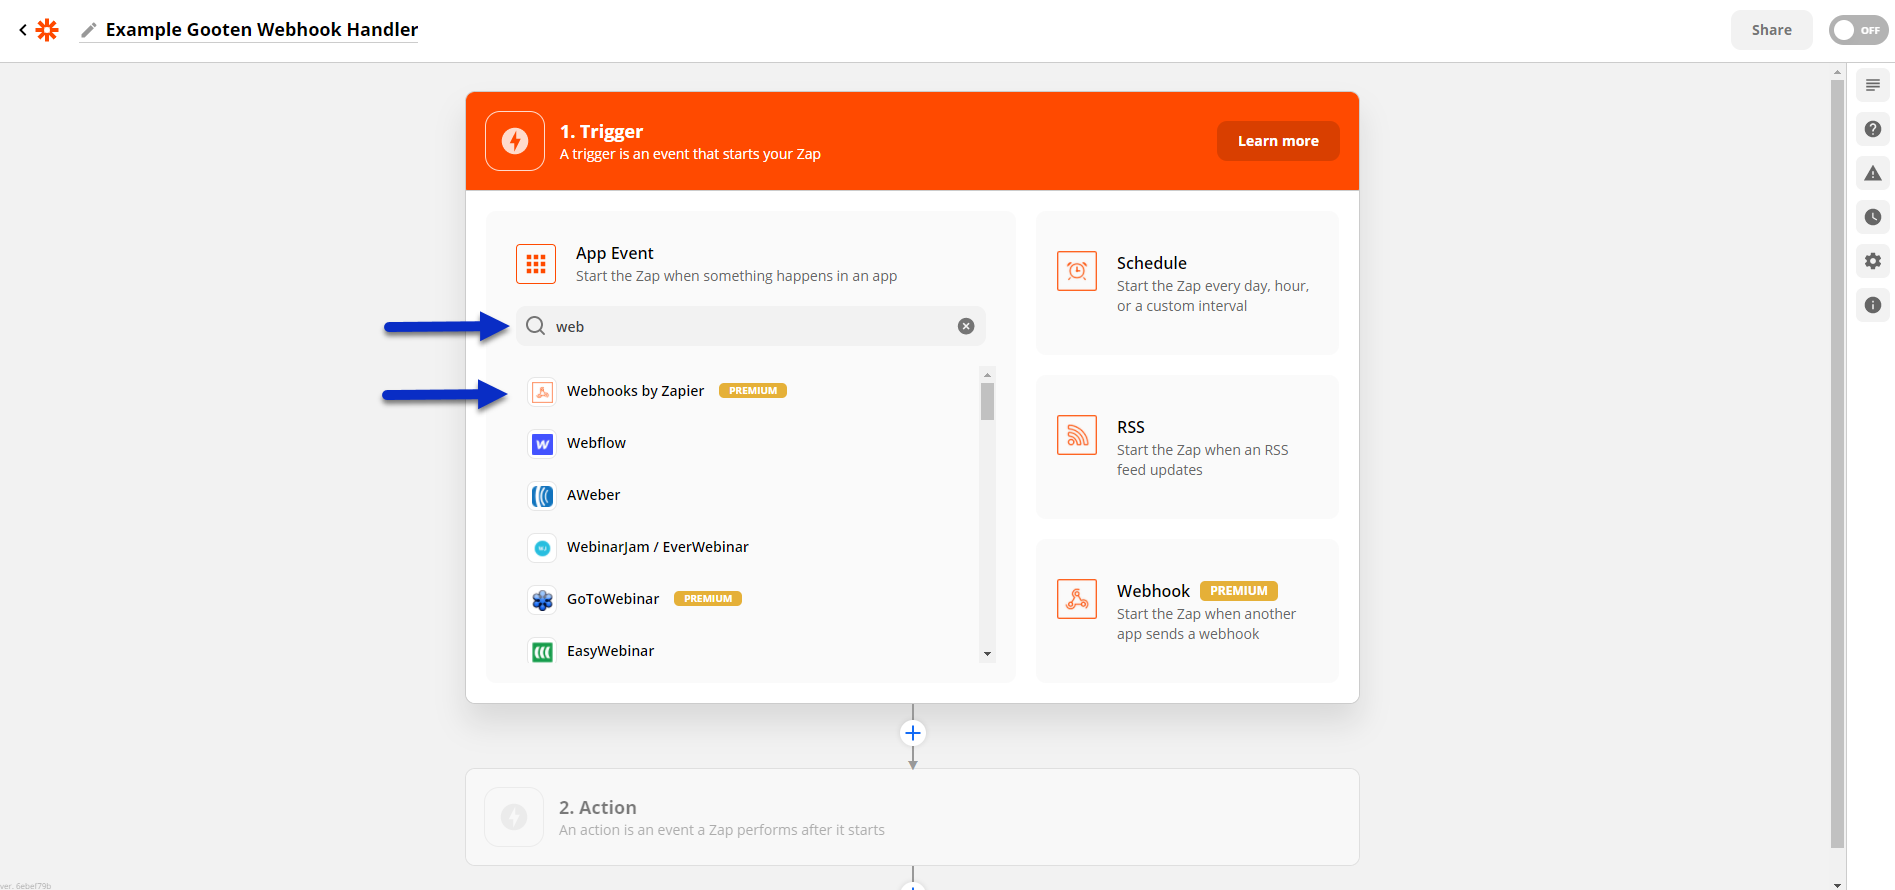
2. You’ll then need to create a trigger. Add the Webhooks by Zapier app by searching and selecting it.
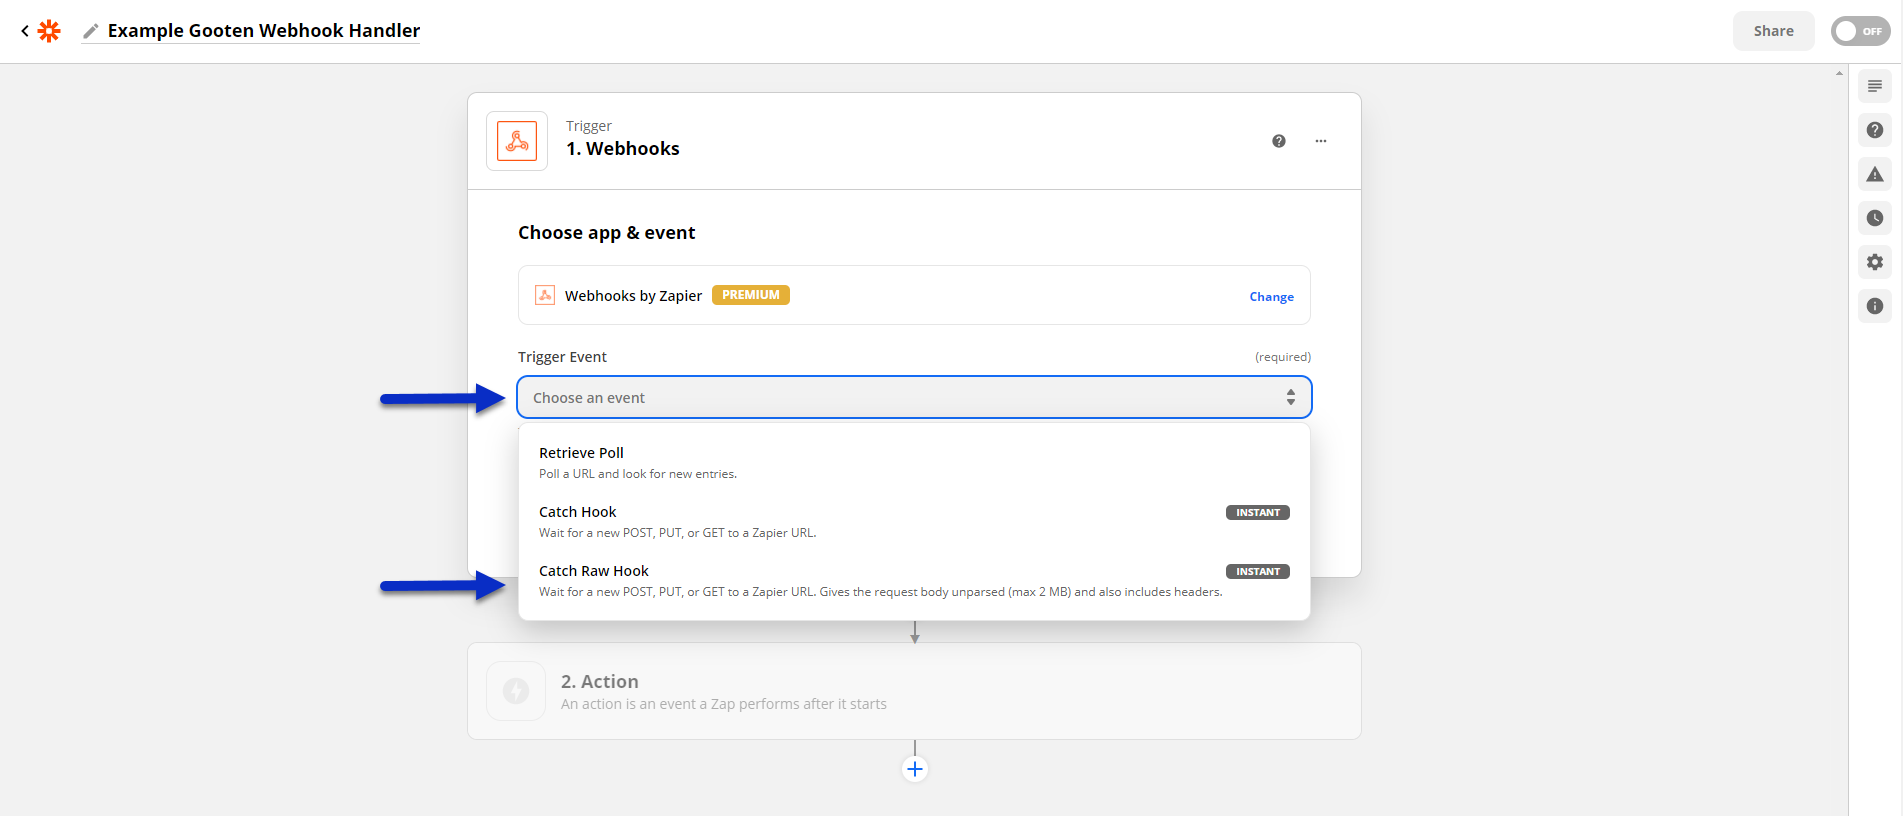
3. In the Trigger Event section, select the Catch Raw Hook event. By selecting this option, the webhook handler you’re building will wait to accept any new POST, PUT, or GET requests sent to the Zapier URL and then provide the request body.
Afterward, click the Continue button.
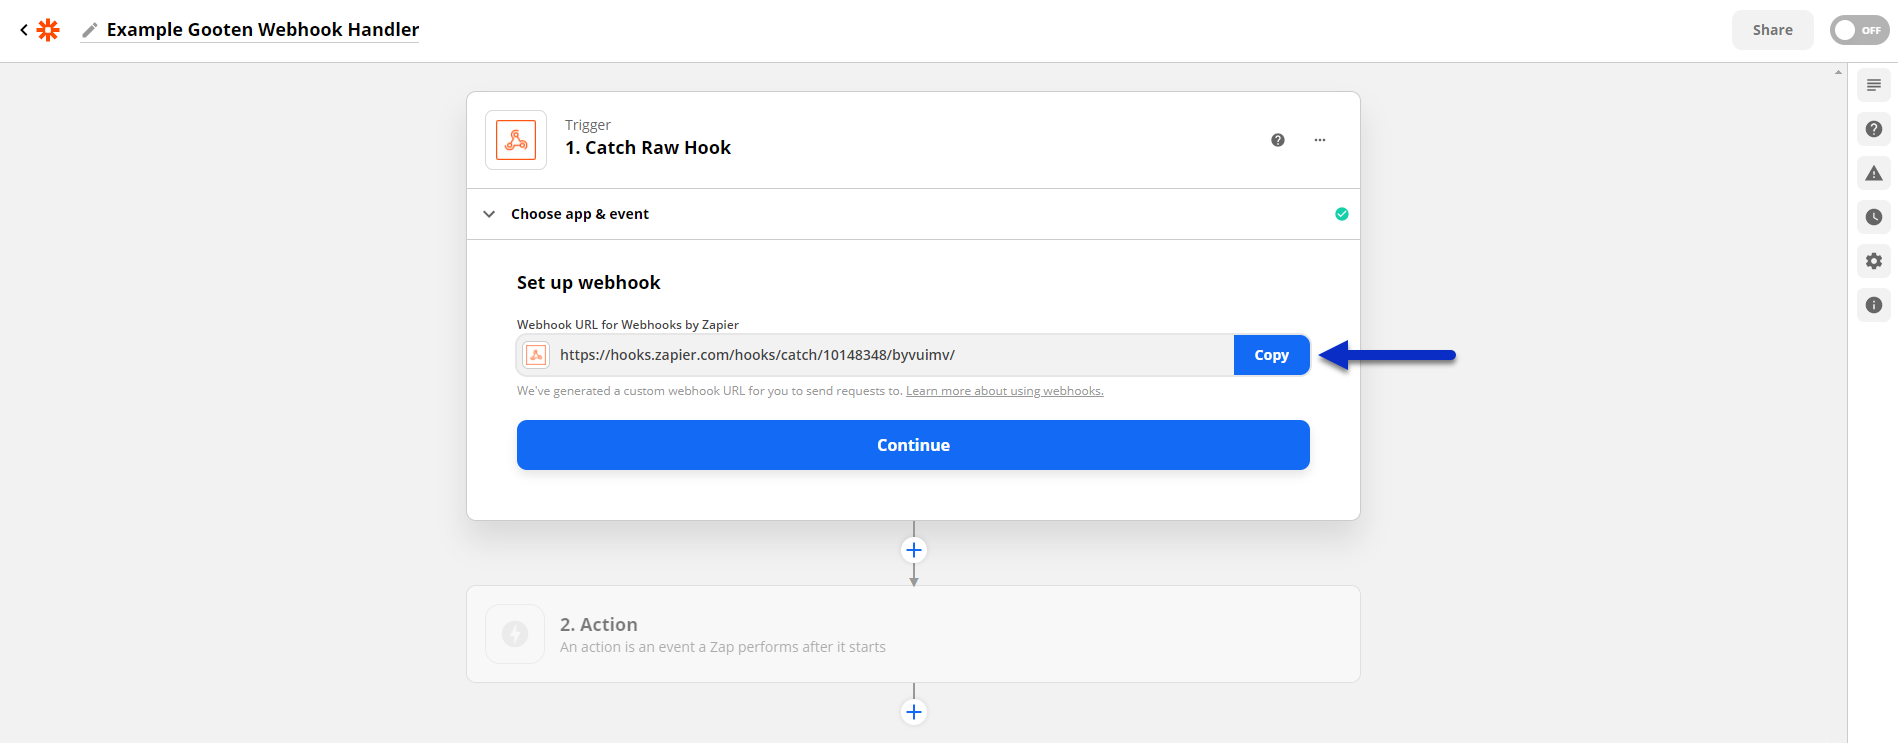
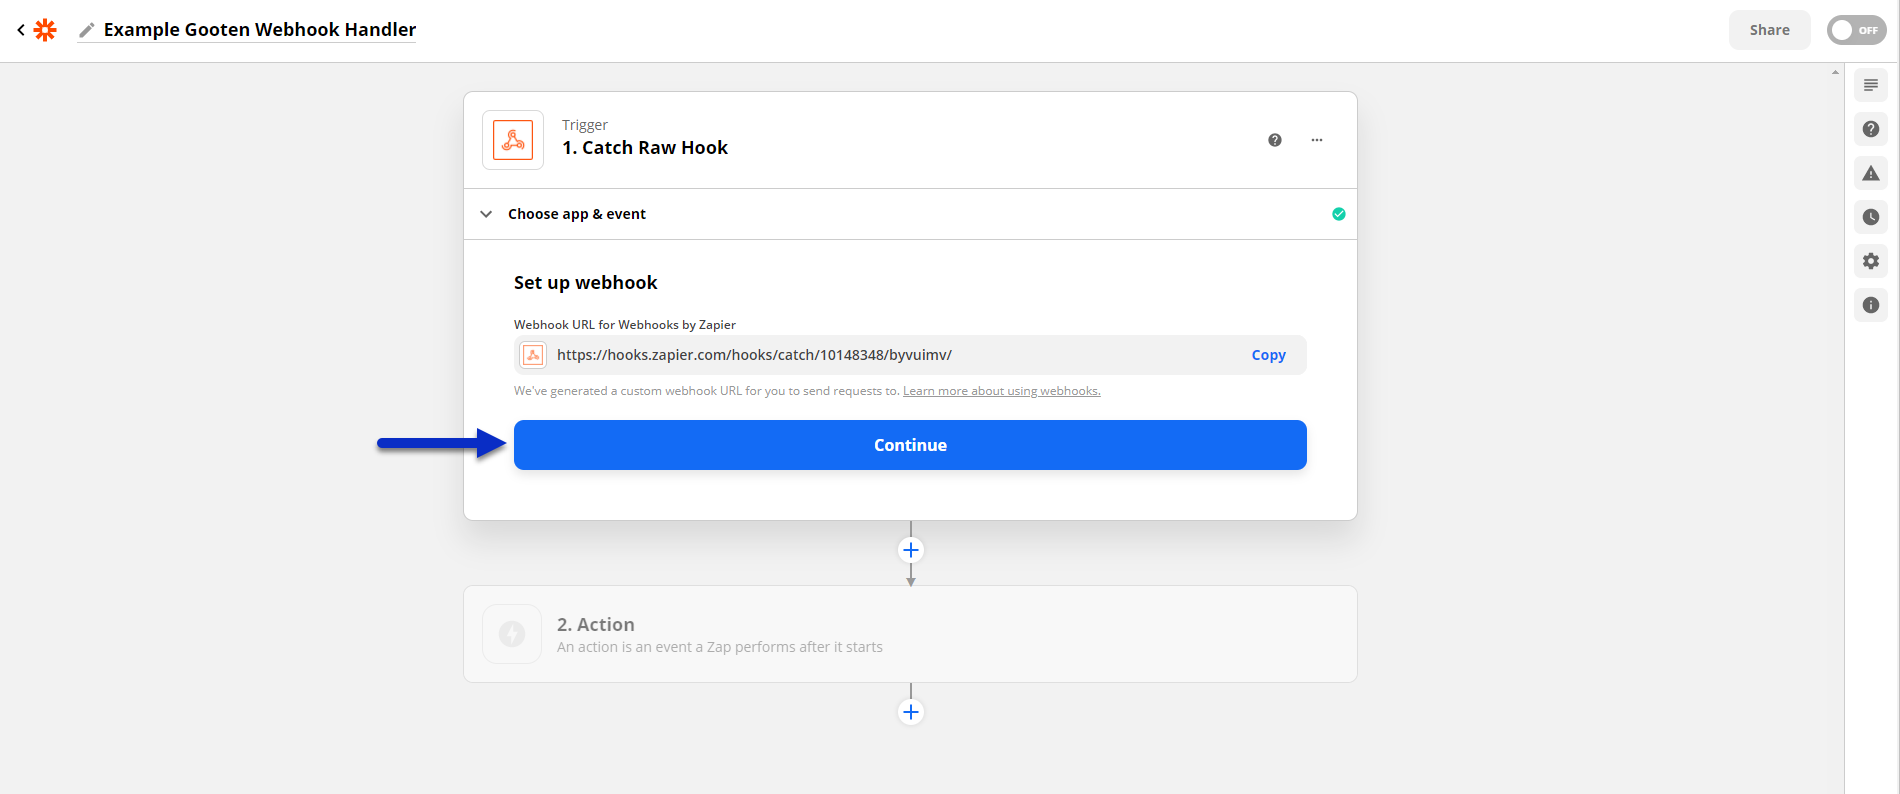
 4. Here, you’ll receive the Webhook URL that can be used to receive the POST requests from Sensaria. You’ll copy this URL by clicking the Copy button, and you’ll need to add this to the Sensaria Co-branded Hub.
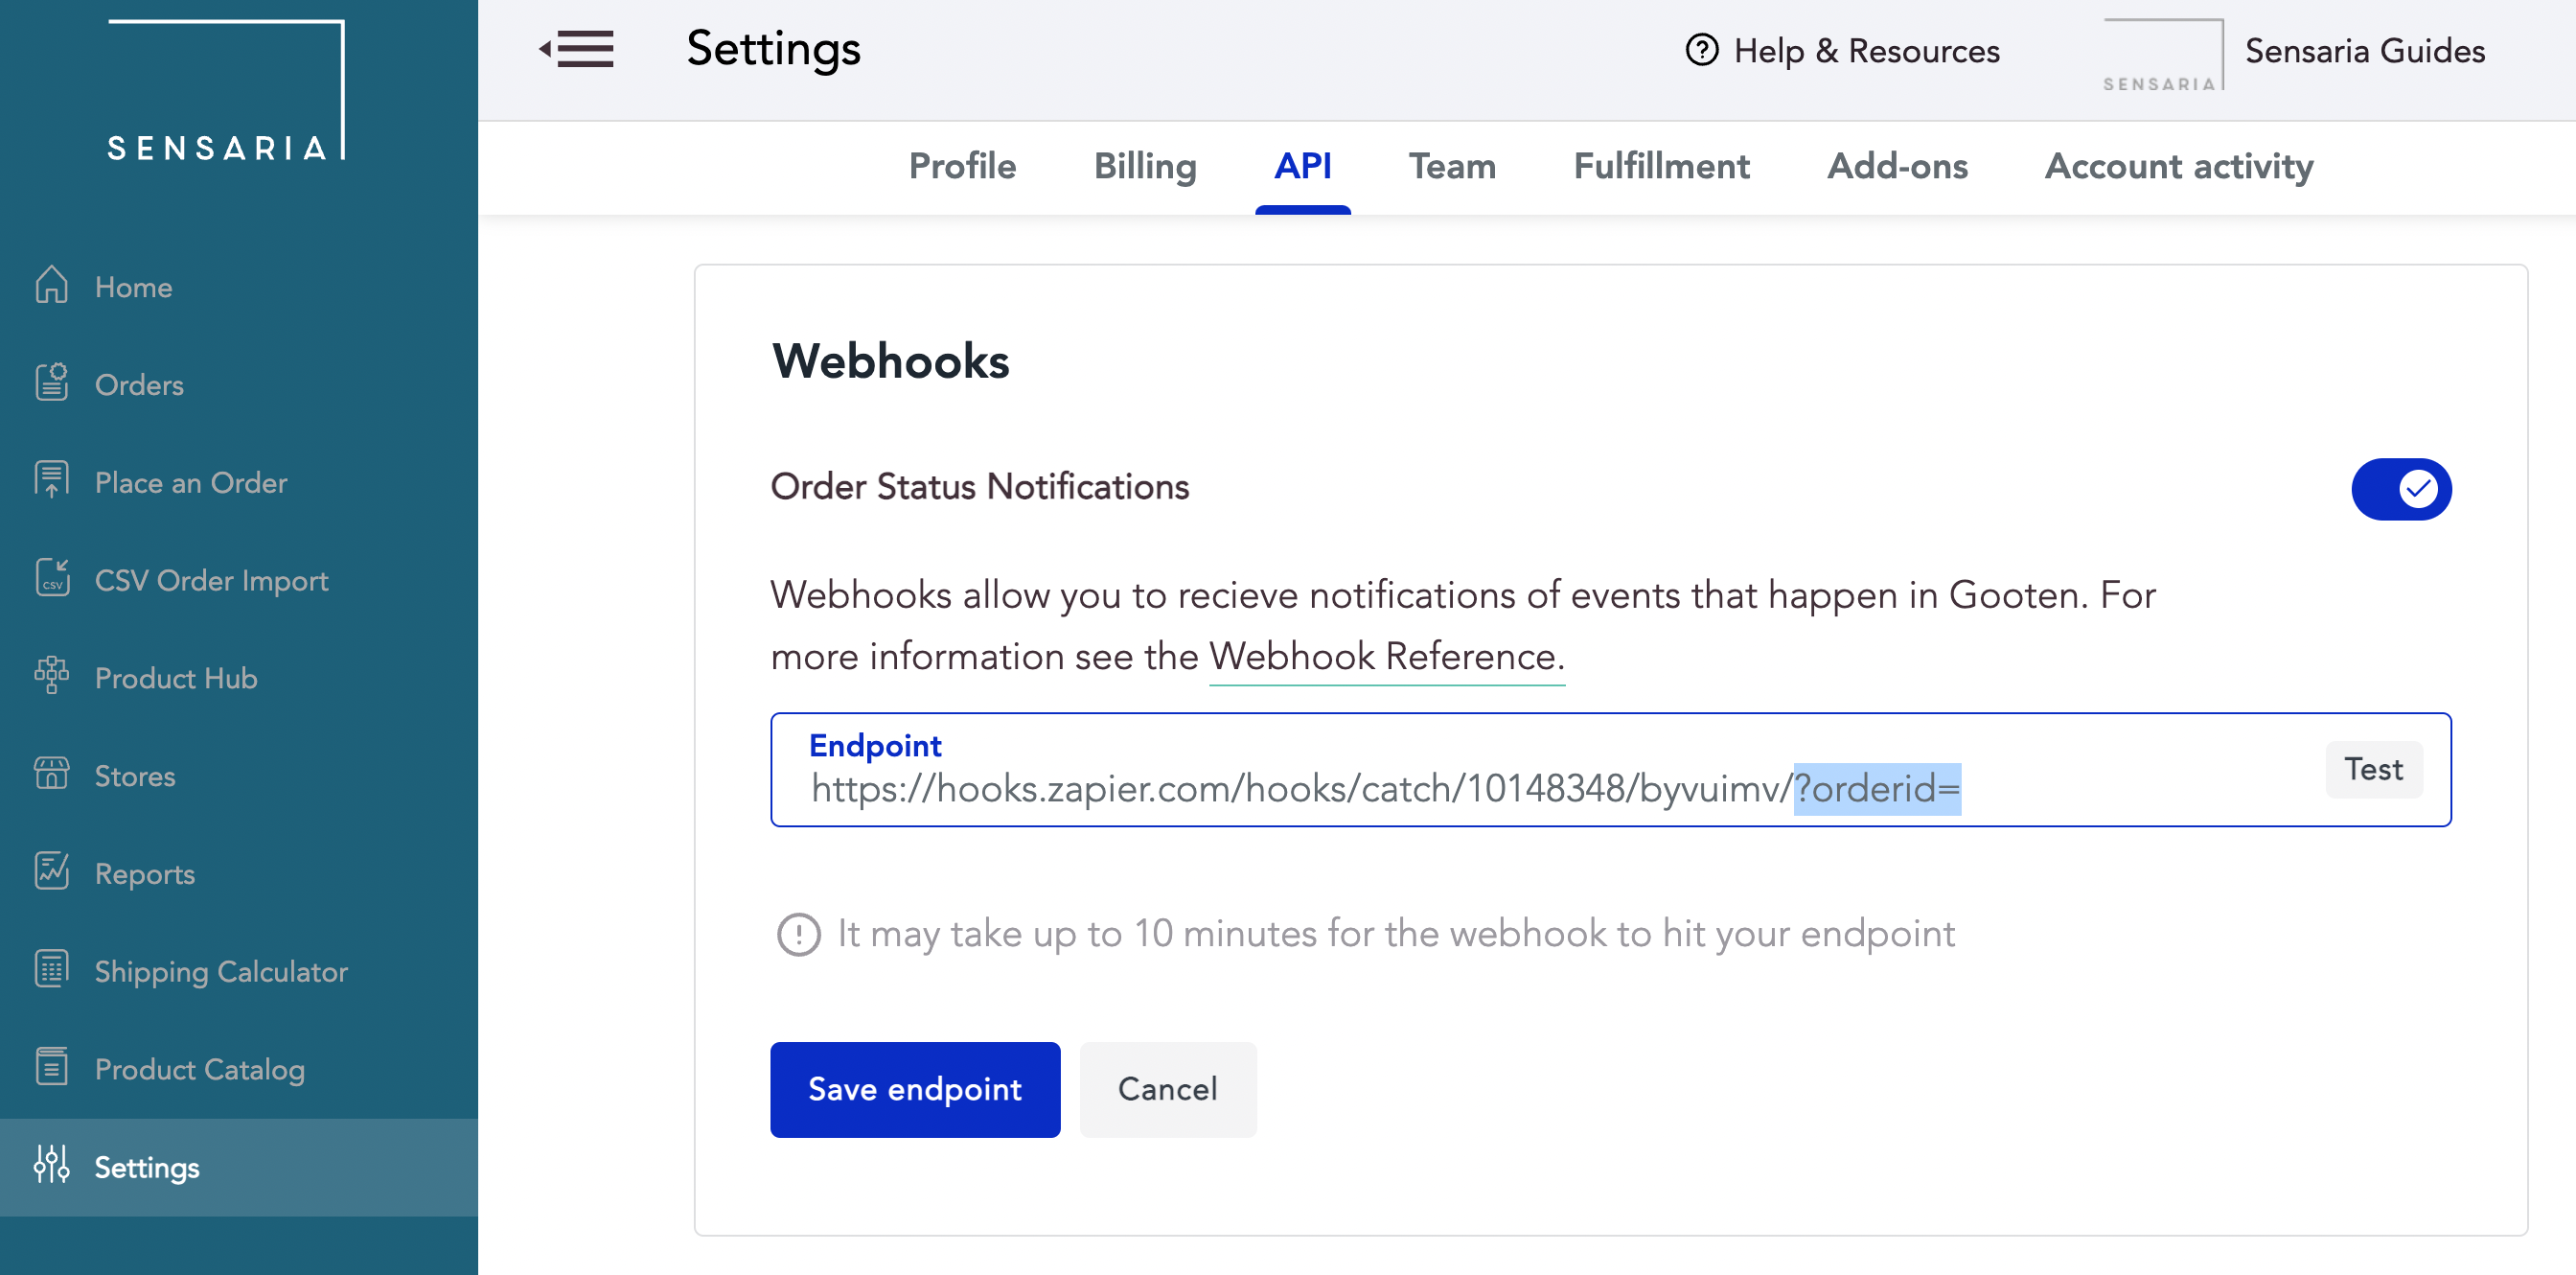
5. In your Sensaria Co-branded Hub, navigate to the Webhooks section under the API tab on the Settings page. When you’re in this section, click on the enable Webhooks option.
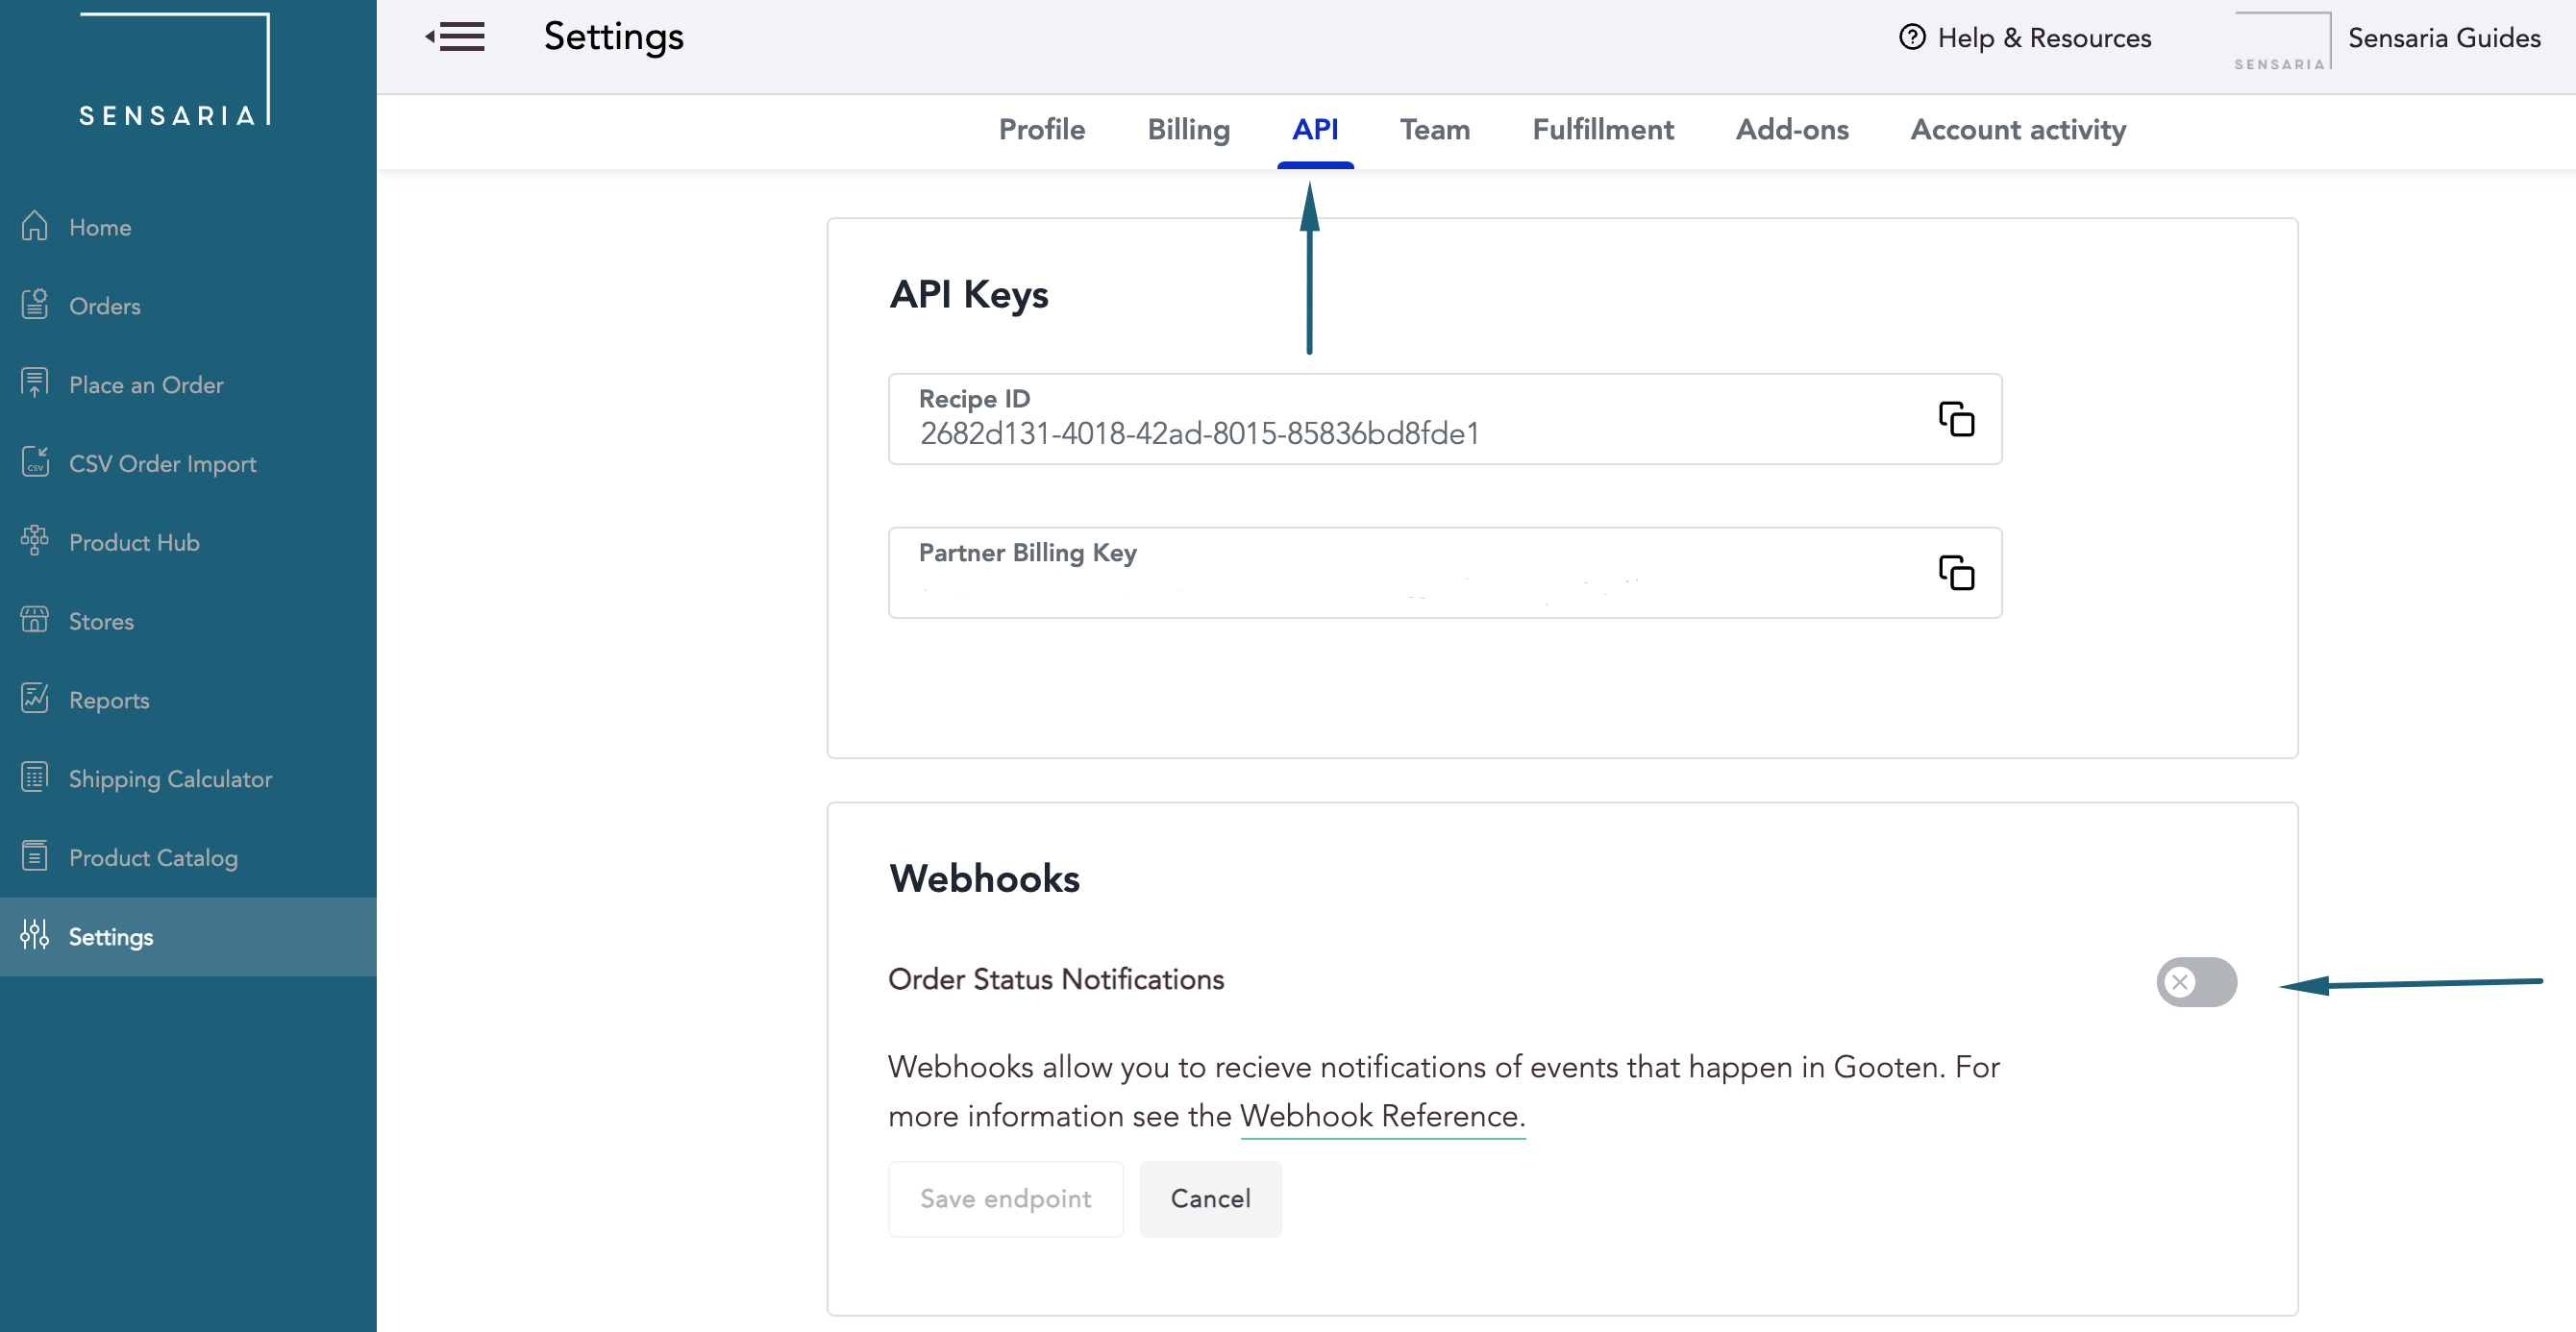
6. Paste in your Webhook handler URL that you copied from Zapier and be sure to append “?orderid=” to the URL as our Sensaria requests will send the order ID when a status change is made. You can find an example webhook handler URL with the order ID attached below.
After entering the webhook handler URL, click on the Test button in the field and then click the Save endpoint button.
https://hooks.zapier.com/hooks/catch/10148348/byvuimv/?orderid=
7. Once you save the endpoint in the Sensaria Co-branded Hub go back to Zapier and click on the Continue button.
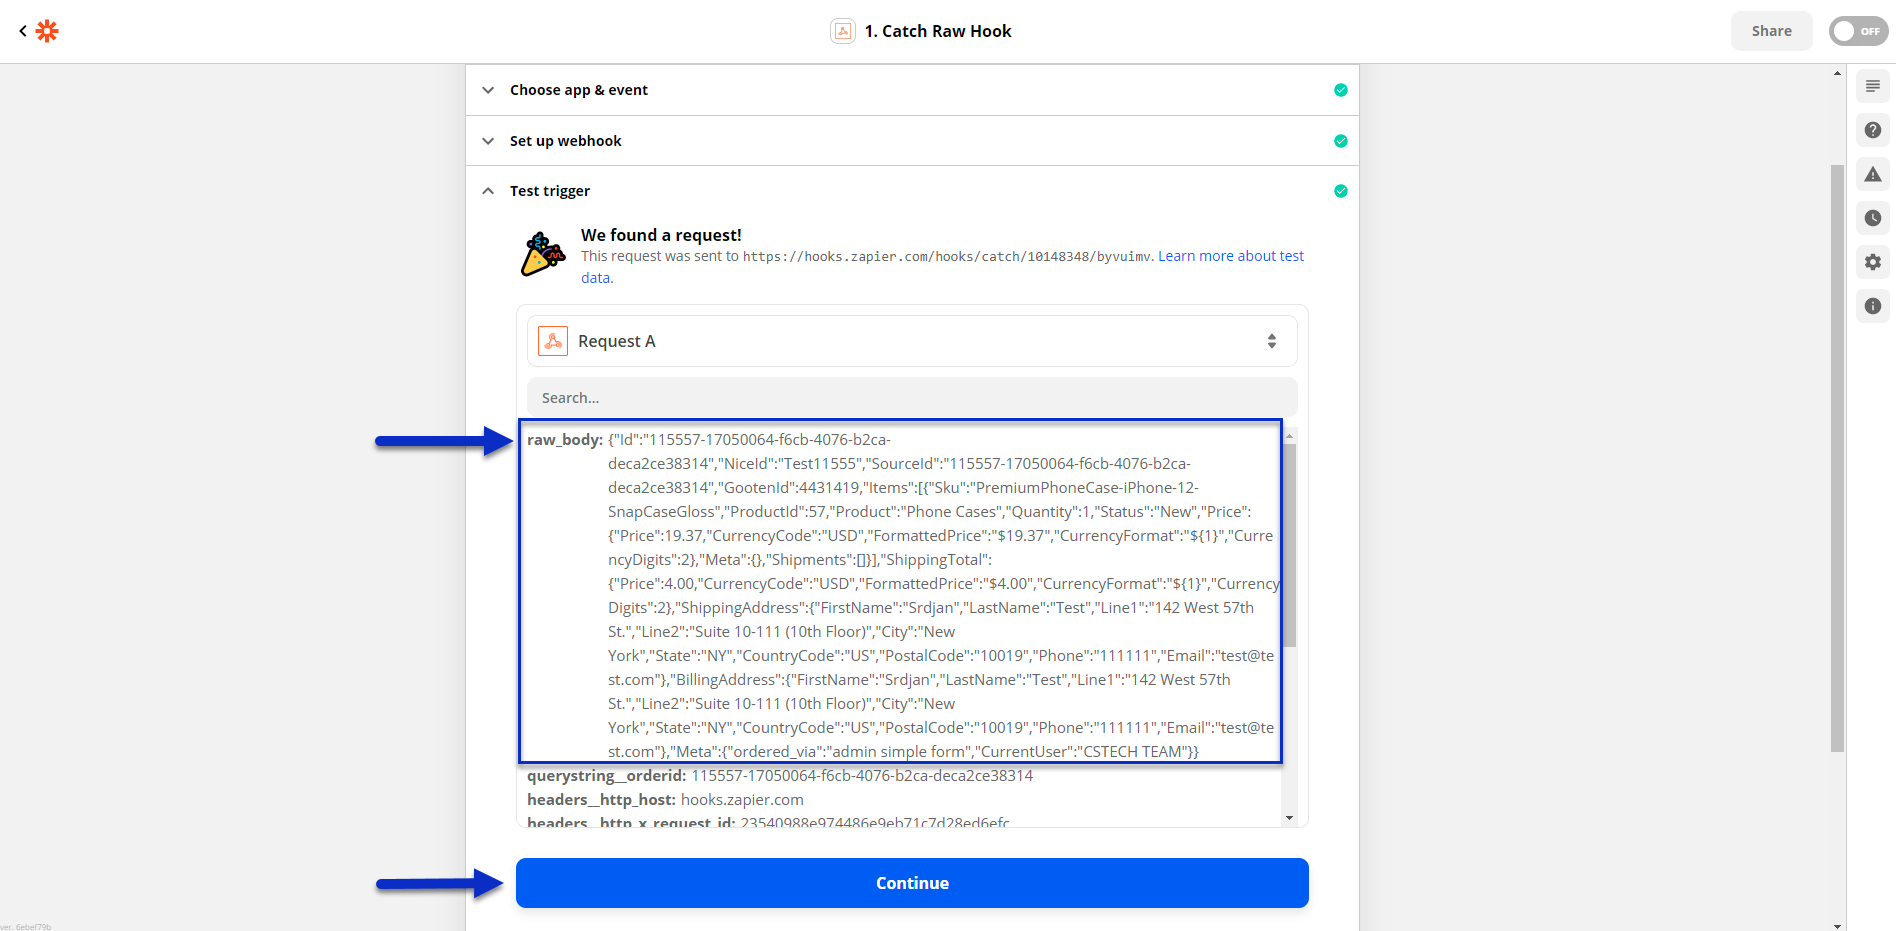
8. The next section allows you to perform a trigger test to ensure that your handler receives a request from Sensaria when there is a status change made. Make a status change to an order in Sensaria Co-branded hub, and then click on the Test trigger button.
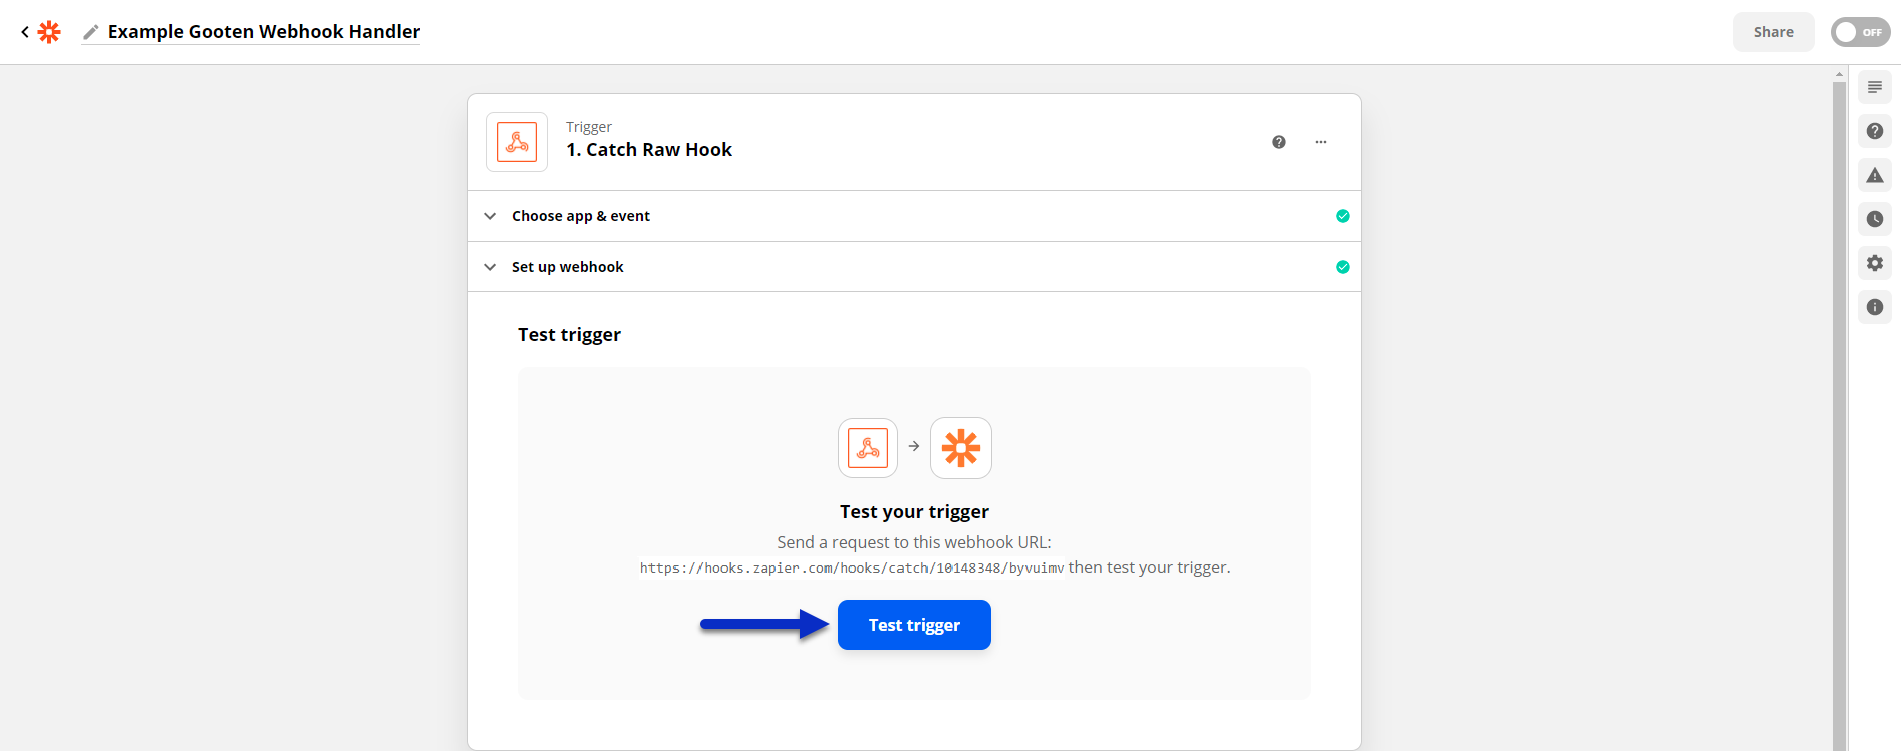
9. Once you test your trigger, you’ll be able to see the body of the POST request that Sensaria sends to your webhook handler URL. This request is sent when an order status is updated, and it will send back the order details with the order ID in the body.
Now the webhook handler you’ve just built should accept POST requests from Gooten whenever an order status is updated in the system. This ensures that your webhooks are working and communicating correctly.
You can then click the Continue button to choose what you want to do with this information from the POST request.
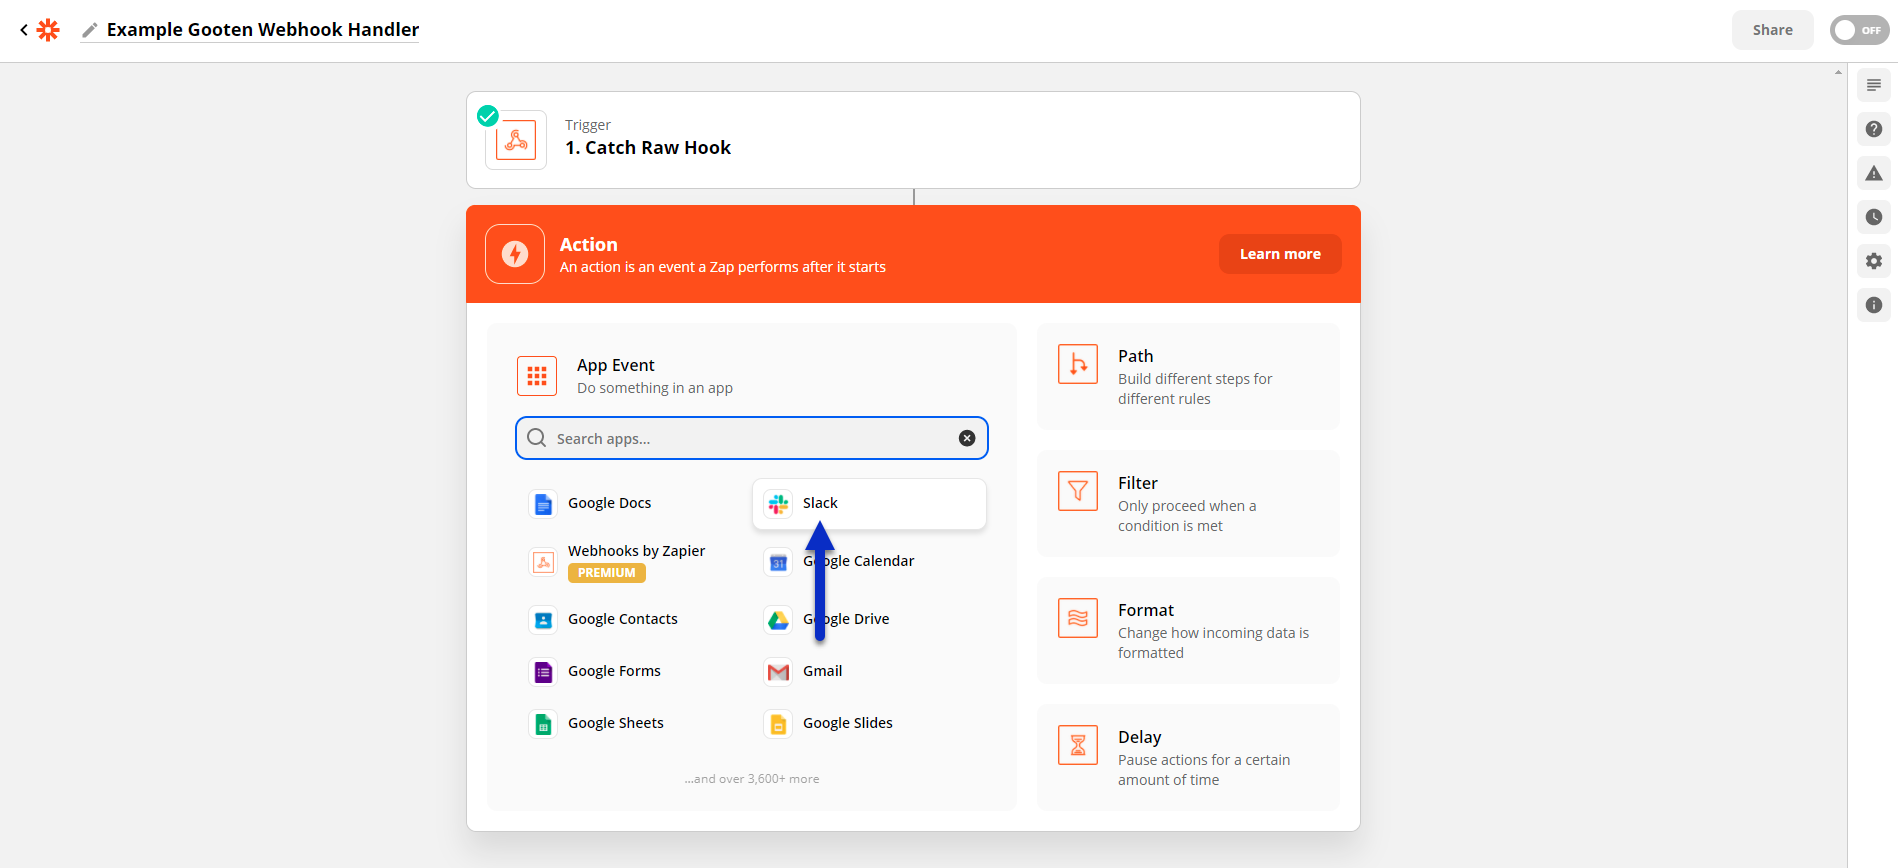
10. Zapier allows you to integrate with many different apps for how you want to display the information in the POST request from Gooten. Let’s choose an action to perform whenever a request is accepted from our webhook handler.
In this example, we’ll choose to display the information in a Slack channel. Select the Slack app in the action window.
- Slack is a software application used to communicate with team members via chat rooms or direct messages.
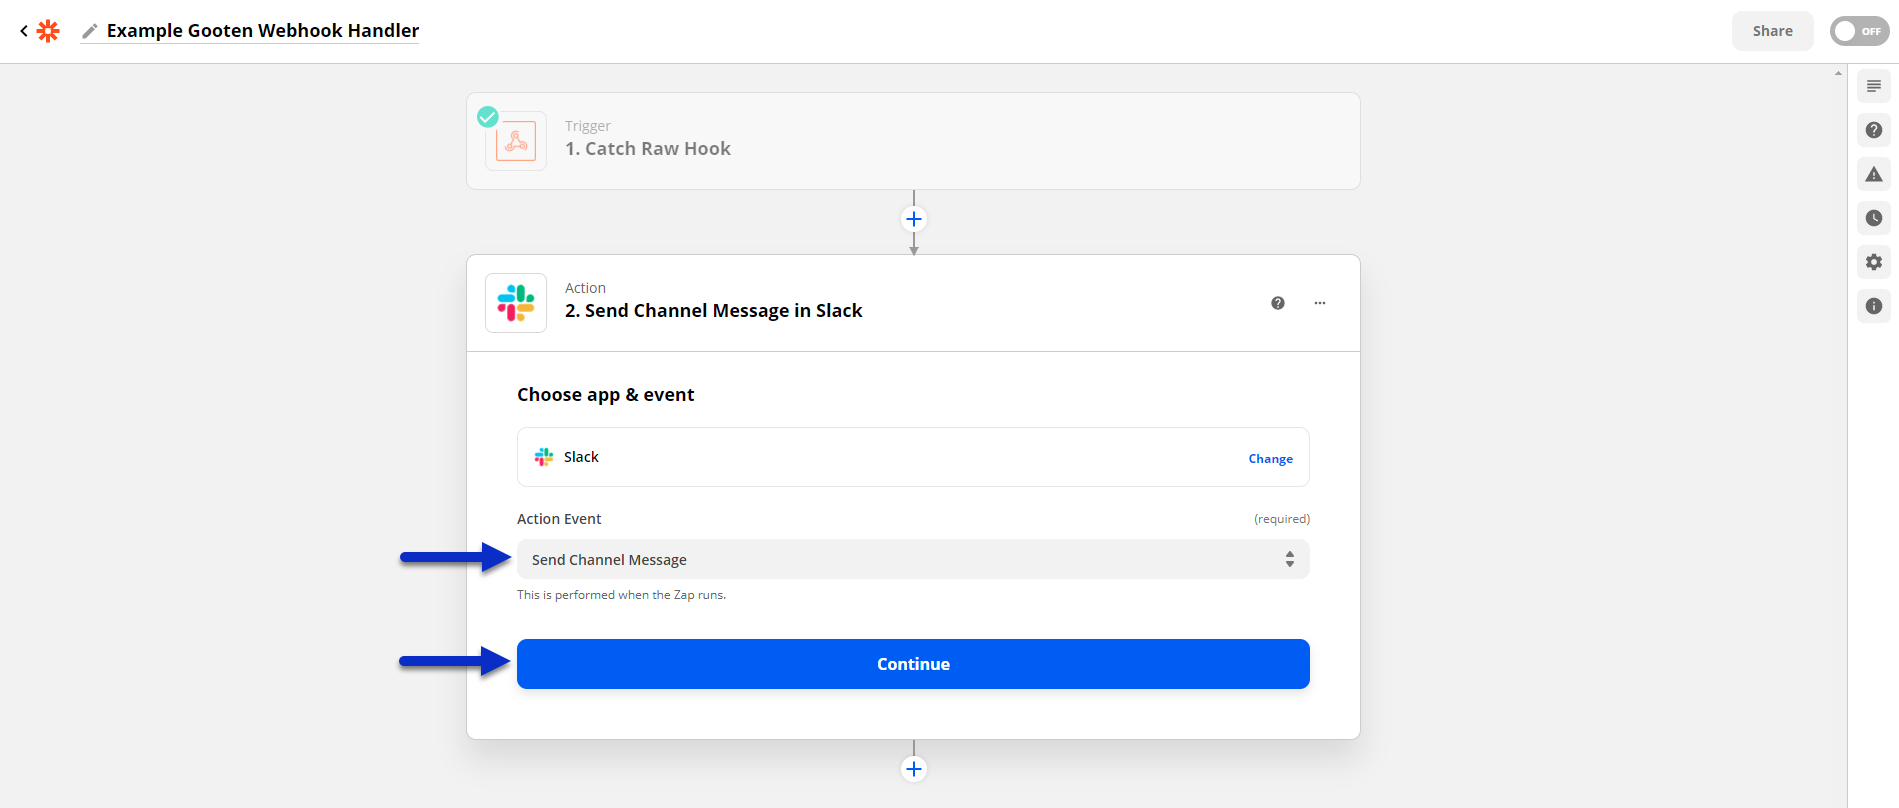
11. We’ll then choose the Send Channel Message as the Action Event and then click Continue.
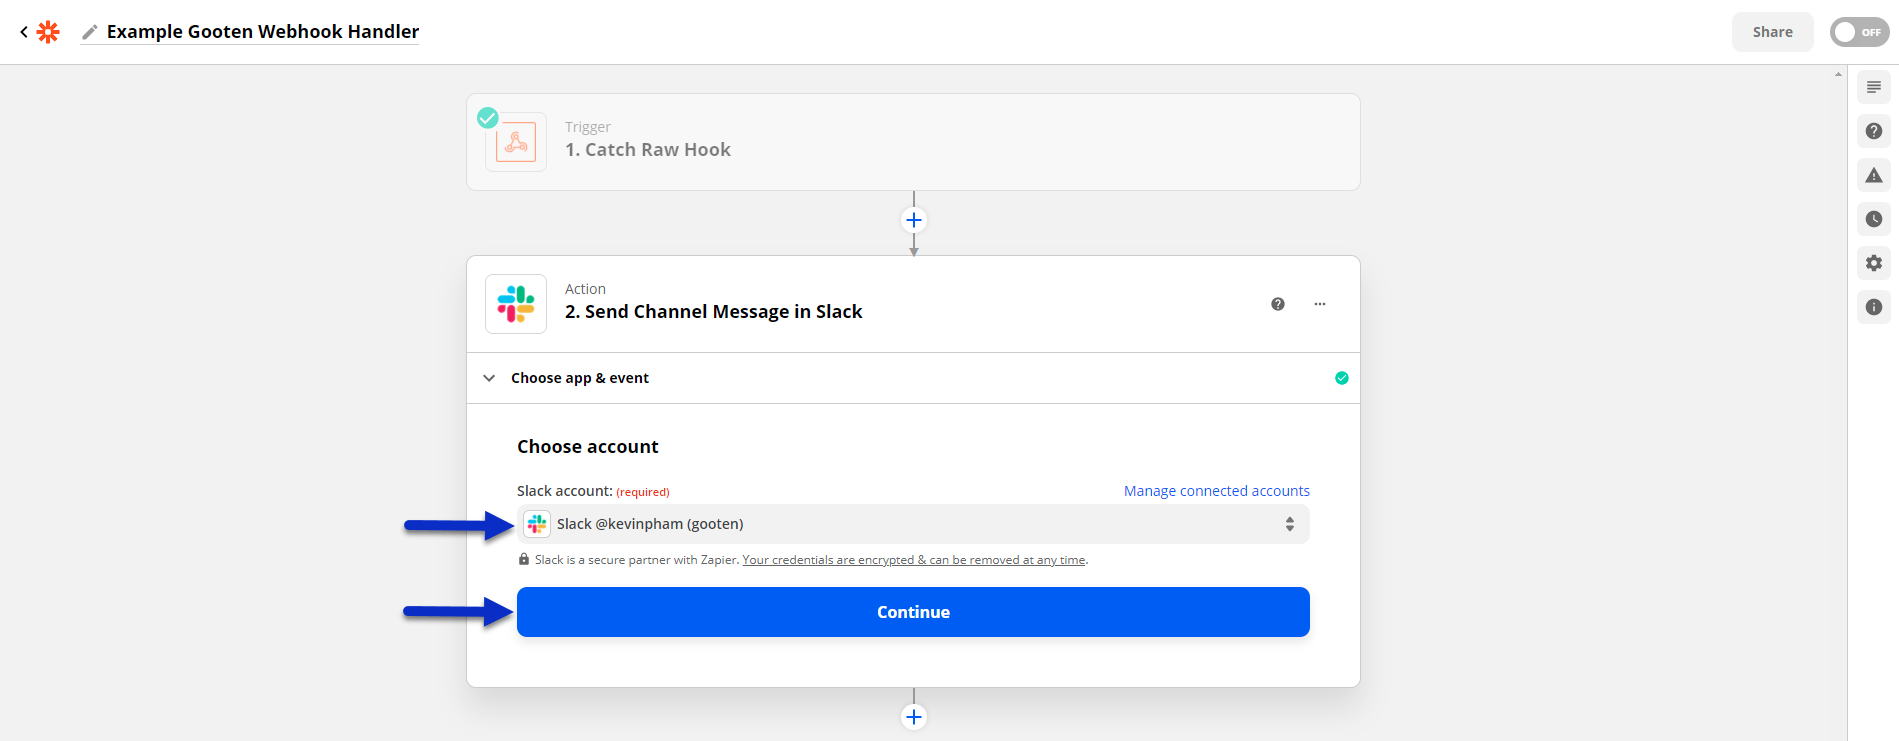
12. Here, we’ll log into our Slack account and then click Continue.
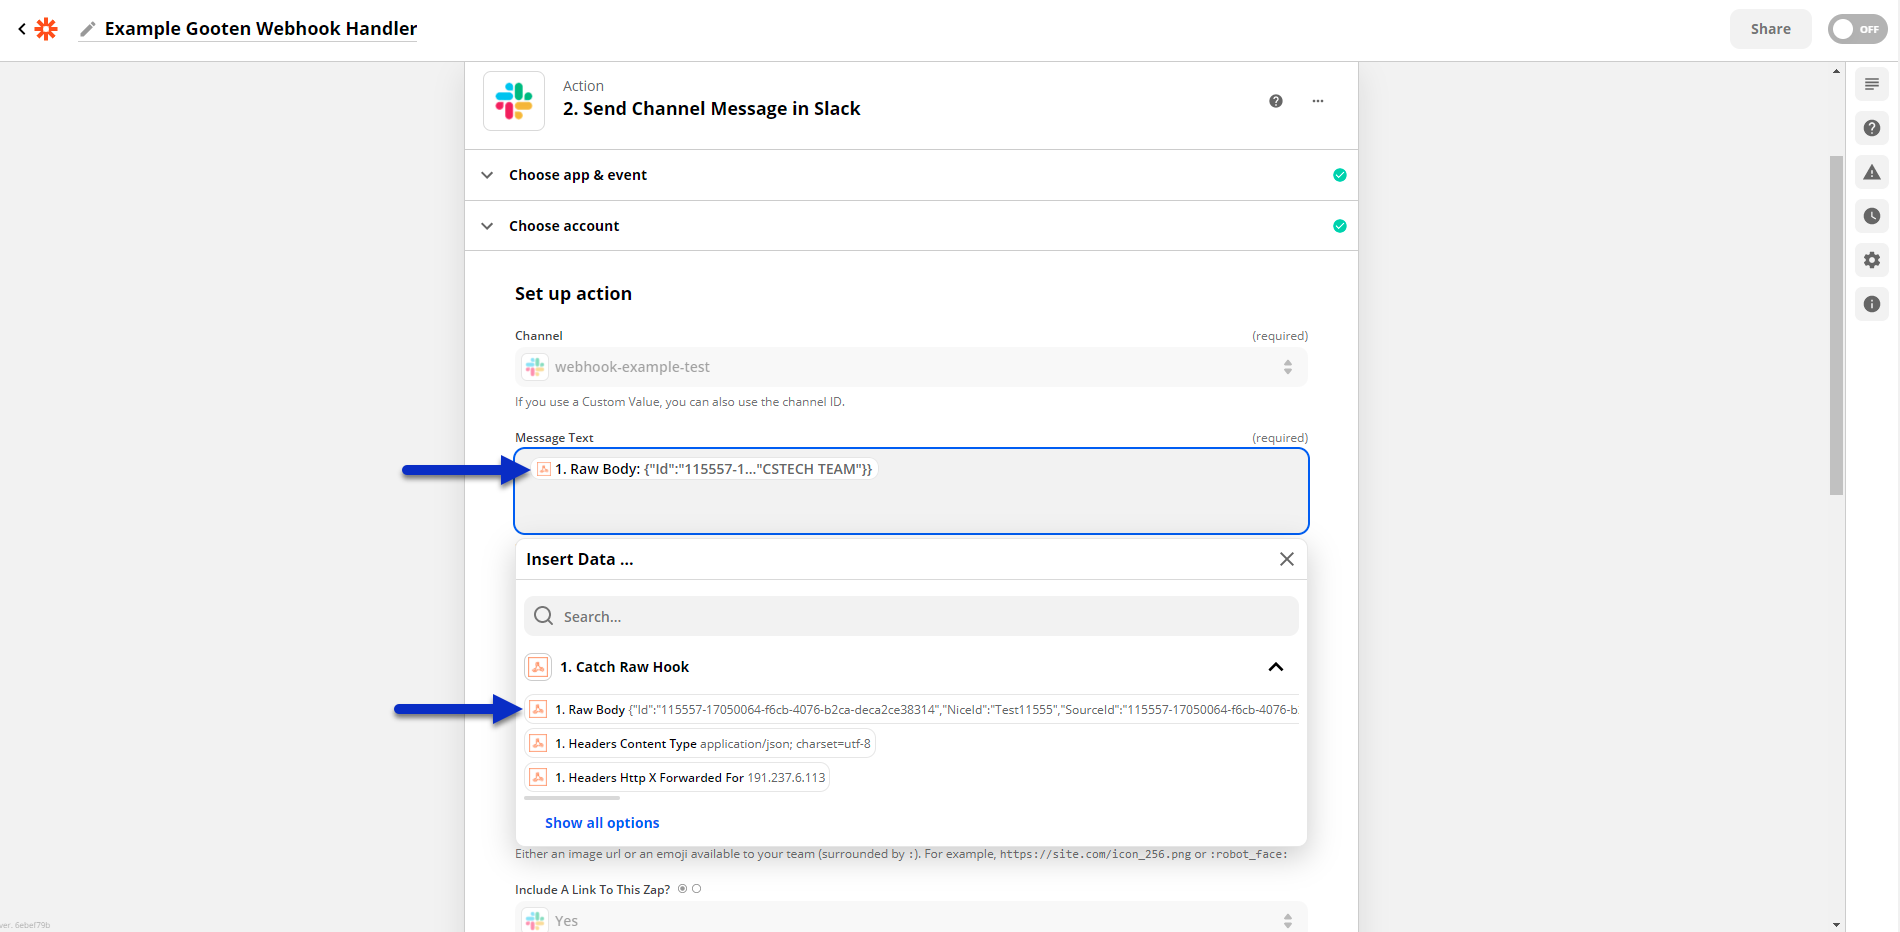
13. In the Set up action section, we’ll choose which channel we want to send the message to and then provide the text for the message.
We’ll have the option to add the raw body information from the Gooten POST request sent to our webhook handler. We’ll do this by clicking on the Raw Body option from the Catch Raw Hook event. This will post the raw body text from the Gooten POST request to the slack channel, and this will occur every time an order status is updated in Gooten.
14. There are many different options that we can change for the slack message, but we’ll keep it generic for this example. Afterward, we’ll click on the Continue button.

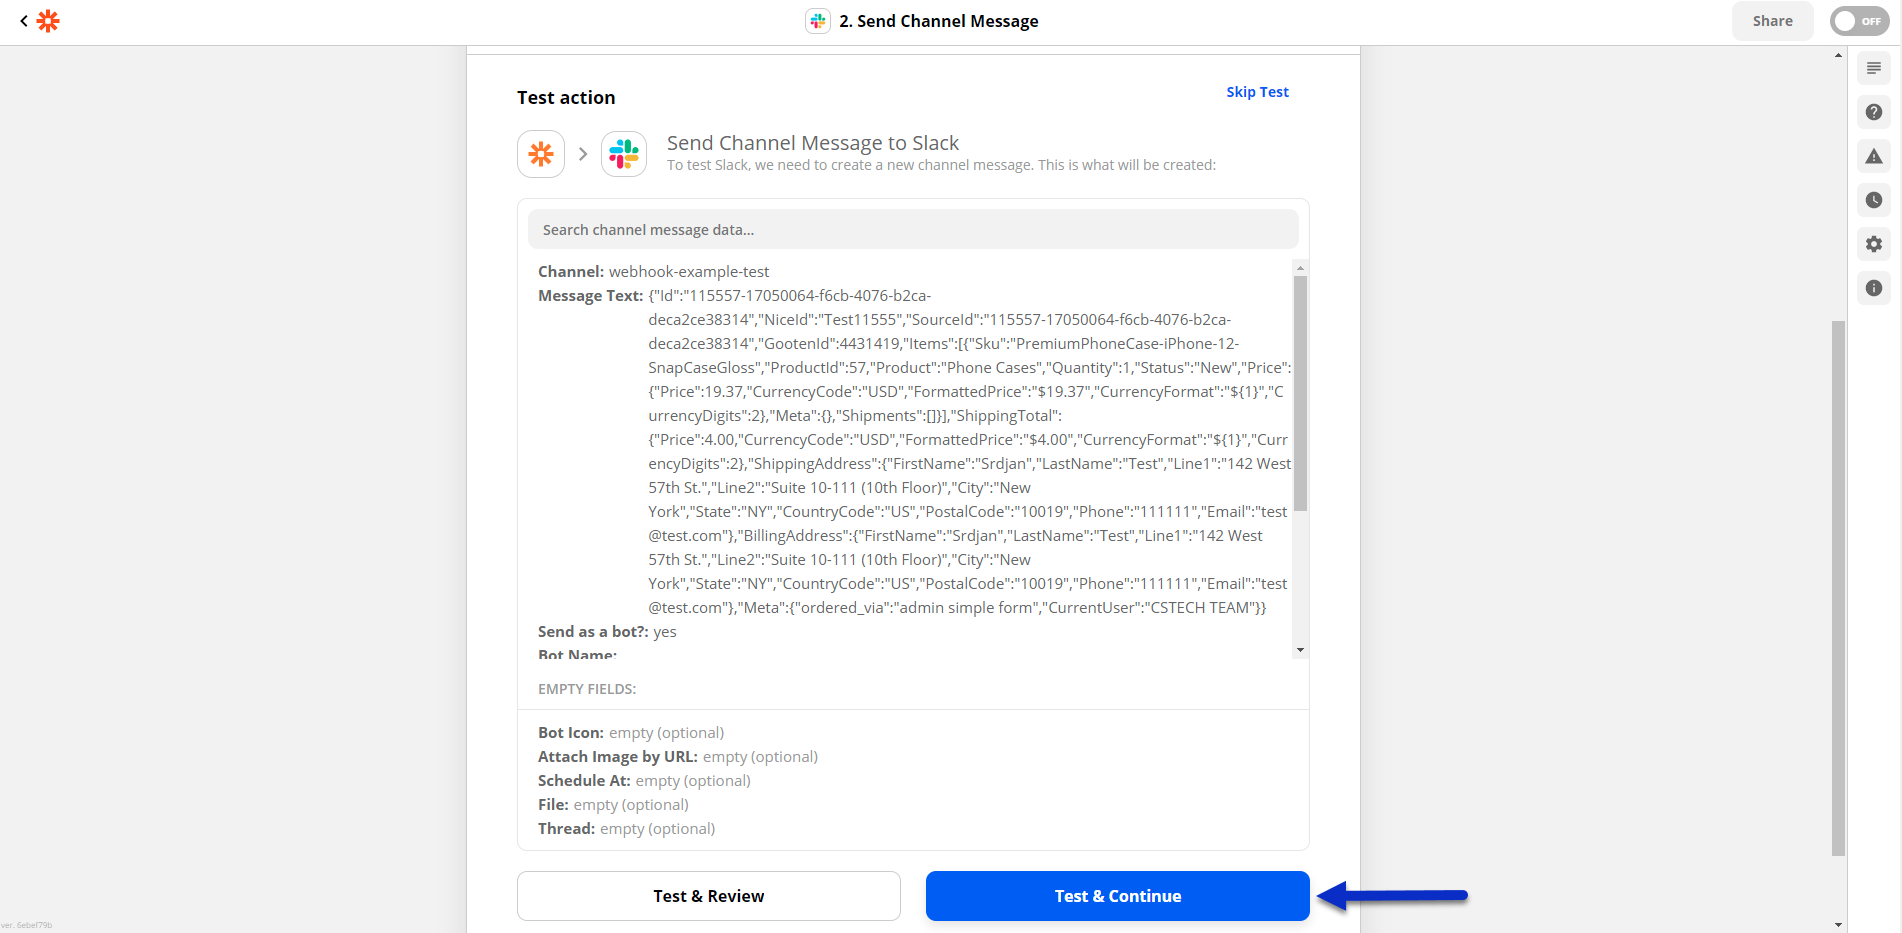
15. After this, we can click on the Test & Continue button to test the action after the webhook handler accepts the request from Gooten.
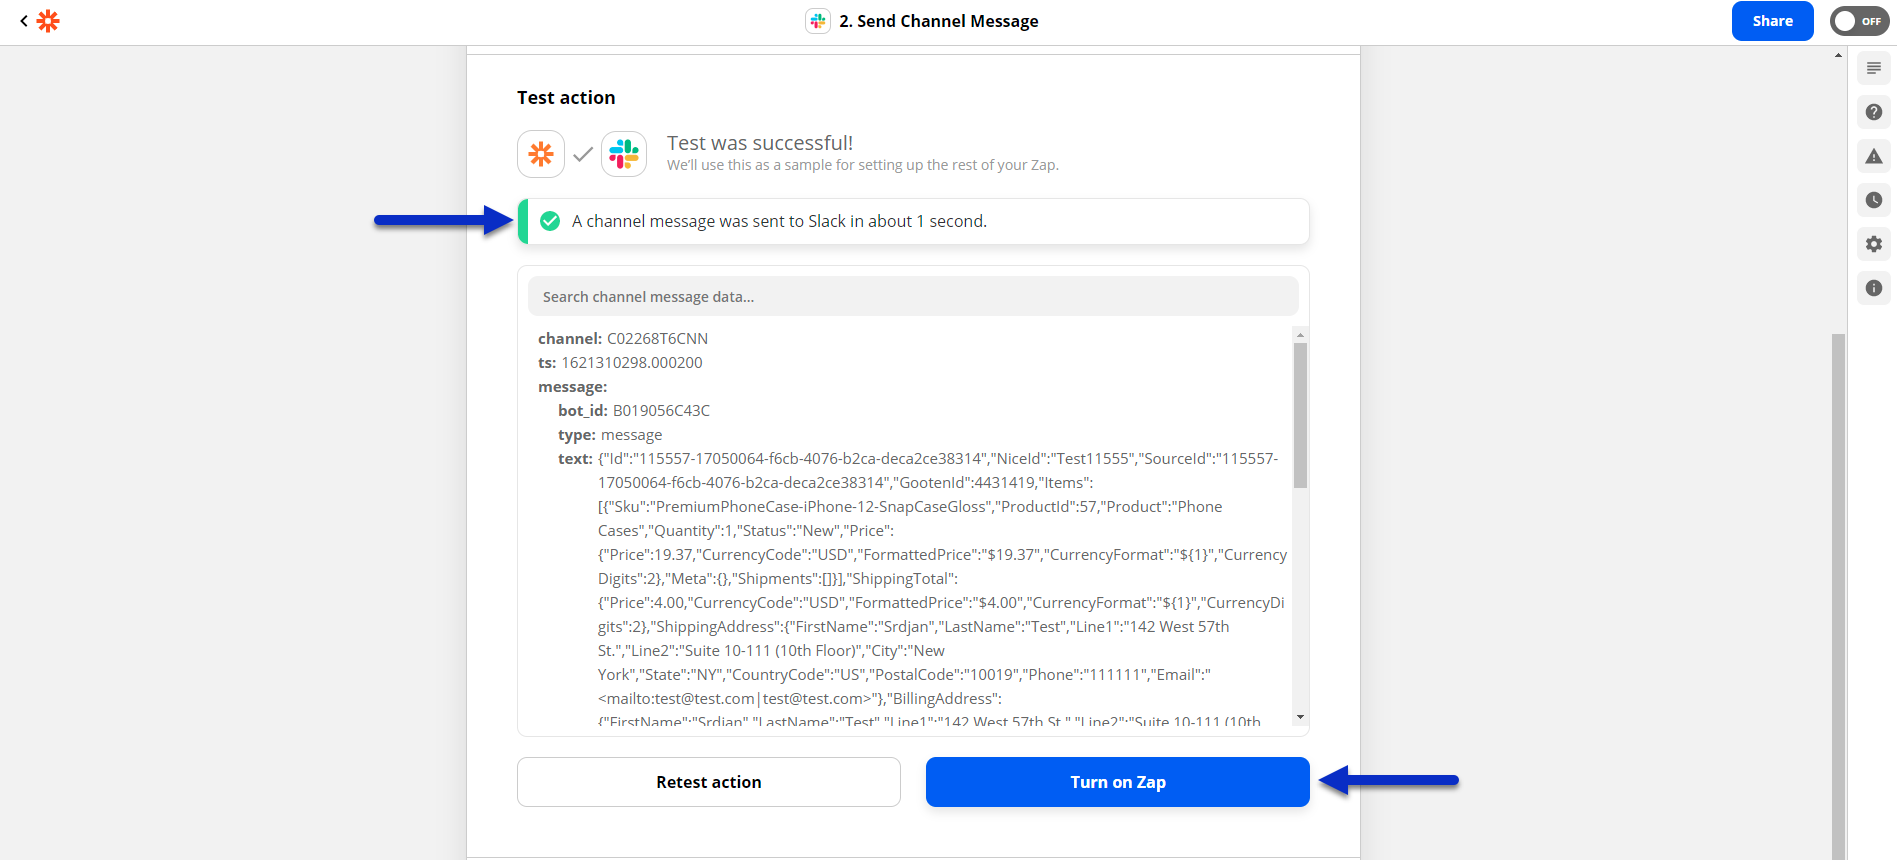
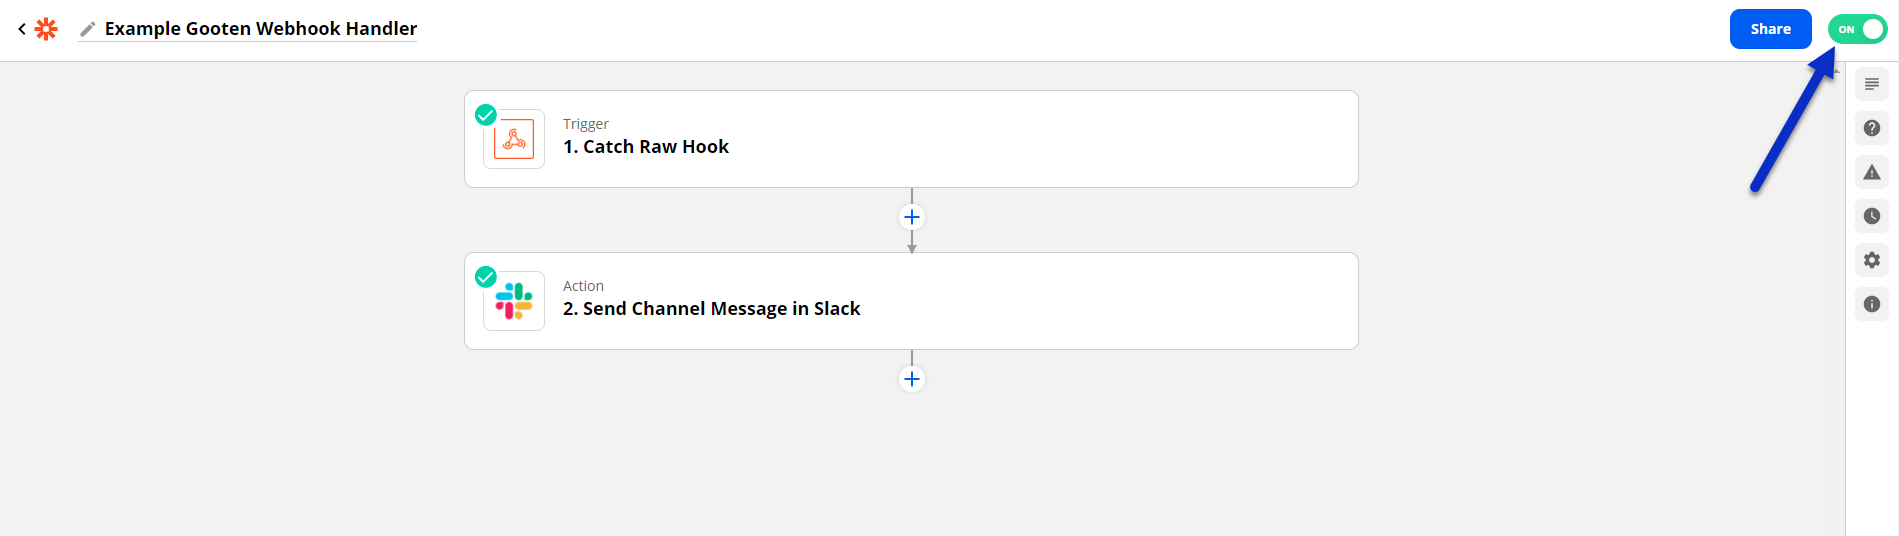
16. Once the test is completed, we’ll receive a notification mentioning that a slack message was sent. We’ll check the slack message sent momentarily. Click the Turn on Zap button to completely turn on the webhook handler.
17. If we take a moment to view the message in slack, it should be sent to the channel that we selected, and the message will include the raw body from the Gooten POST request that our webhook handler accepted. This will occur when the status of an order is updated.
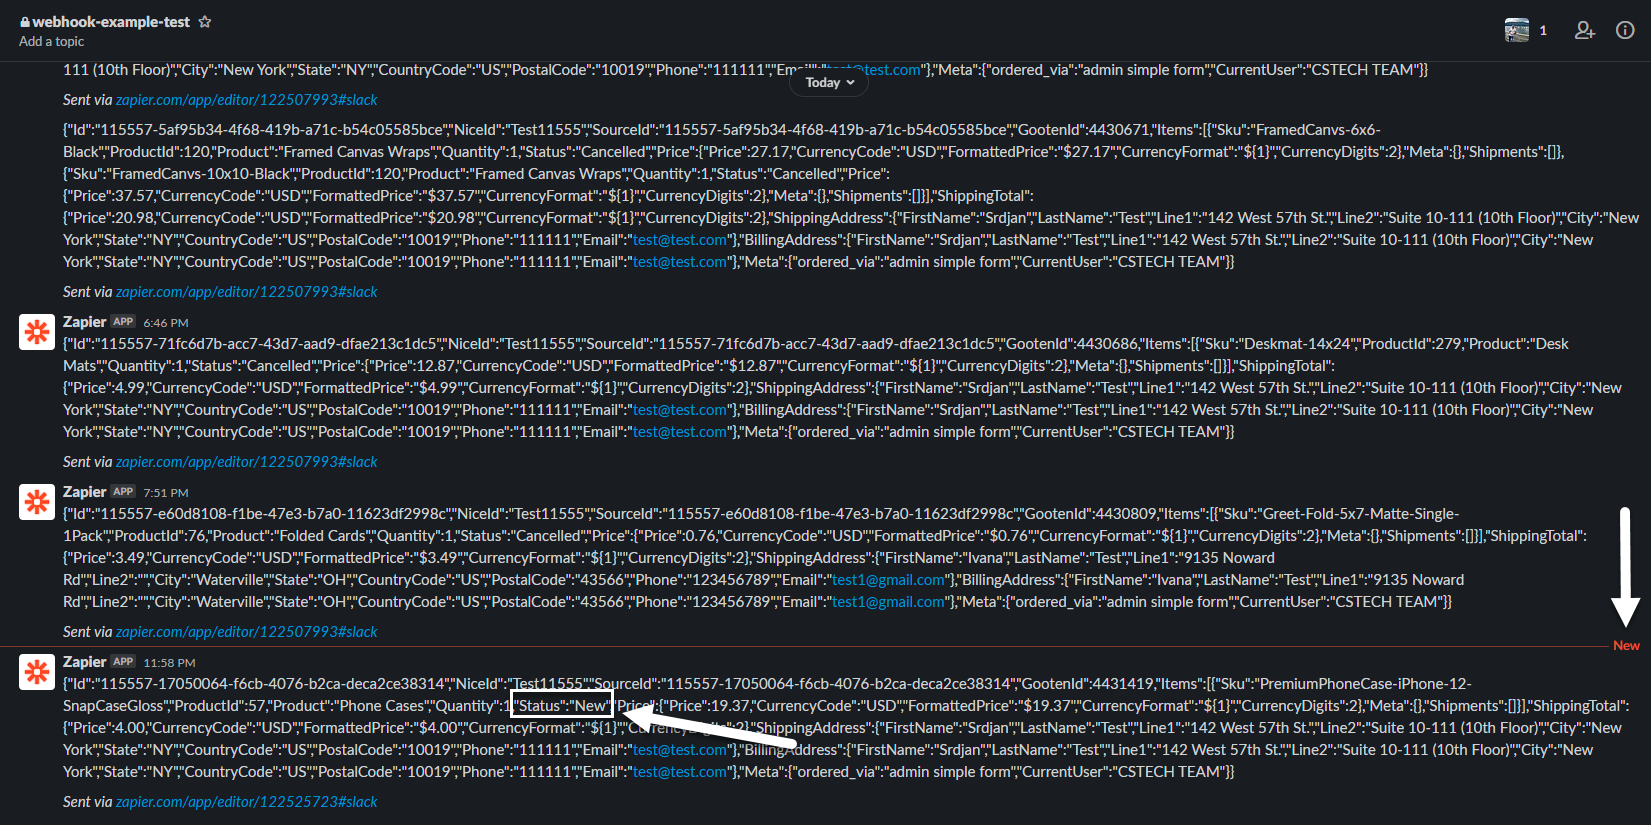
18. If you go back to the Zapier webhook handler, ensure that it is enabled. As long as your webhook handler is enabled, it will receive all Gooten POST requests whenever an order status is updated, and it will perform that action that you have set up. In our case, it will send a slack message every time an order status is updated in Sensaria Co-branded Hub.
Sample webhook content
Webhooks will fire each time an order item is updated. All webhook content includes details of an order and all of its order items. Most importantly, each order item has a status attribute that tracks it through the status lifecycle from ‘new’ to ‘delivered.'
{
  "Id": "7-501853e1-8d78-4e1e-83a0-be9fb432efe1",
  "NiceId": "Magic7-501",
  "Items": [{
    "Sku": "TabletCase-GalaxyNote10.0-Matte",
    "ProductId": 58,
    "Product": "Tablet Cases",
    "Quantity": 1,
    "Status": "New",
    "TrackingNumber": "9400115901344442556597",
    "TrackingUrl": "",
    "Price": {
      "Price": 25.5,
      "CurrencyCode": "USD",
      "FormattedPrice": "$25.50",
      "CurrencyFormat": "${1}",
      "CurrencyDigits": 2
    },
    "DiscountAmount": {
      "Price": 0,
      "CurrencyCode": "USD",
      "FormattedPrice": "$0.00",
      "CurrencyFormat": "${1}",
      "CurrencyDigits": 2
    }
  }, {
    "Sku": "TabletCase-GalaxyNote8.0-Gloss",
    "ProductId": 58,
    "Product": "Tablet Cases",
    "Quantity": 1,
    "Status": "New",
    "Price": {
      "Price": 22.8,
      "CurrencyCode": "USD",
      "FormattedPrice": "$22.80",
      "CurrencyFormat": "${1}",
      "CurrencyDigits": 2
    },
    "DiscountAmount": {
      "Price": 0,
      "CurrencyCode": "USD",
      "FormattedPrice": "$0.00",
      "CurrencyFormat": "${1}",
      "CurrencyDigits": 2
    }
  }, {
    "Sku": "WovenBlanket_50x60",
    "ProductId": 101,
    "Product": "Woven Blankets",
    "Quantity": 1,
    "Status": "New",
    "Price": {
      "Price": 45,
      "CurrencyCode": "USD",
      "FormattedPrice": "$45.00",
      "CurrencyFormat": "${1}",
      "CurrencyDigits": 2
    },
    "DiscountAmount": {
      "Price": 0,
      "CurrencyCode": "USD",
      "FormattedPrice": "$0.00",
      "CurrencyFormat": "${1}",
      "CurrencyDigits": 2
    }
  }],
  "Total": {
    "Price": 108.91,
    "CurrencyCode": "USD",
    "FormattedPrice": "$108.91",
    "CurrencyFormat": "${1}",
    "CurrencyDigits": 2
  },
  "ShippingTotal": {
    "Price": 15.61,
    "CurrencyCode": "USD",
    "FormattedPrice": "$15.61",
    "CurrencyFormat": "${1}",
    "CurrencyDigits": 2
  },
  "ShippingAddress": {
    "FirstName": "Alina",
    "LastName": "Magicworld",
    "Line1": "Bittersweet St. 67, appt.#37",
    "City": "Bittersweet",
    "State": "AL",
    "CountryCode": "US",
    "PostalCode": "548912",
    "Phone": "80507894586",
    "Email": "Bittersweet@gmail.com"
  },
  "BillingAddress": {
    "FirstName": "Alina",
    "LastName": "Magicworld",
    "Line1": " ",
    "City": " ",
    "State": " ",
    "CountryCode": "US",
    "PostalCode": "654812",
    "Email": "Bittersweet@gmail.com"
  }
}
Limitations and troubleshooting scenarios
Please note that it's not possible to set up multiple webhook endpoints for one account. Sensaria sends out one endpoint, and you are free to send it out to other endpoints from that point.
Please note that if you have an endpoint for the Sensaria webhooks and you’re not receiving any data, the most likely culprit is the missing `?orderid=` in the endpointURL. By default, the endpoint appends the orderid as a value to the URL, so you need a querystring to capture it.