Learn how to connect your WooCommerce store and start using Sensaria with your WooCommerce shop!
- Connect my WooCommerce store
- Create new products
- Syncing existing products
- Shipping prices with WooCommerce
- WooCommerce Email Notifications
Connect my WooCommerce store
Connecting your WooCommerce store to Sensaria is a simple and quick process. Please follow the steps below:
1. First, install the 'Gooten Shipping for WooCommerce' plug-in in the admin panel of your WordPress site: https://wordpress.org/plugins/gooten-dropshipping-for-woocommerce/
- You must install this plugin for your shipping options and shipping charges to work correctly.
2. Go to the WordPress Permalink Settings section on the Settings page. Select "Post name" under the Common Settings section.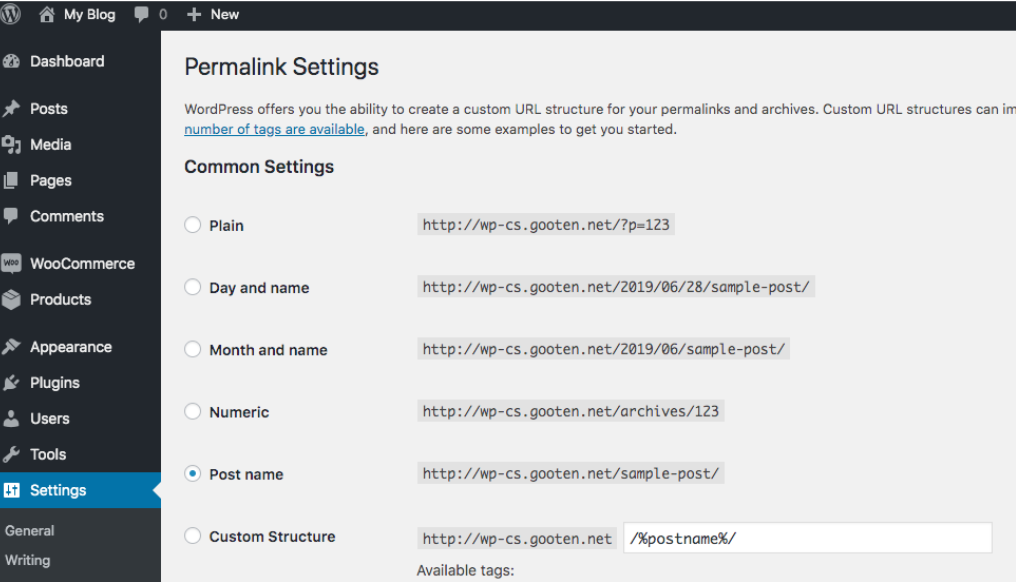
3. Install and activate the Gooten Shipping for WooCommerce plugin.
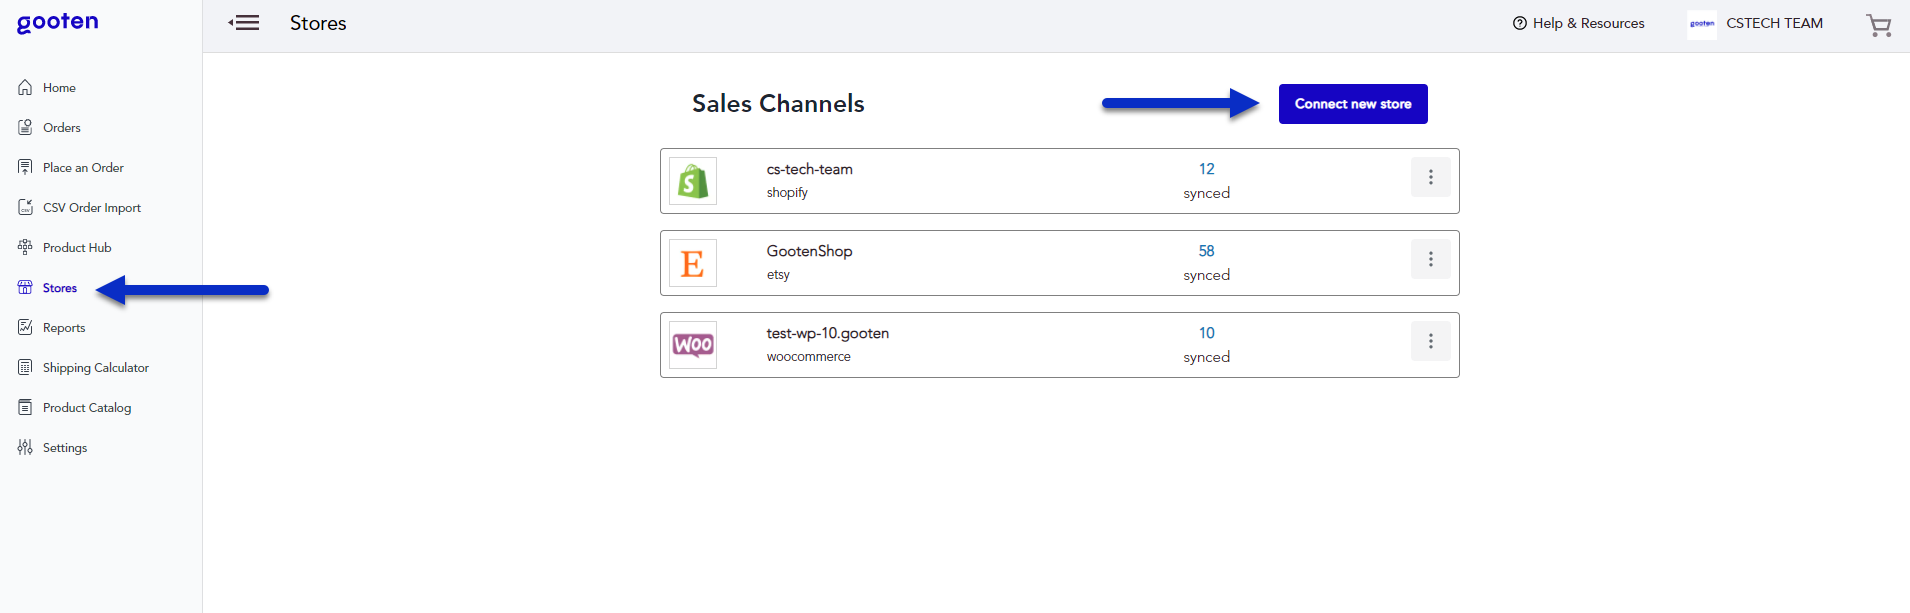
4. Log in to the Sensaria Admin, go on your Stores page, and click the Connect new store button.
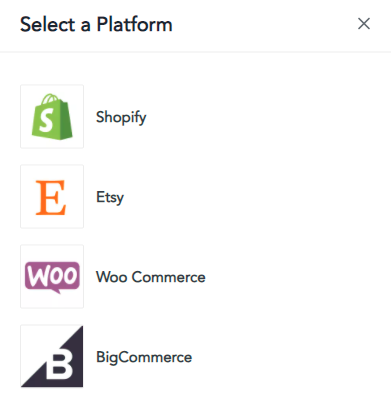
3. Click on the WooCommerce option as your platform.
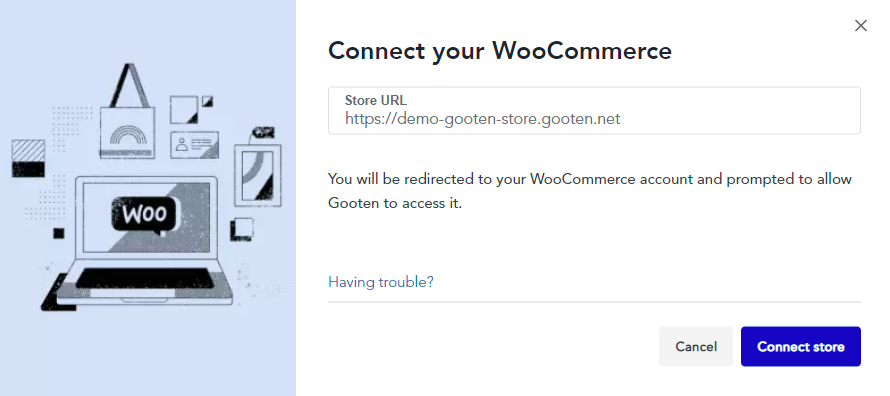
4. Then, you can add your WooCommerce store URL and hit Connect store for installation.
- The domain name you enter should match your site name exactly. You can update this in your settings. Use the change domain guide for help updating your domain.
You can do this for however many stores you want to install, but please note that You can only connect one WooCommerce store to one Sensaria account.
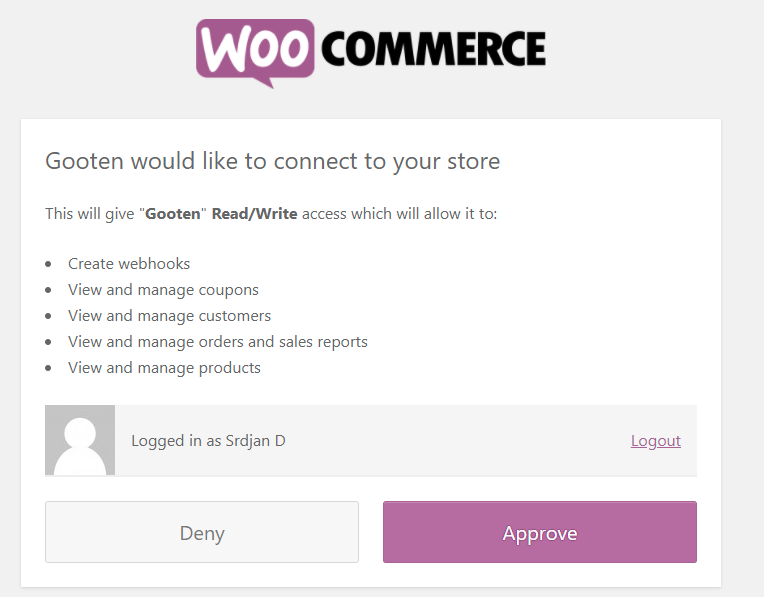
5. You'll be redirected to your WooCommerce store, where you'll be asked to approve Sensaria accessing your site. Click on the Approve button.
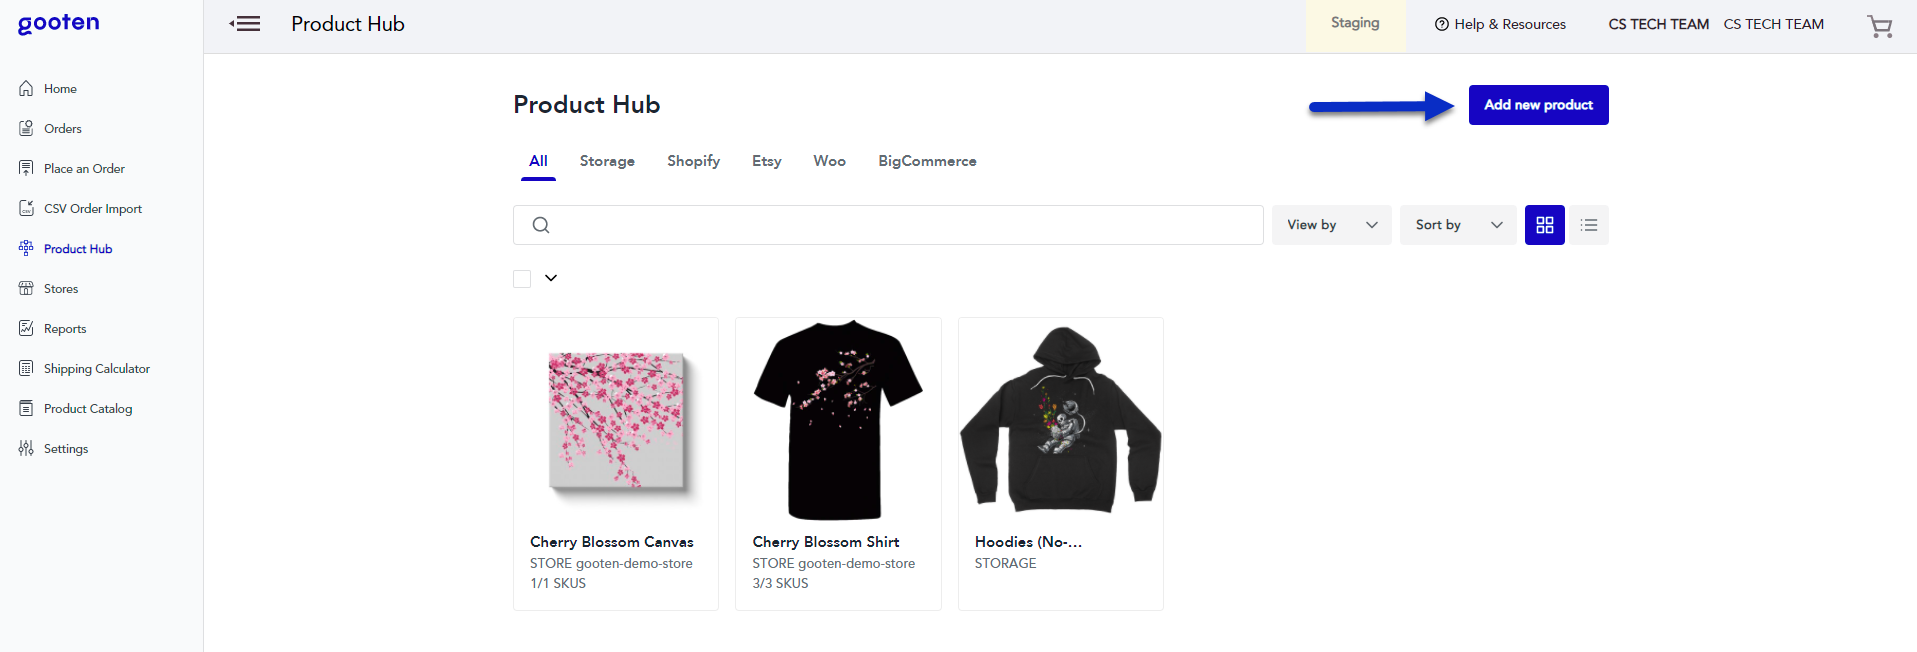
Your store will connect, and if you had any existing products that were synced or created from Sensaria, it would automatically appear in the WooCommerce tab in the Product hub.
Once you've connected your store, you can start creating, syncing, and fulfilling products.
Here is a brief video tutorial for connecting your WooCommerce store to Sensaria:
Create new products
Create products in Sensaria
Once your store is connected to Sensaria, you can start creating new products in the Product Hub.
Start by clicking on the Add New Product button, and work your way through the Product and Design pages until you get to the last step at the Product Details page.
This is where you will be able to edit the product name, description, SKUs, and product prices before publishing the product to your WooCommerce store.
For more details, please check out the following video tutorial:
Create new products in your WooCommerce store
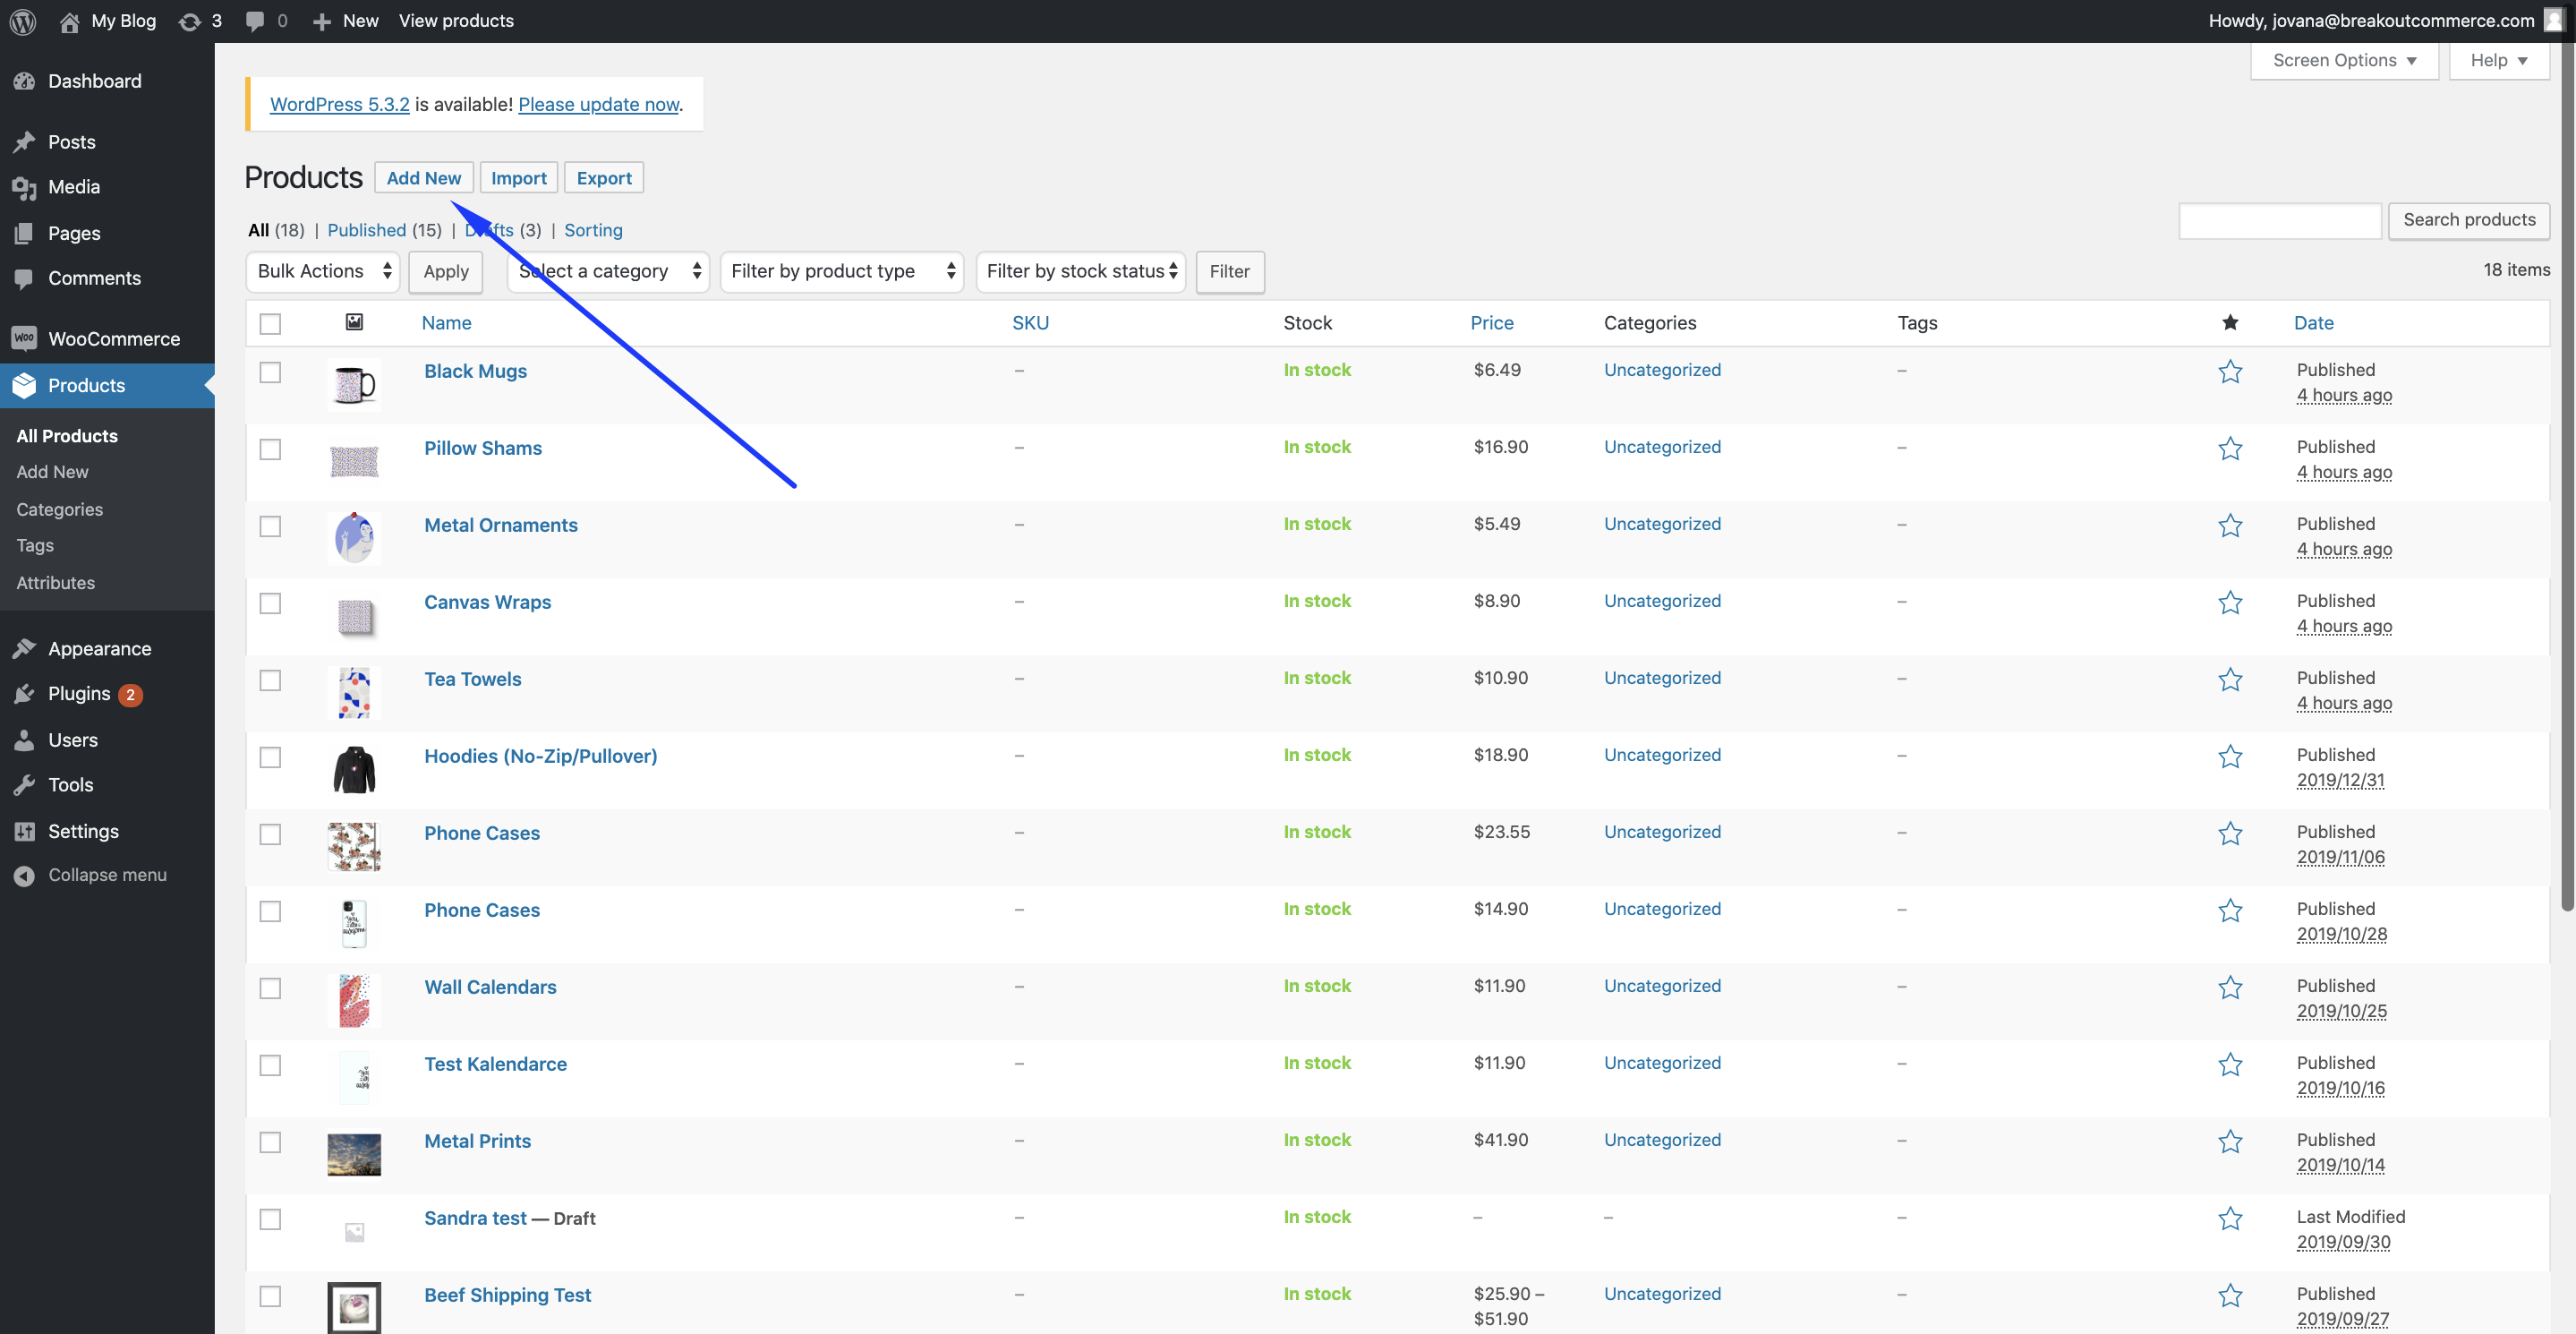
1. To create new products in your store, navigate to the Products tab and select the Add New button.
Steps you should follow while creating each new product:
-
Fill out the name field (description, category, and tags are optional)
-
Set product type to "Variable product" - this step is required if you want to add variants to this product.
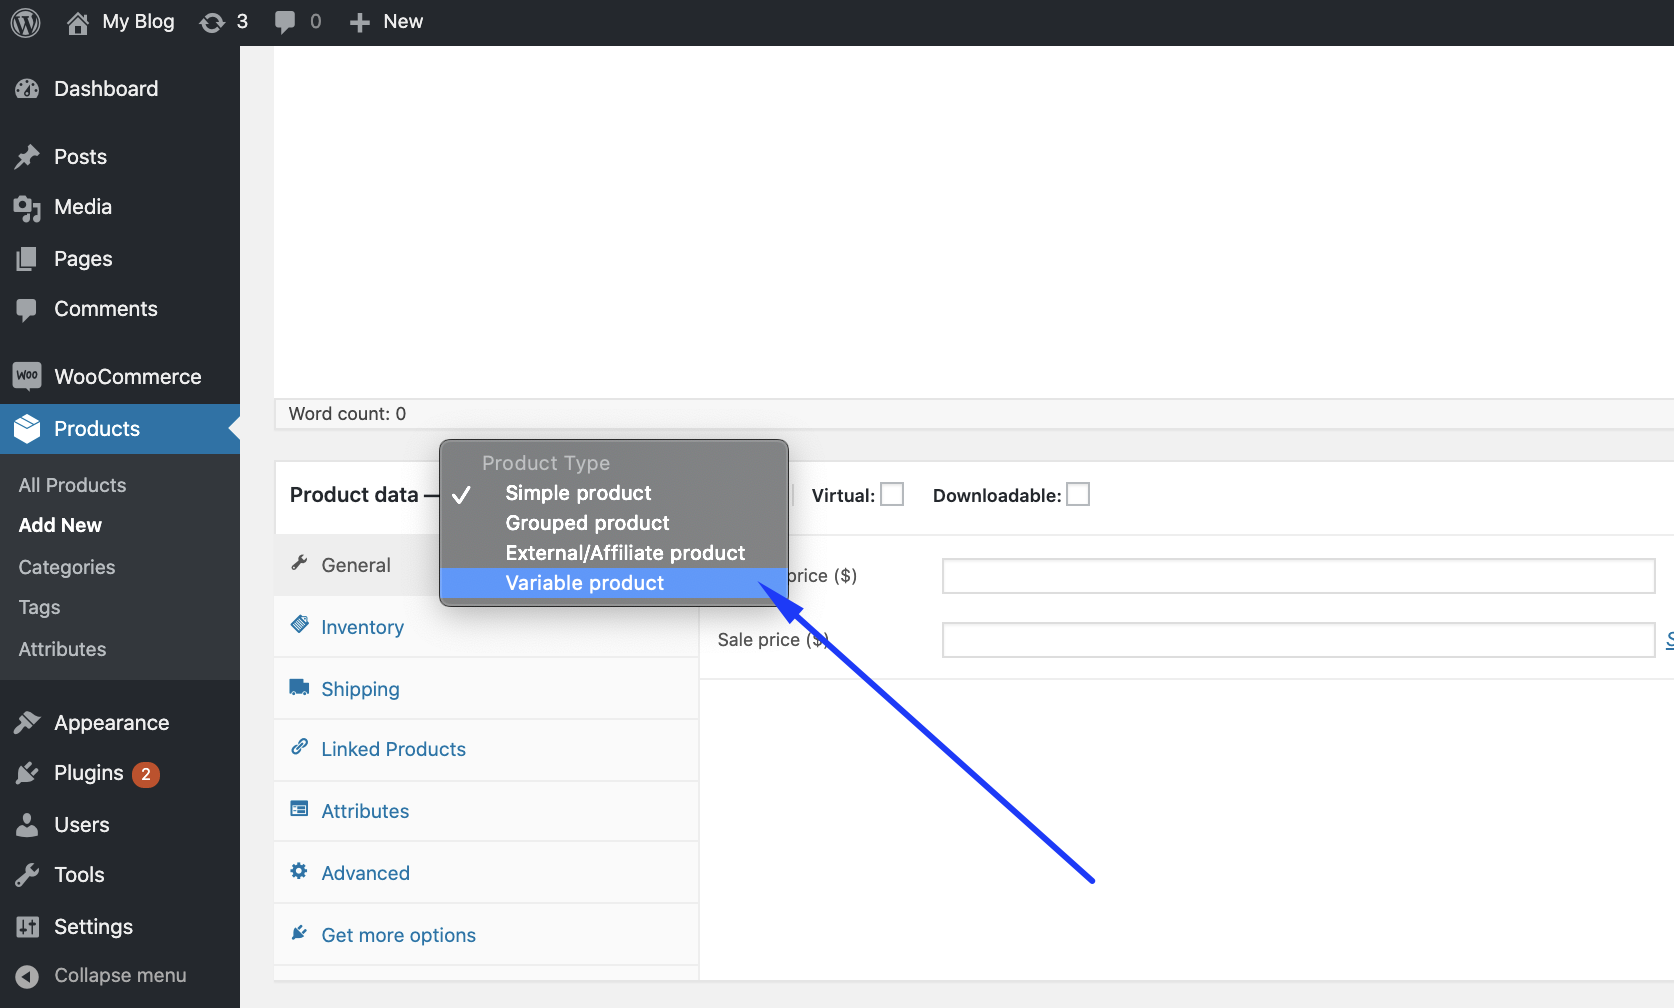
Note that without adding attributes, you will not be able to add variations either. Attributes correspond to product options in the Product Hub, and as such, vary depending on the selected product:
- Fill in the SKU and price for each variant. If these are left blank, our system will populate this data automatically when you link the product, and you can make any necessary changes at that time.
If you add SKUs to your products in WooCommerce, please note that every product must have a unique SKU. For example, if you create 6 mug variants, they will need unique identifiers added to the SKU, like mug_beachtheme or mug_unicorn.
Syncing existing products
Sensaria will not receive orders for products published on your WooCommerce site if the product is not linked to your Sensaria account.
If you want to sync and add new variants to an existing listing in your WooCommerce store, please follow the steps below.
1. In WooCommerce, create/add new variants for products to sync to Sensaria.
- Follow the step to Create new products in your WooCommerce store above.
2. After saving those newly created variants, go into your Sensaria Product Hub for that store, click on the WooCommerce tab, and then click on the Sync product button.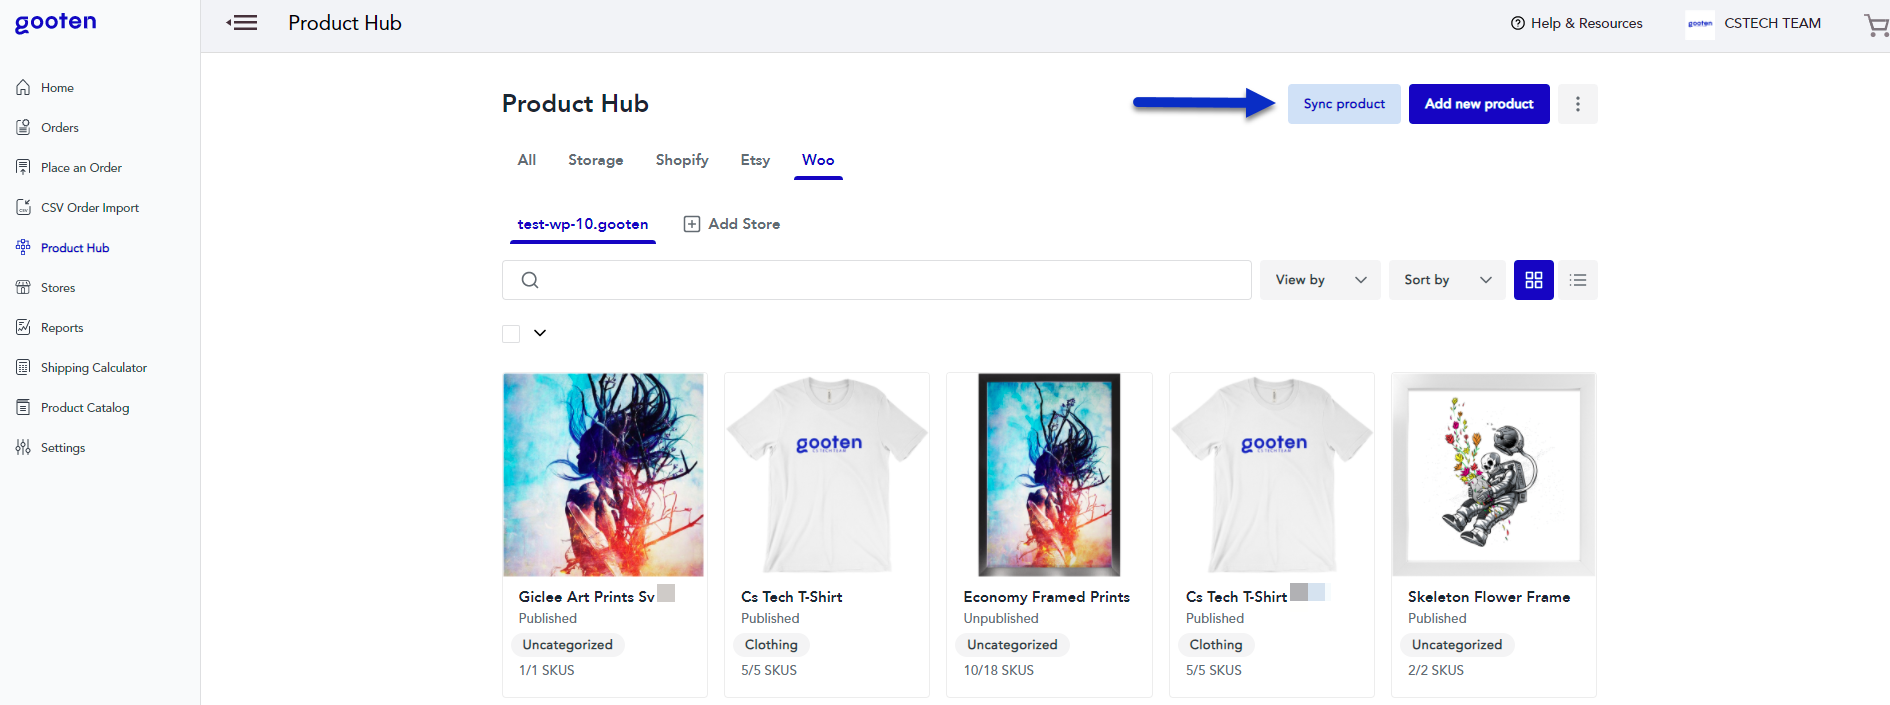
3. Select the product that you want to sync to Sensaria.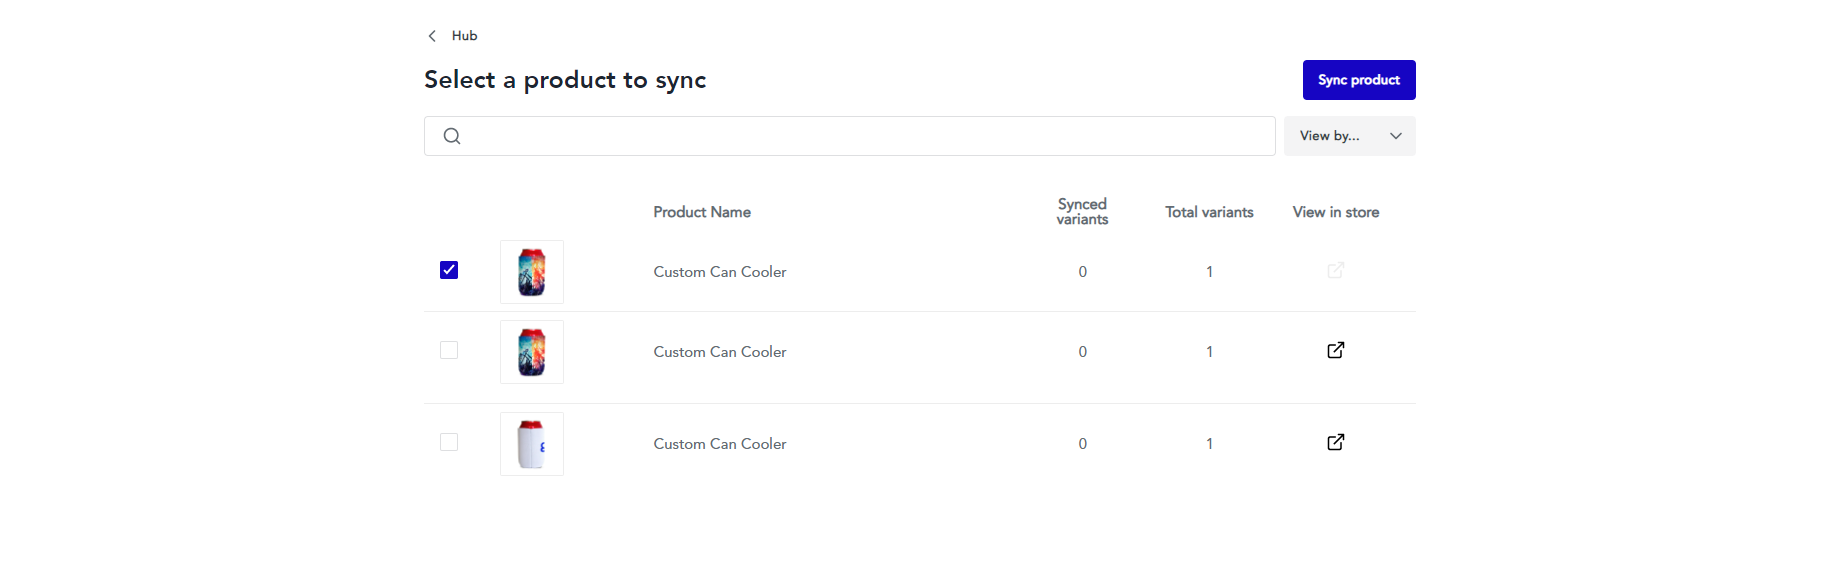
4. Select the product you are connecting to Sensaria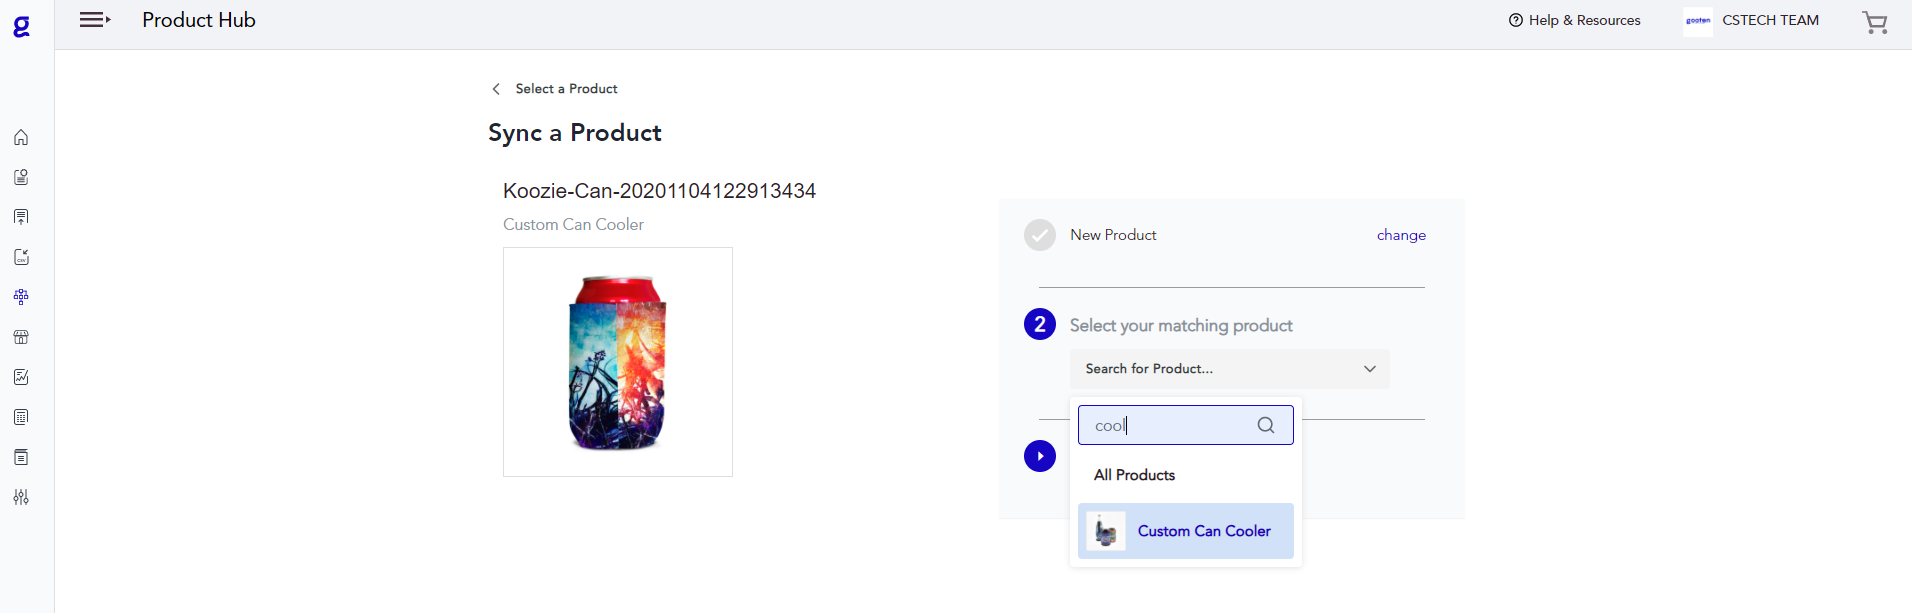
5. Select a matching product SKU that you want to connect to your WooCommerce product variant.
- Repeat this step for each of the variants, or you can use the Skip option if you want to leave any of them out of the syncing process.
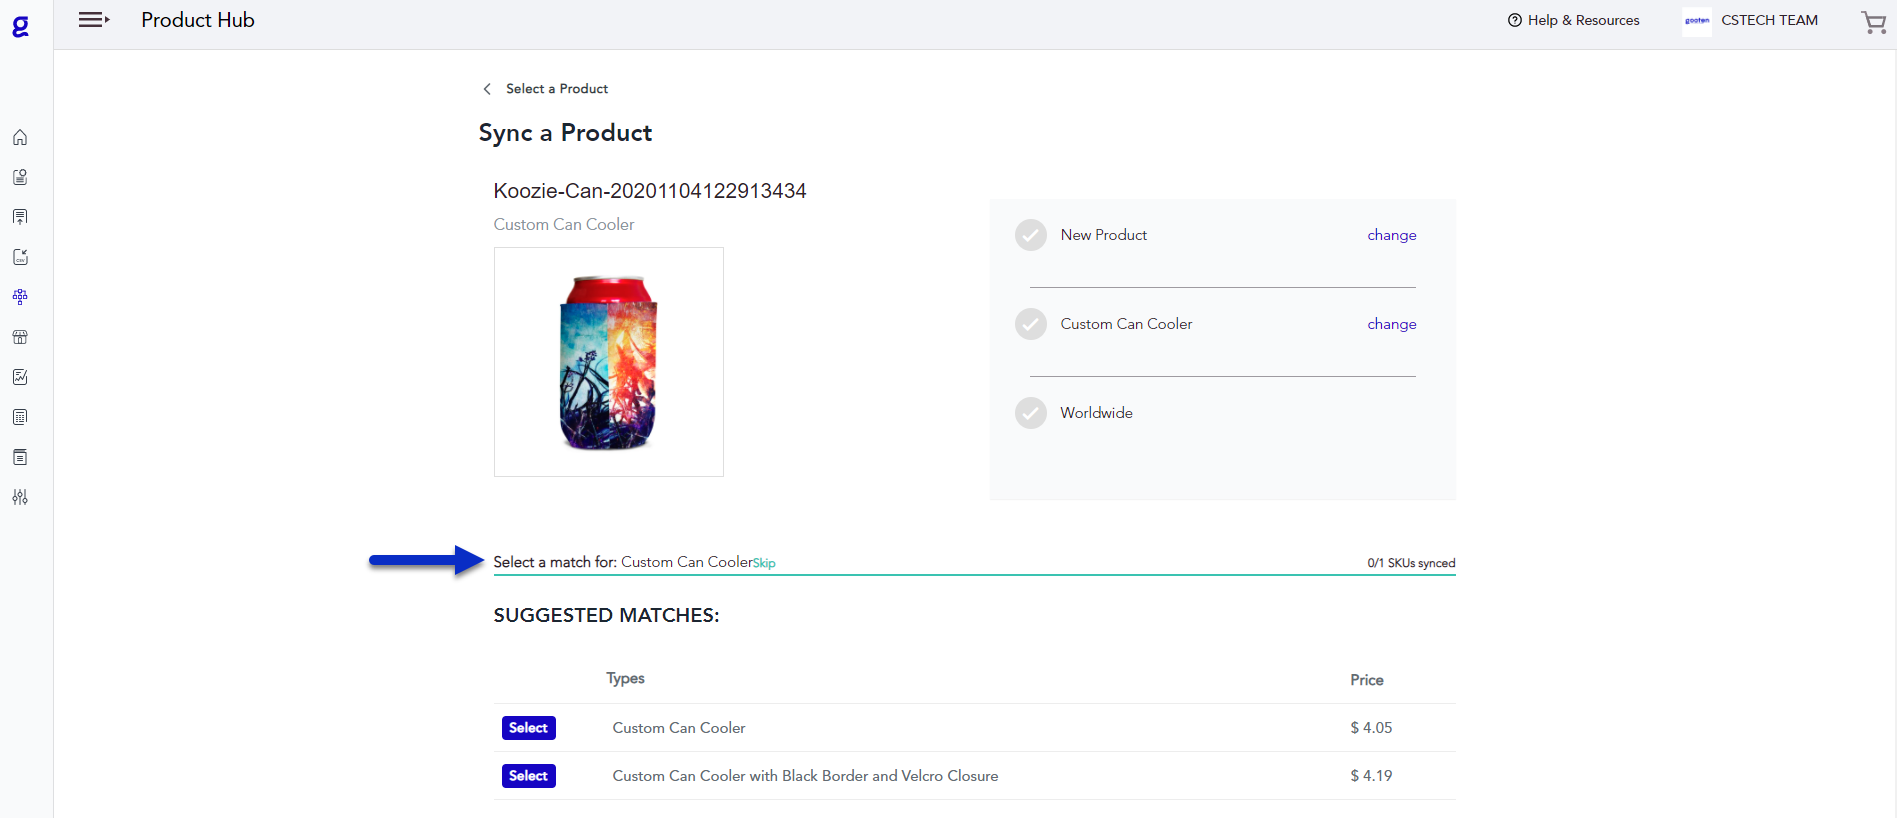
6. Once you've connected the variants, click on the Continue to upload artwork button to design the product and go through the rest of the syncing process

To see our short video tutorial about syncing your existing products, please check out the video below:
Shipping prices with WooCommerce
Be aware that if shipping prices increase, Sensaria does not automatically update your prices for your products to accommodate the increased shipping prices. If you would like to accommodate any shipping price increases in your product, make sure you manually update your product prices in your store.
WooCommerce Email Notifications
WooCommerce automatically sends order confirmation emails to whoever places the order. Once the order is marked as fulfilled in our system, WooCommerce will automatically pull the shipping information from our system and send a shipping notification email to your customer.
Once the order is shipped, tracking numbers are sent from Sensaria to WooCommerce. However, please note that there are some limitations to the process.
- WooCommerce doesn’t allow the order to be partially fulfilled or have multiple tracking numbers submitted. As soon as one item gets the tracking code, the whole order will be marked as completed and shipped on the WooCommerce end, which will send the notification to the customer.
- In the scenario that you have items fulfilled by multiple POD providers in the same order, any item that gets completed and shipped will update the order as fulfilled, and it will send a notification to your customer. WooCommerce won't send any additional shipping notifications once the rest of the items are completed and shipped.
There is an option to set up email notifications that are sent from Sensaria. Still, if you have set up email notifications both from Sensaria and from the WooCommerce platform, your customer will be receiving duplicate shipping notification emails. We suggest enabling email notifications for only one of those two options.