Our BigCommerce integration is coming soon! Get ready by learning how to connect your BigCommerce store and start using Sensaria with your BigCommerce shop!
Check out how to get started with integrating and using BigCommerce with Sensaria!
- Connect my BigCommerce store
- Create new products
- Sync existing products
- Edit Products
- Setting up BigCommerce Shipping
Connect my BigCommerce store
Connecting your BigCommerce store is quick and easy. Please follow the steps below to connect your store and start using BigCommerce with Sensaria.
1. To add the BigCommerce store via the Sensaria Platform, go to your Stores page and click on the Connect new store button.
- You can also connect your BigCommerce store via the BigCommerce tab in the product hub.
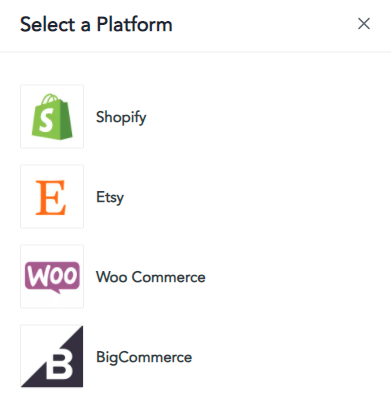
2. Click on the BigCommerce option as your platform.
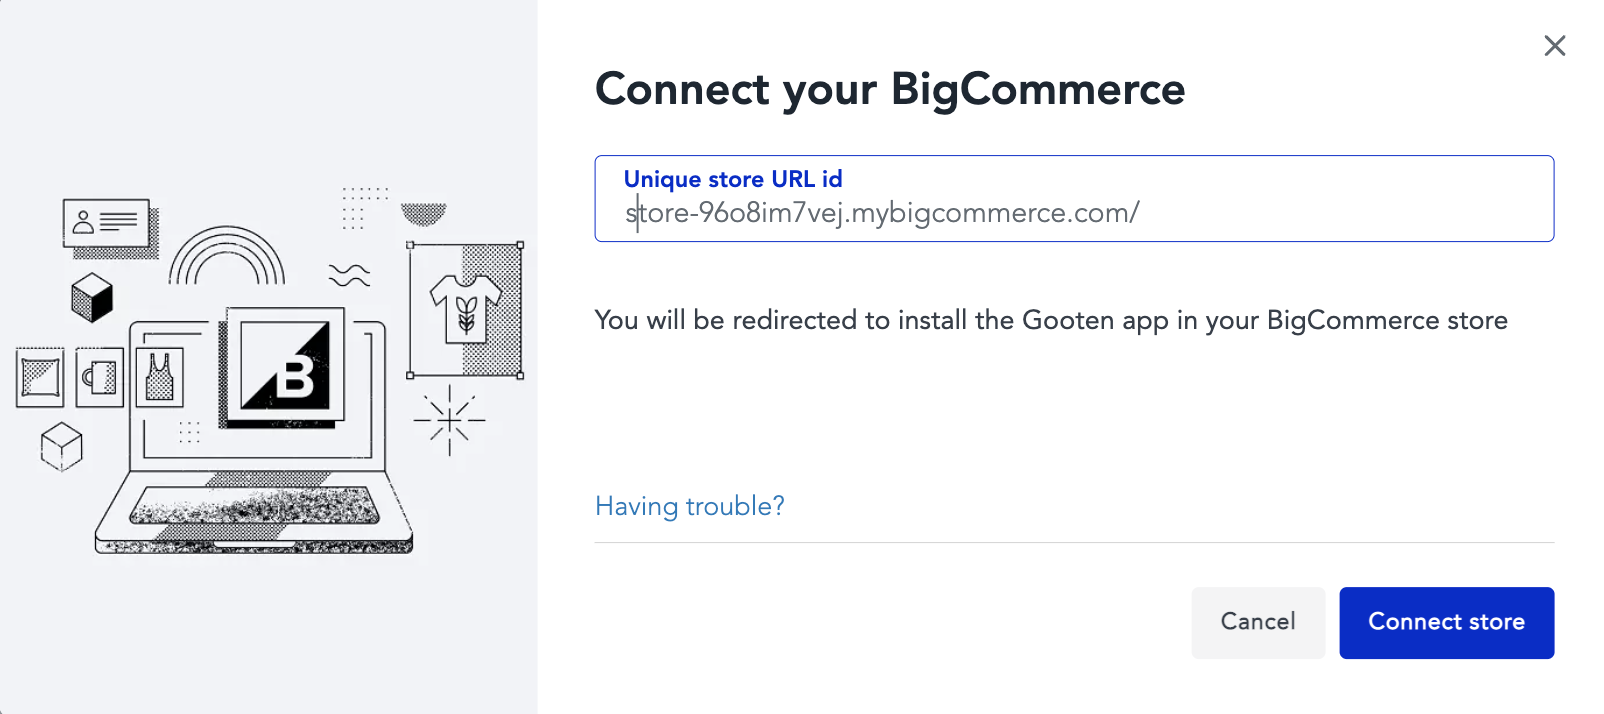
3. Then, you can add your storename.mybigcommerce.com URL in Sensaria and hit the Connect store button for installation.
- Please be sure to fill out your "storename" followed by ".mybigcommerce.com" to ensure that the connection works. An example of a correct URL would be "store-a1b2c3def.mybigcommerce.com," as it includes the store name and the BigCommerce URL.
- If you're signing up for Sensaria for the first time and selecting BigCommerce as your store integration, please be sure to fill out the subdomain correctly similar to the example above.
However, you can do this for however many stores you want to install, but please note that each BigCommerce store can only be connected to a single Sensaria account.
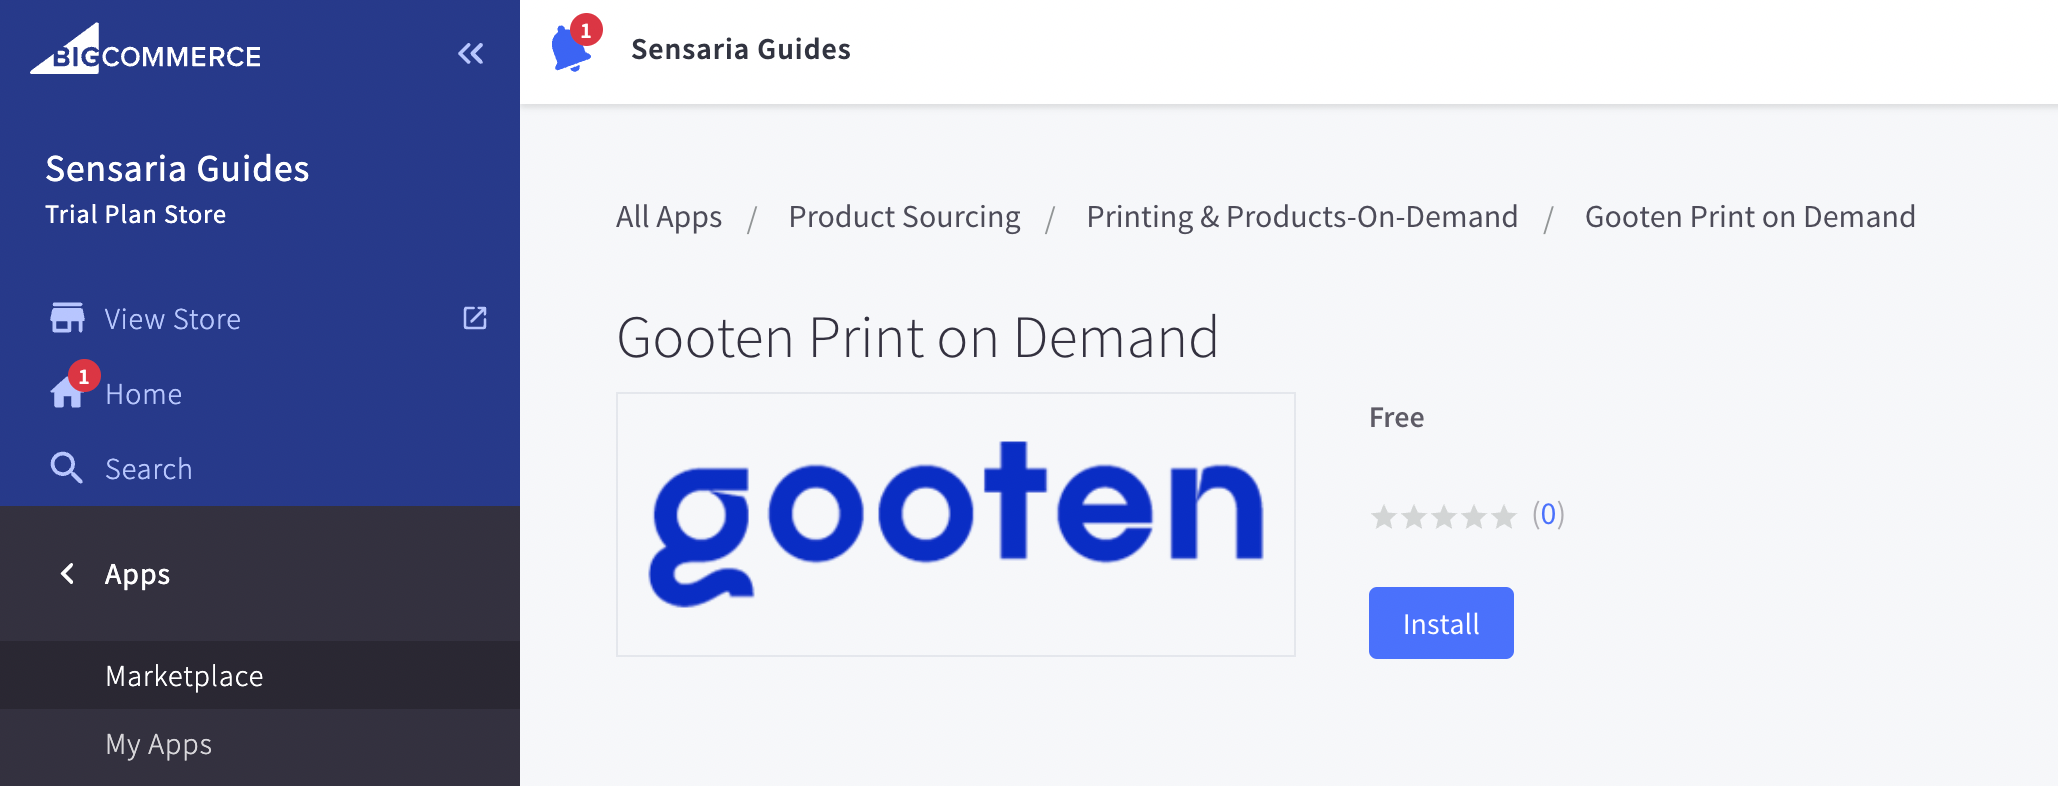
4. After you click the Connect store button, you will be redirected to log into your BigCommerce account.
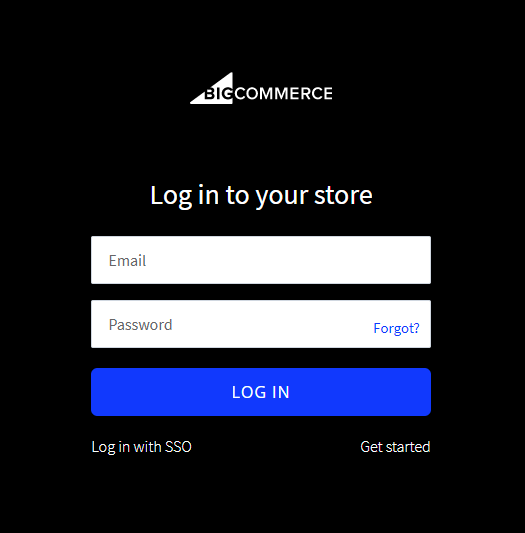
5. Log into your BigCommerce account if you have an existing store, and then you'll be asked to install the Gooten app for BigCommerce. Click on the Install button.
6. Click on the Confirm button to allow Sensaria to access your BigCommerce account.
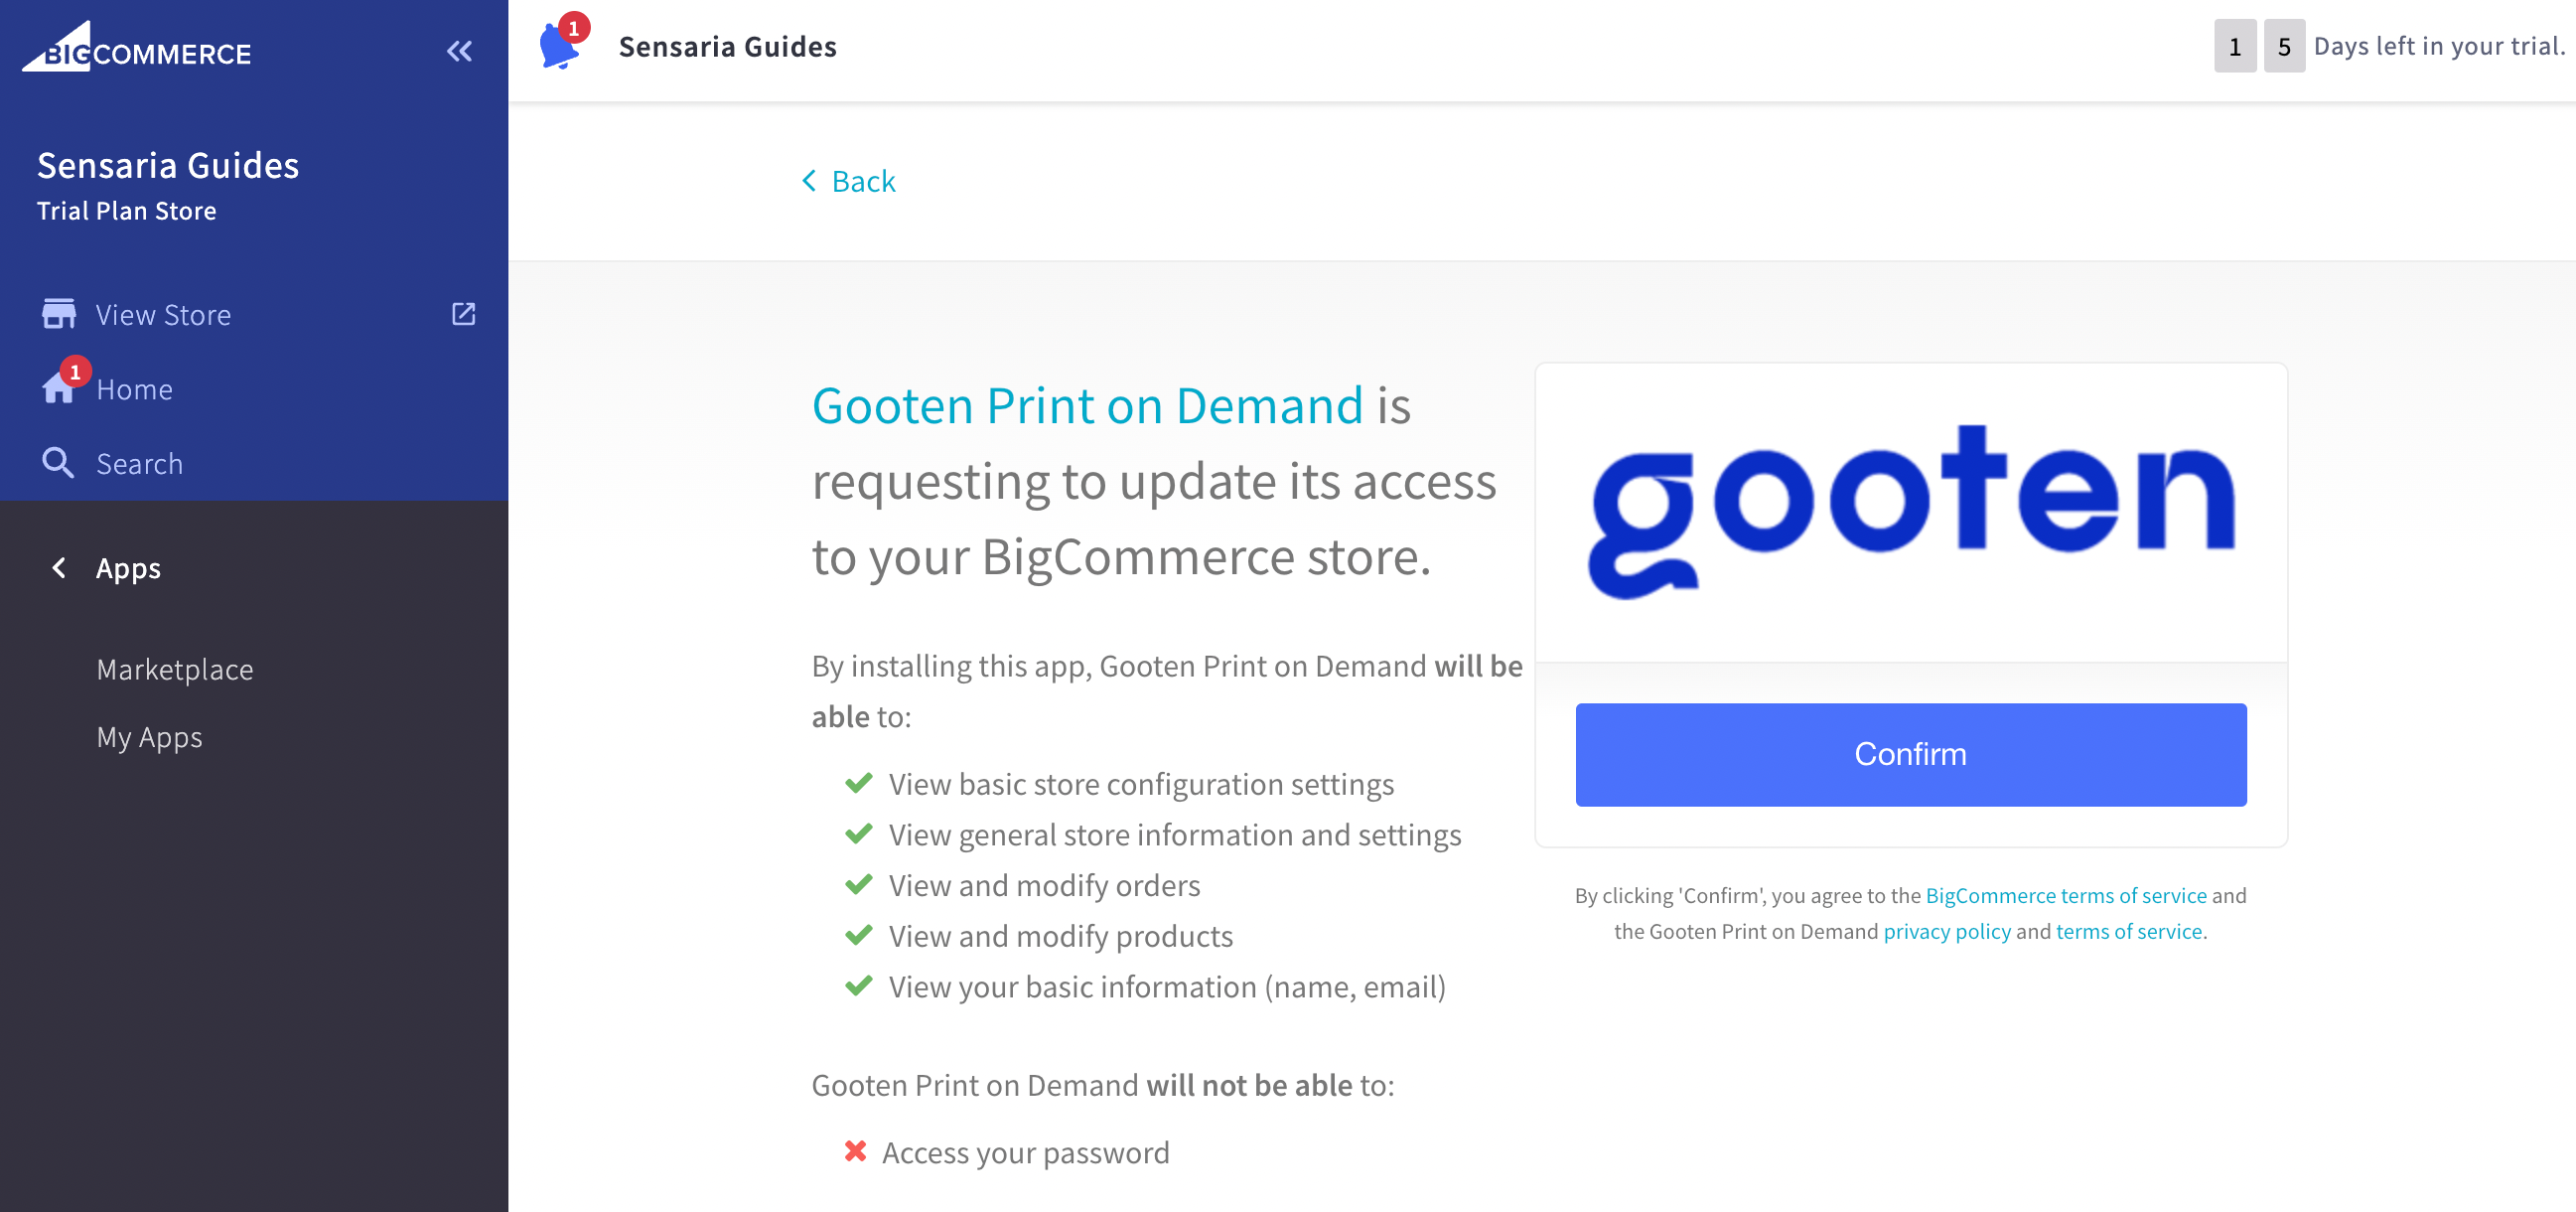
7. Once confirming the installation of the Gooten app in BigCommerce, You have the option to be redirected back to Sensaria by clicking the Go to Sensaria button.
- Your BigCommerce store is now connected!

Additionally, check out our brief tutorial video:
Create new products
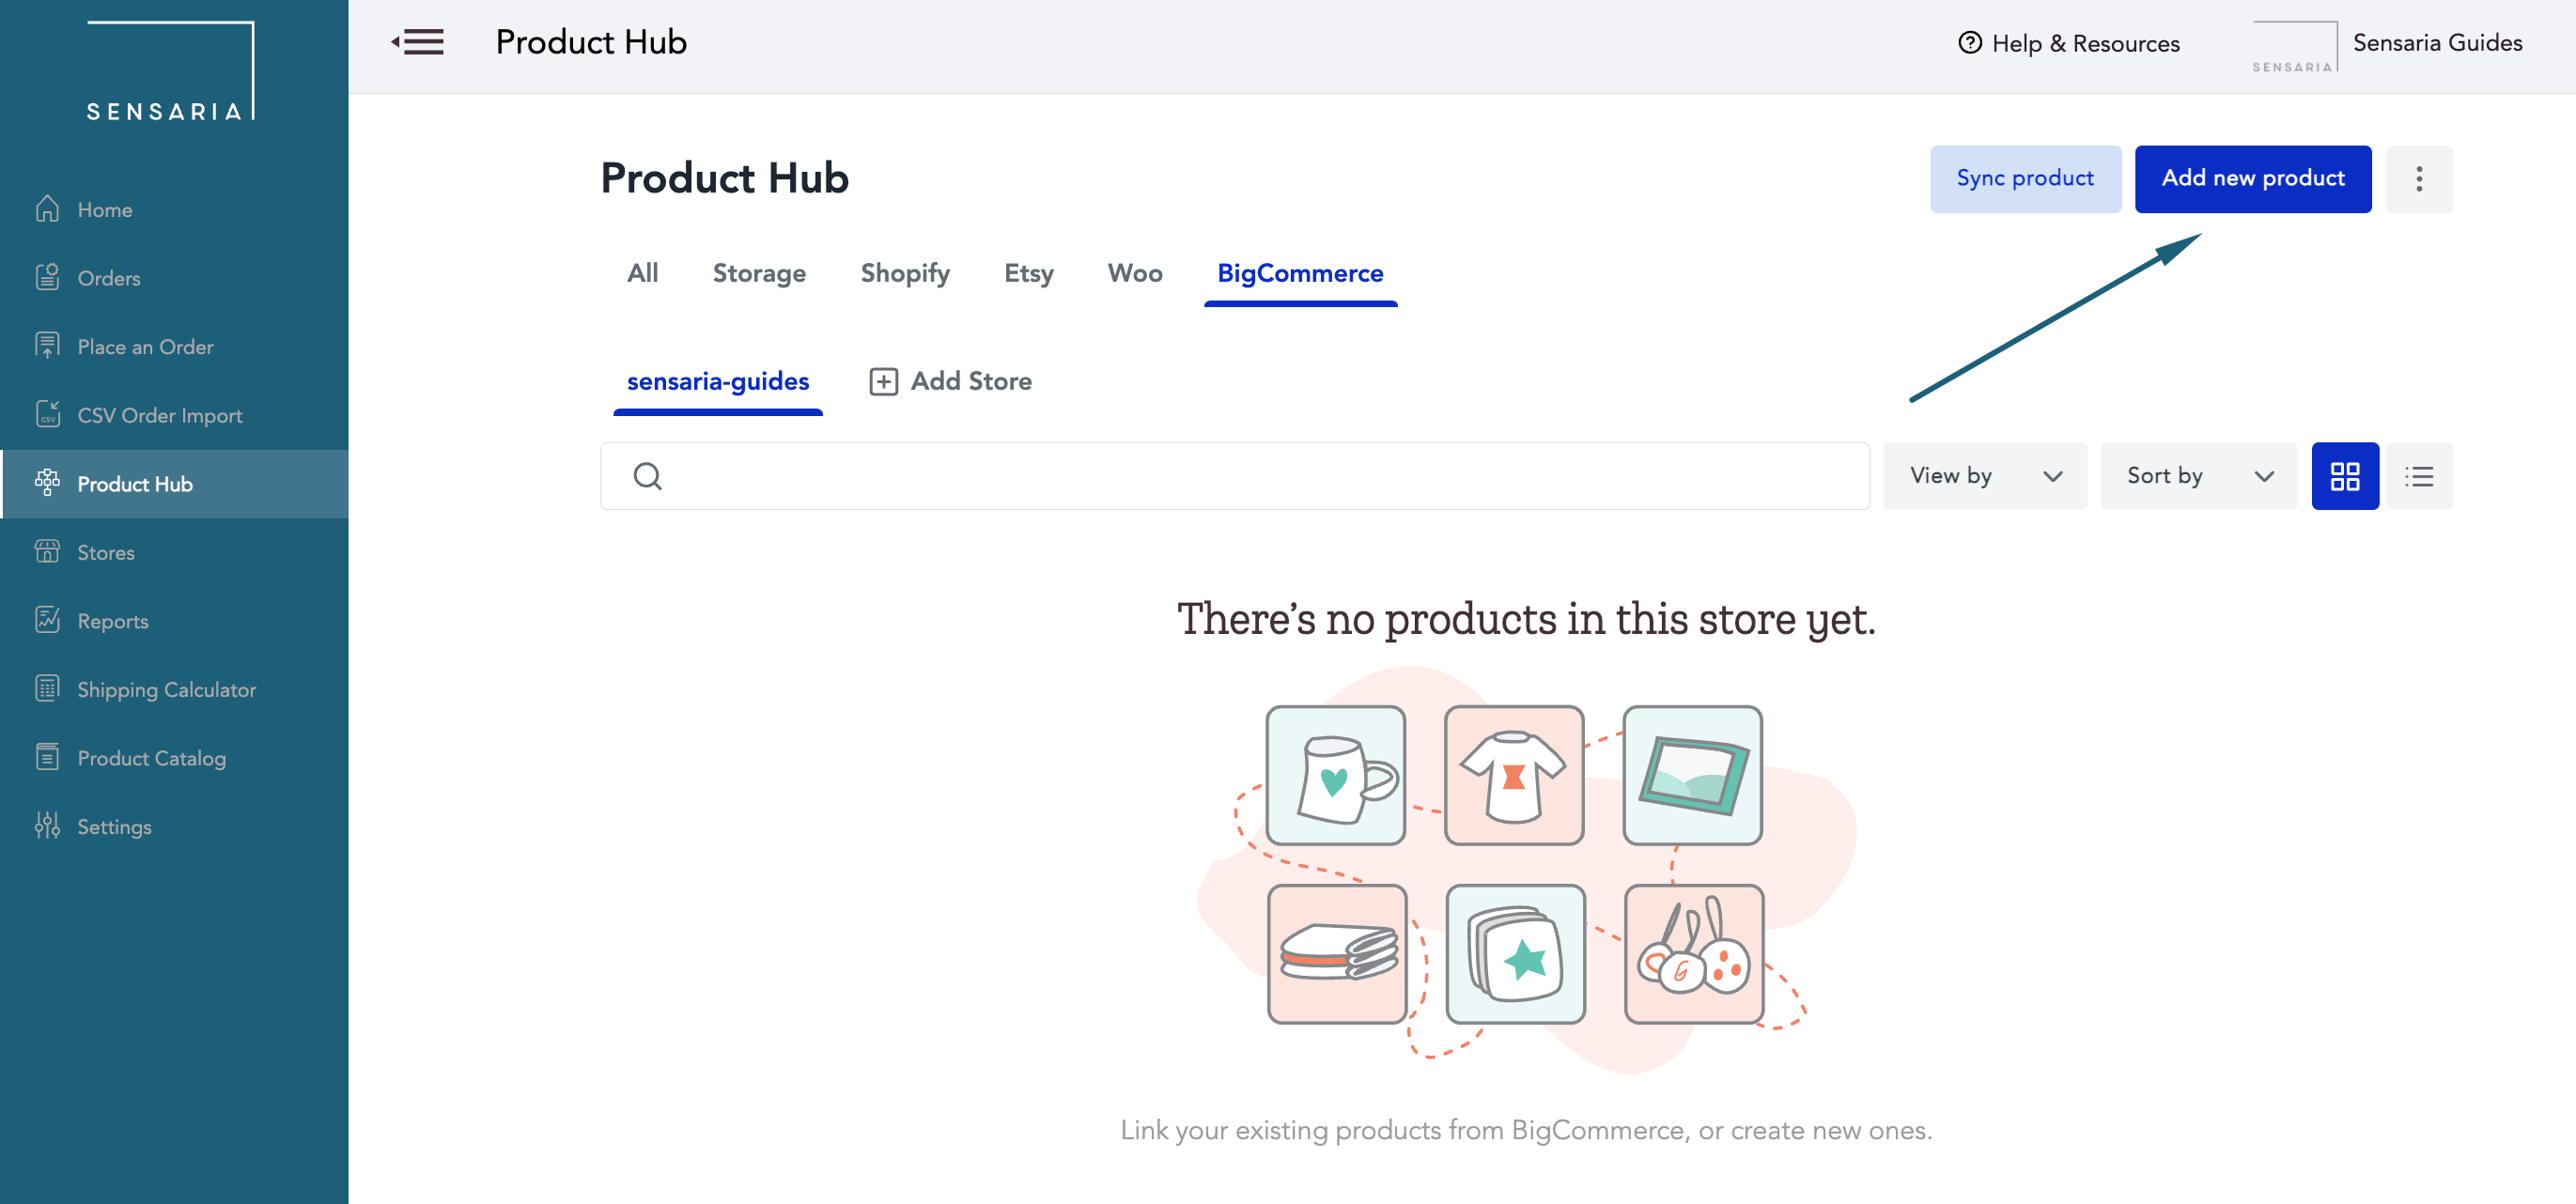
Once your store is connected to Sensaria, you can create new products in the Product Hub.
1. Start by clicking on the Add New Product button and work your way through the Product and Design pages until you get to the last step on the Product Details page.
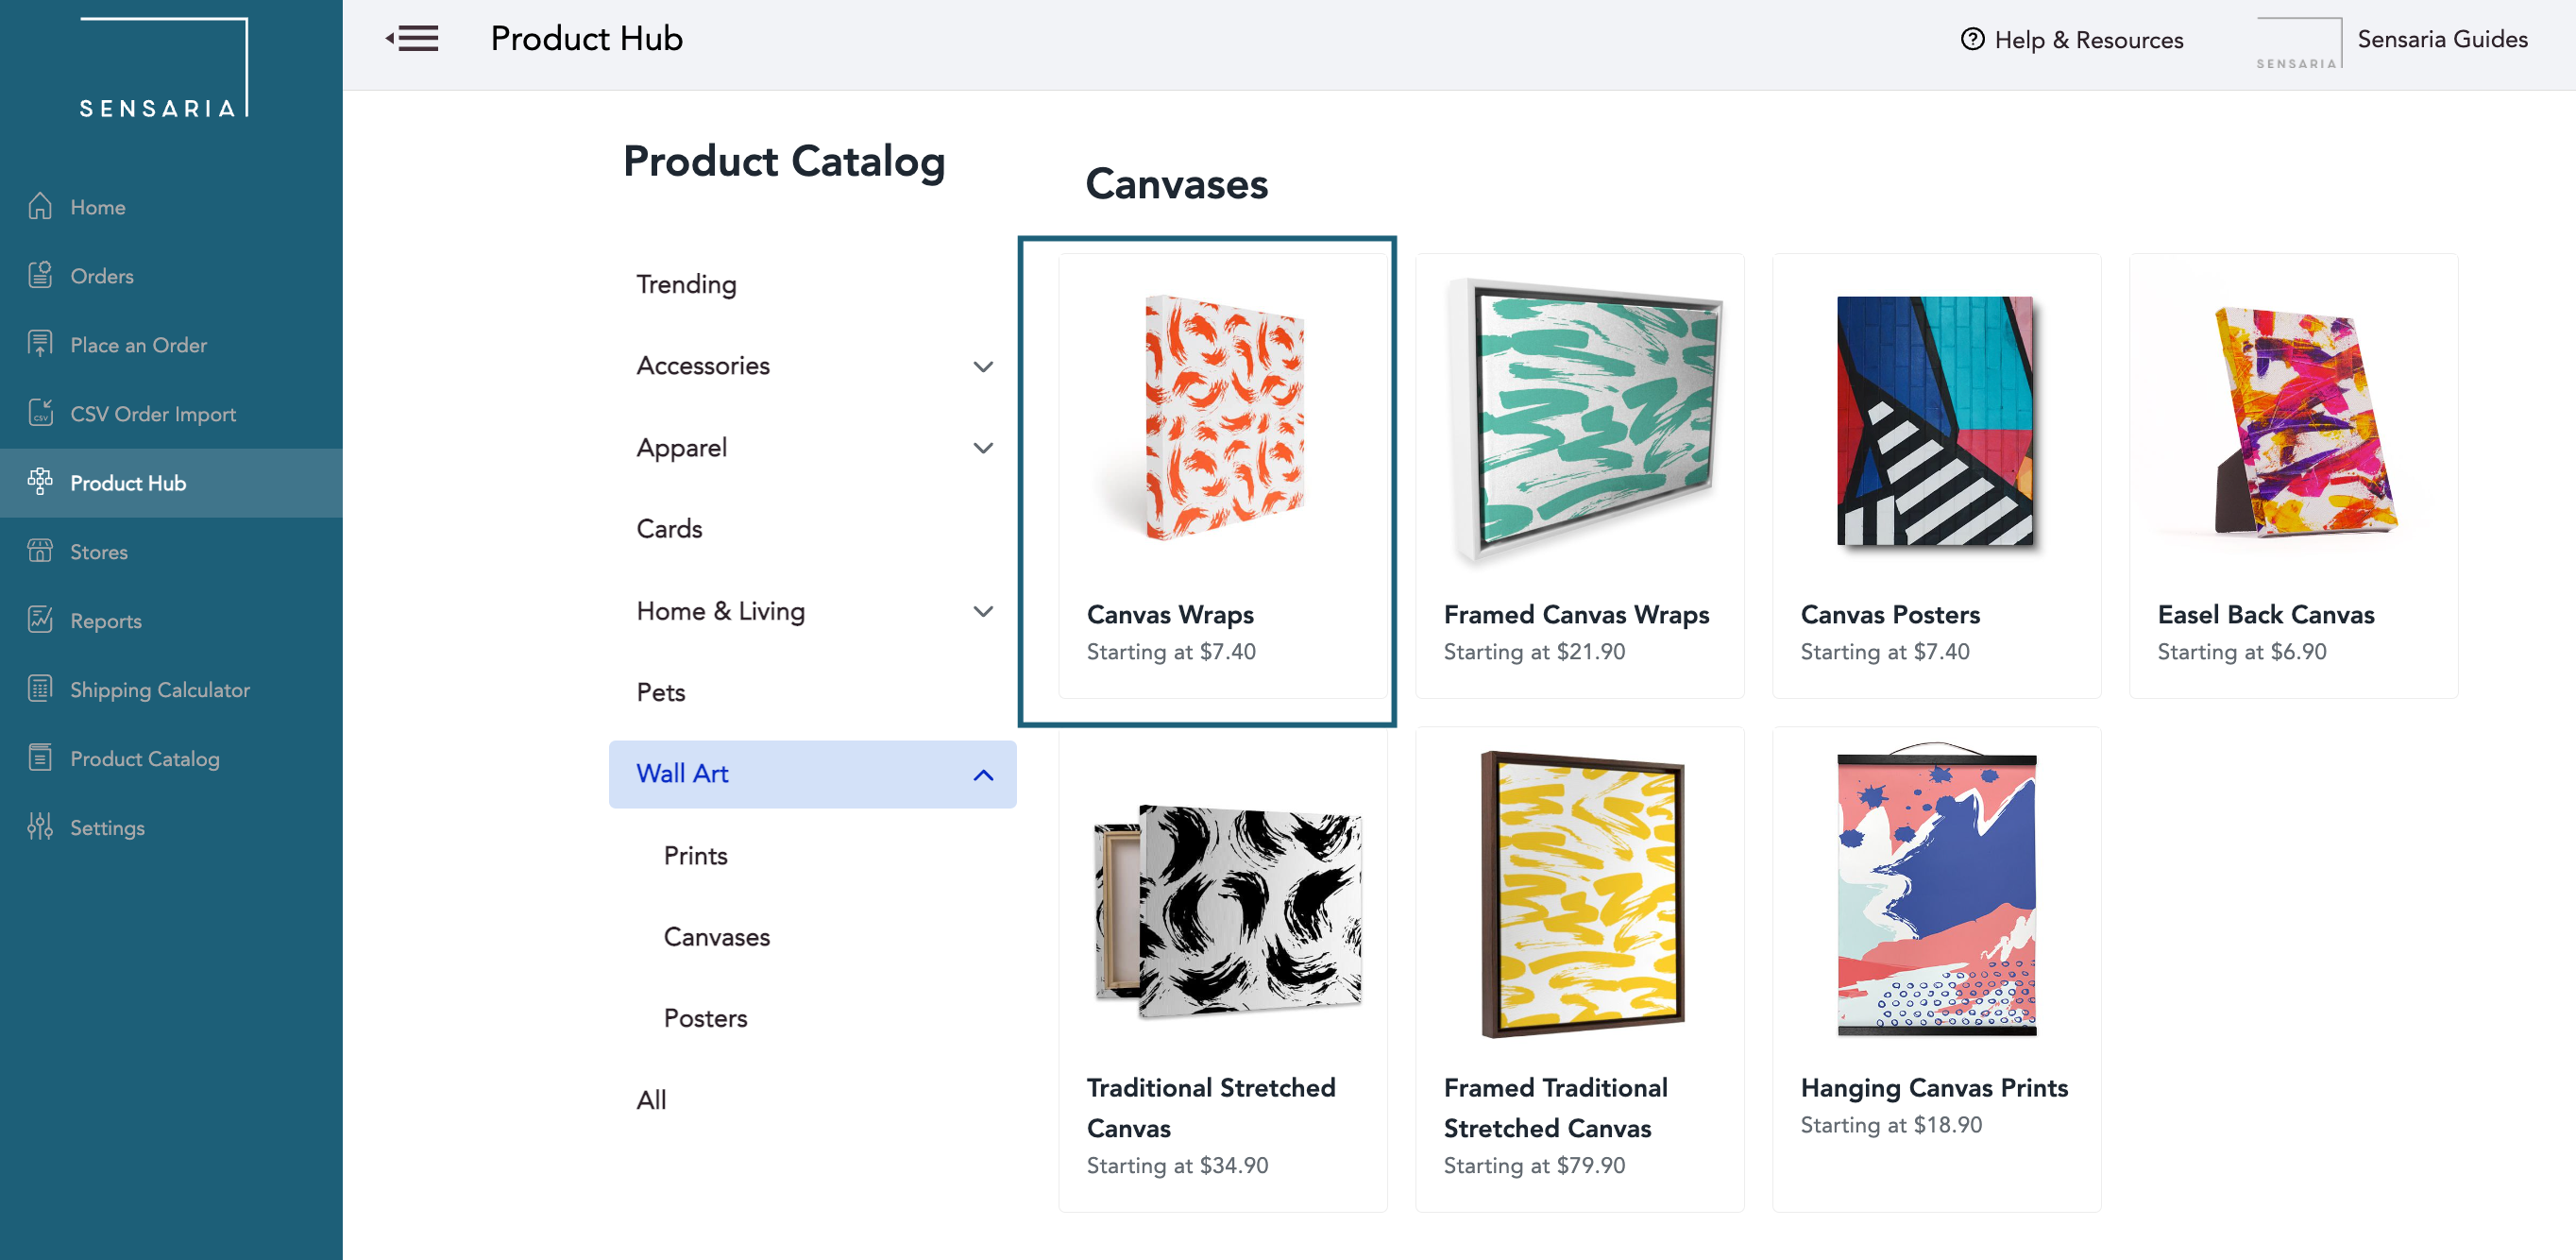
2. Select the product you want to create by highlighting the product and clicking the Select Product button.
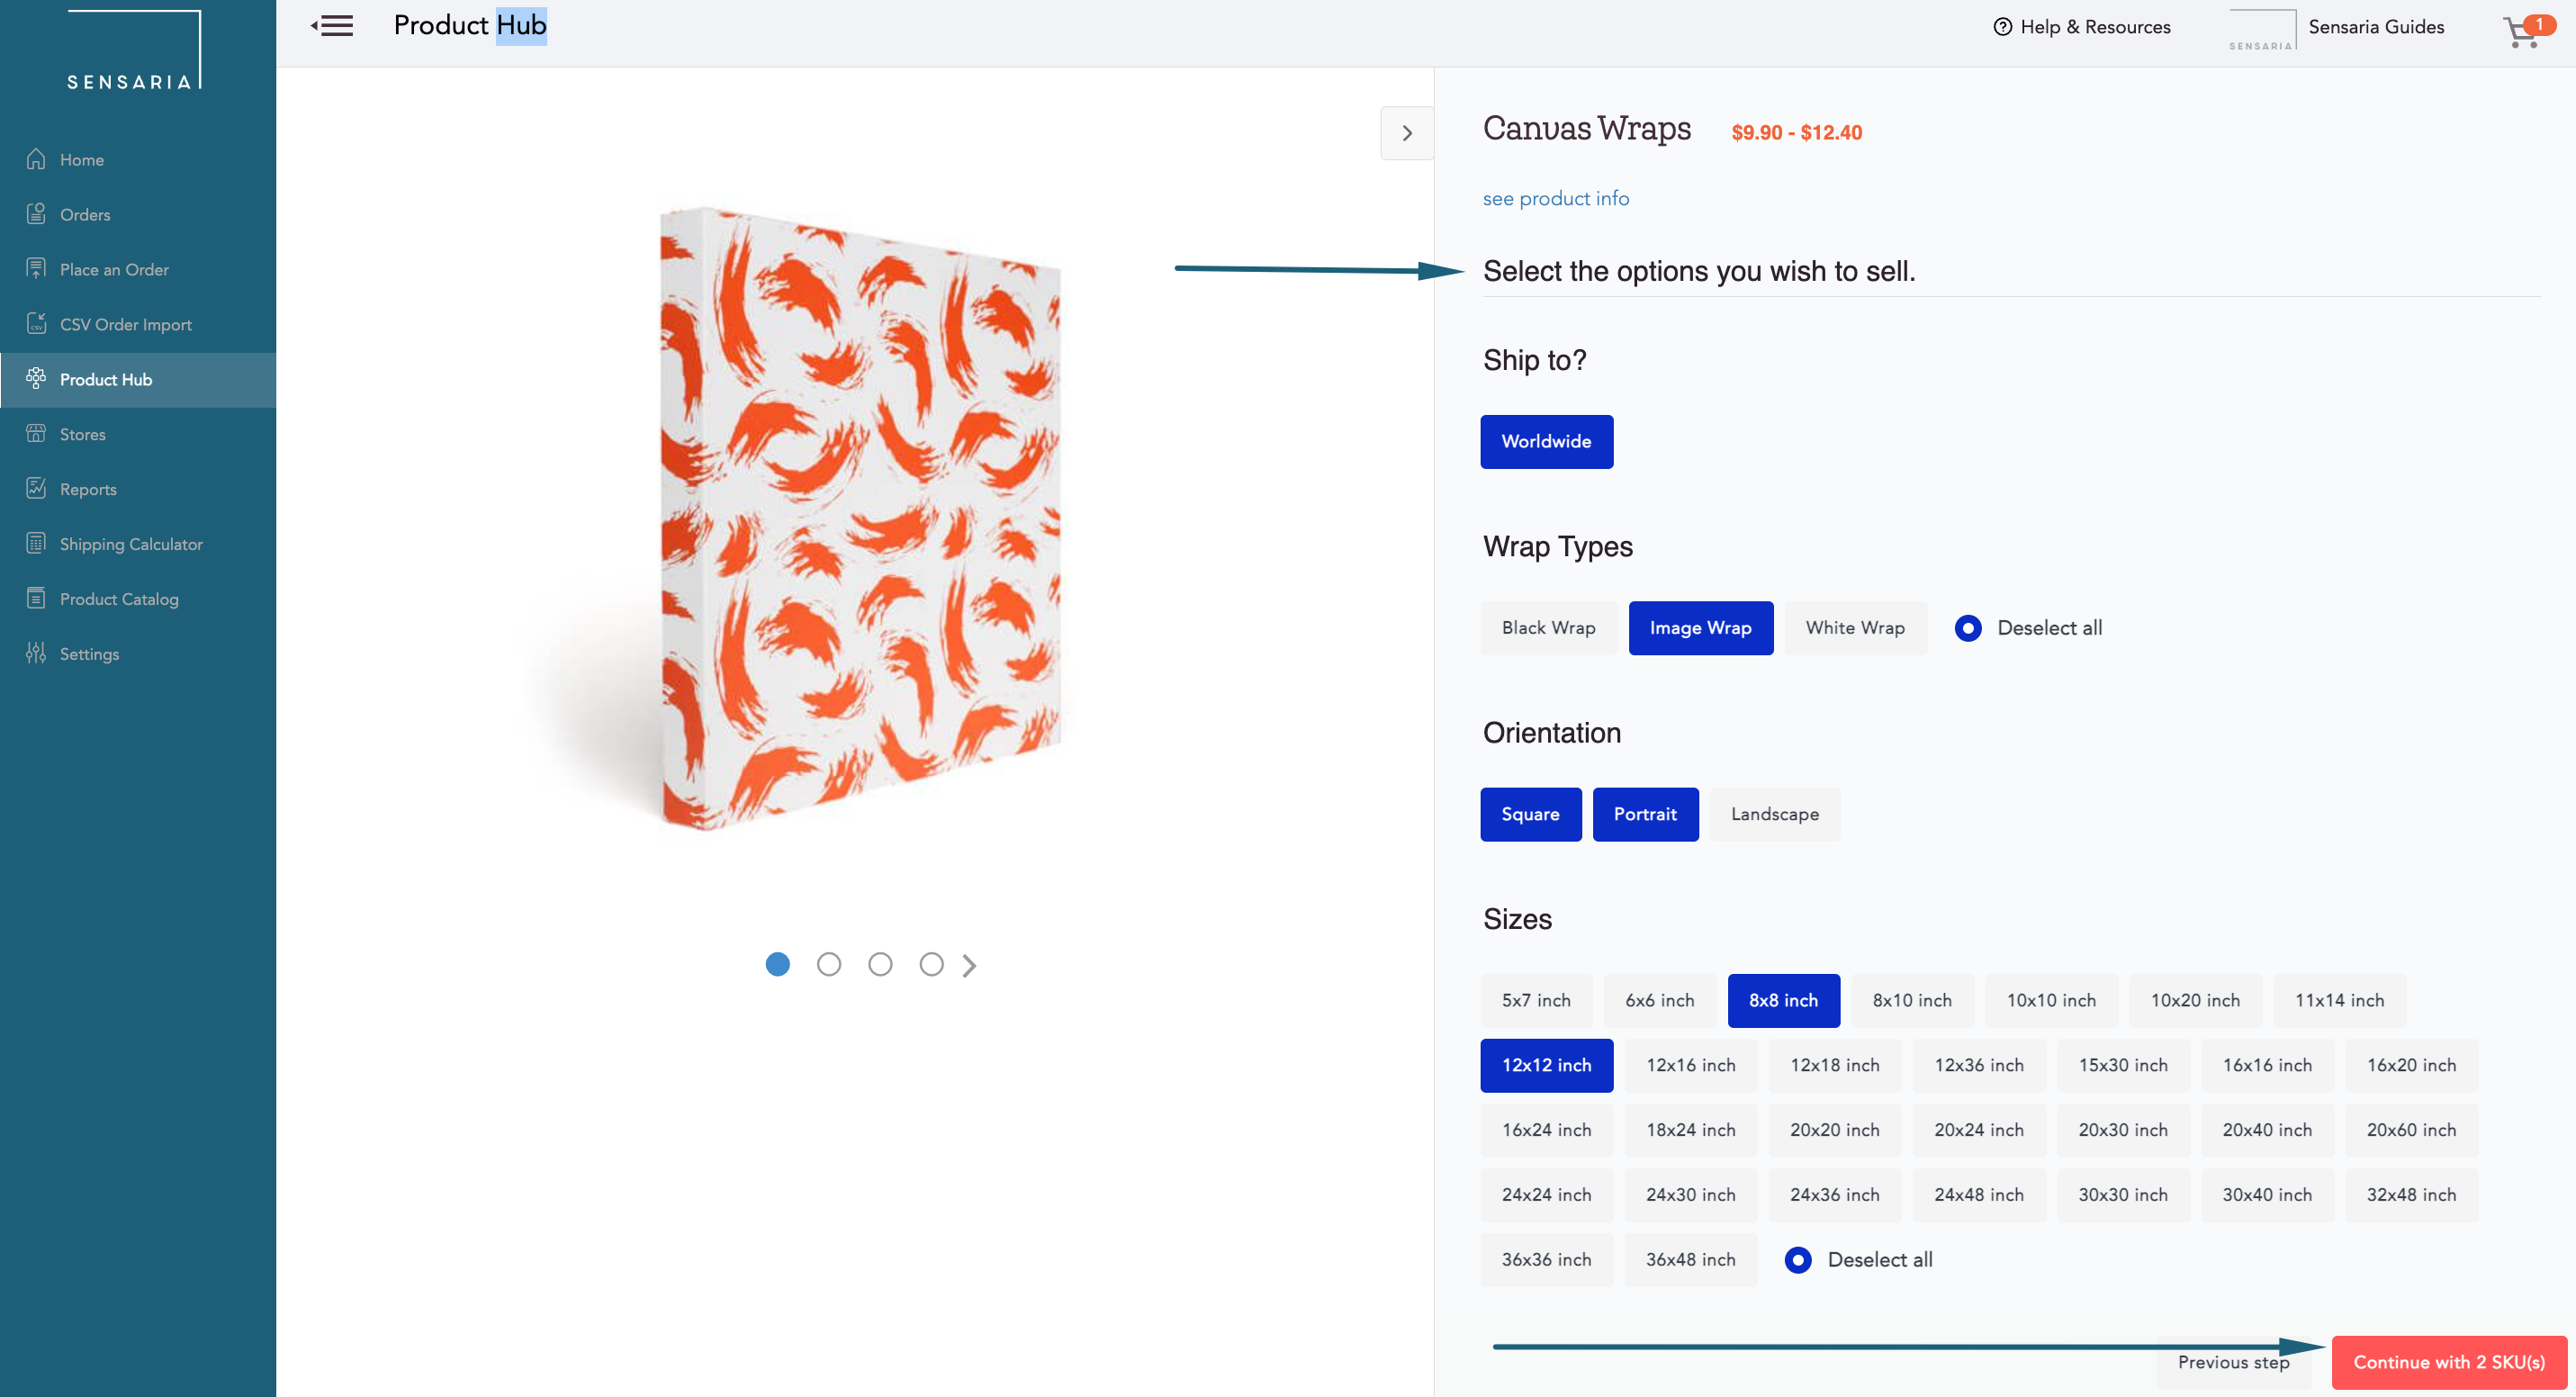
3. Use this page to select the different variants you want to create for the product. Click the Continue button once done.
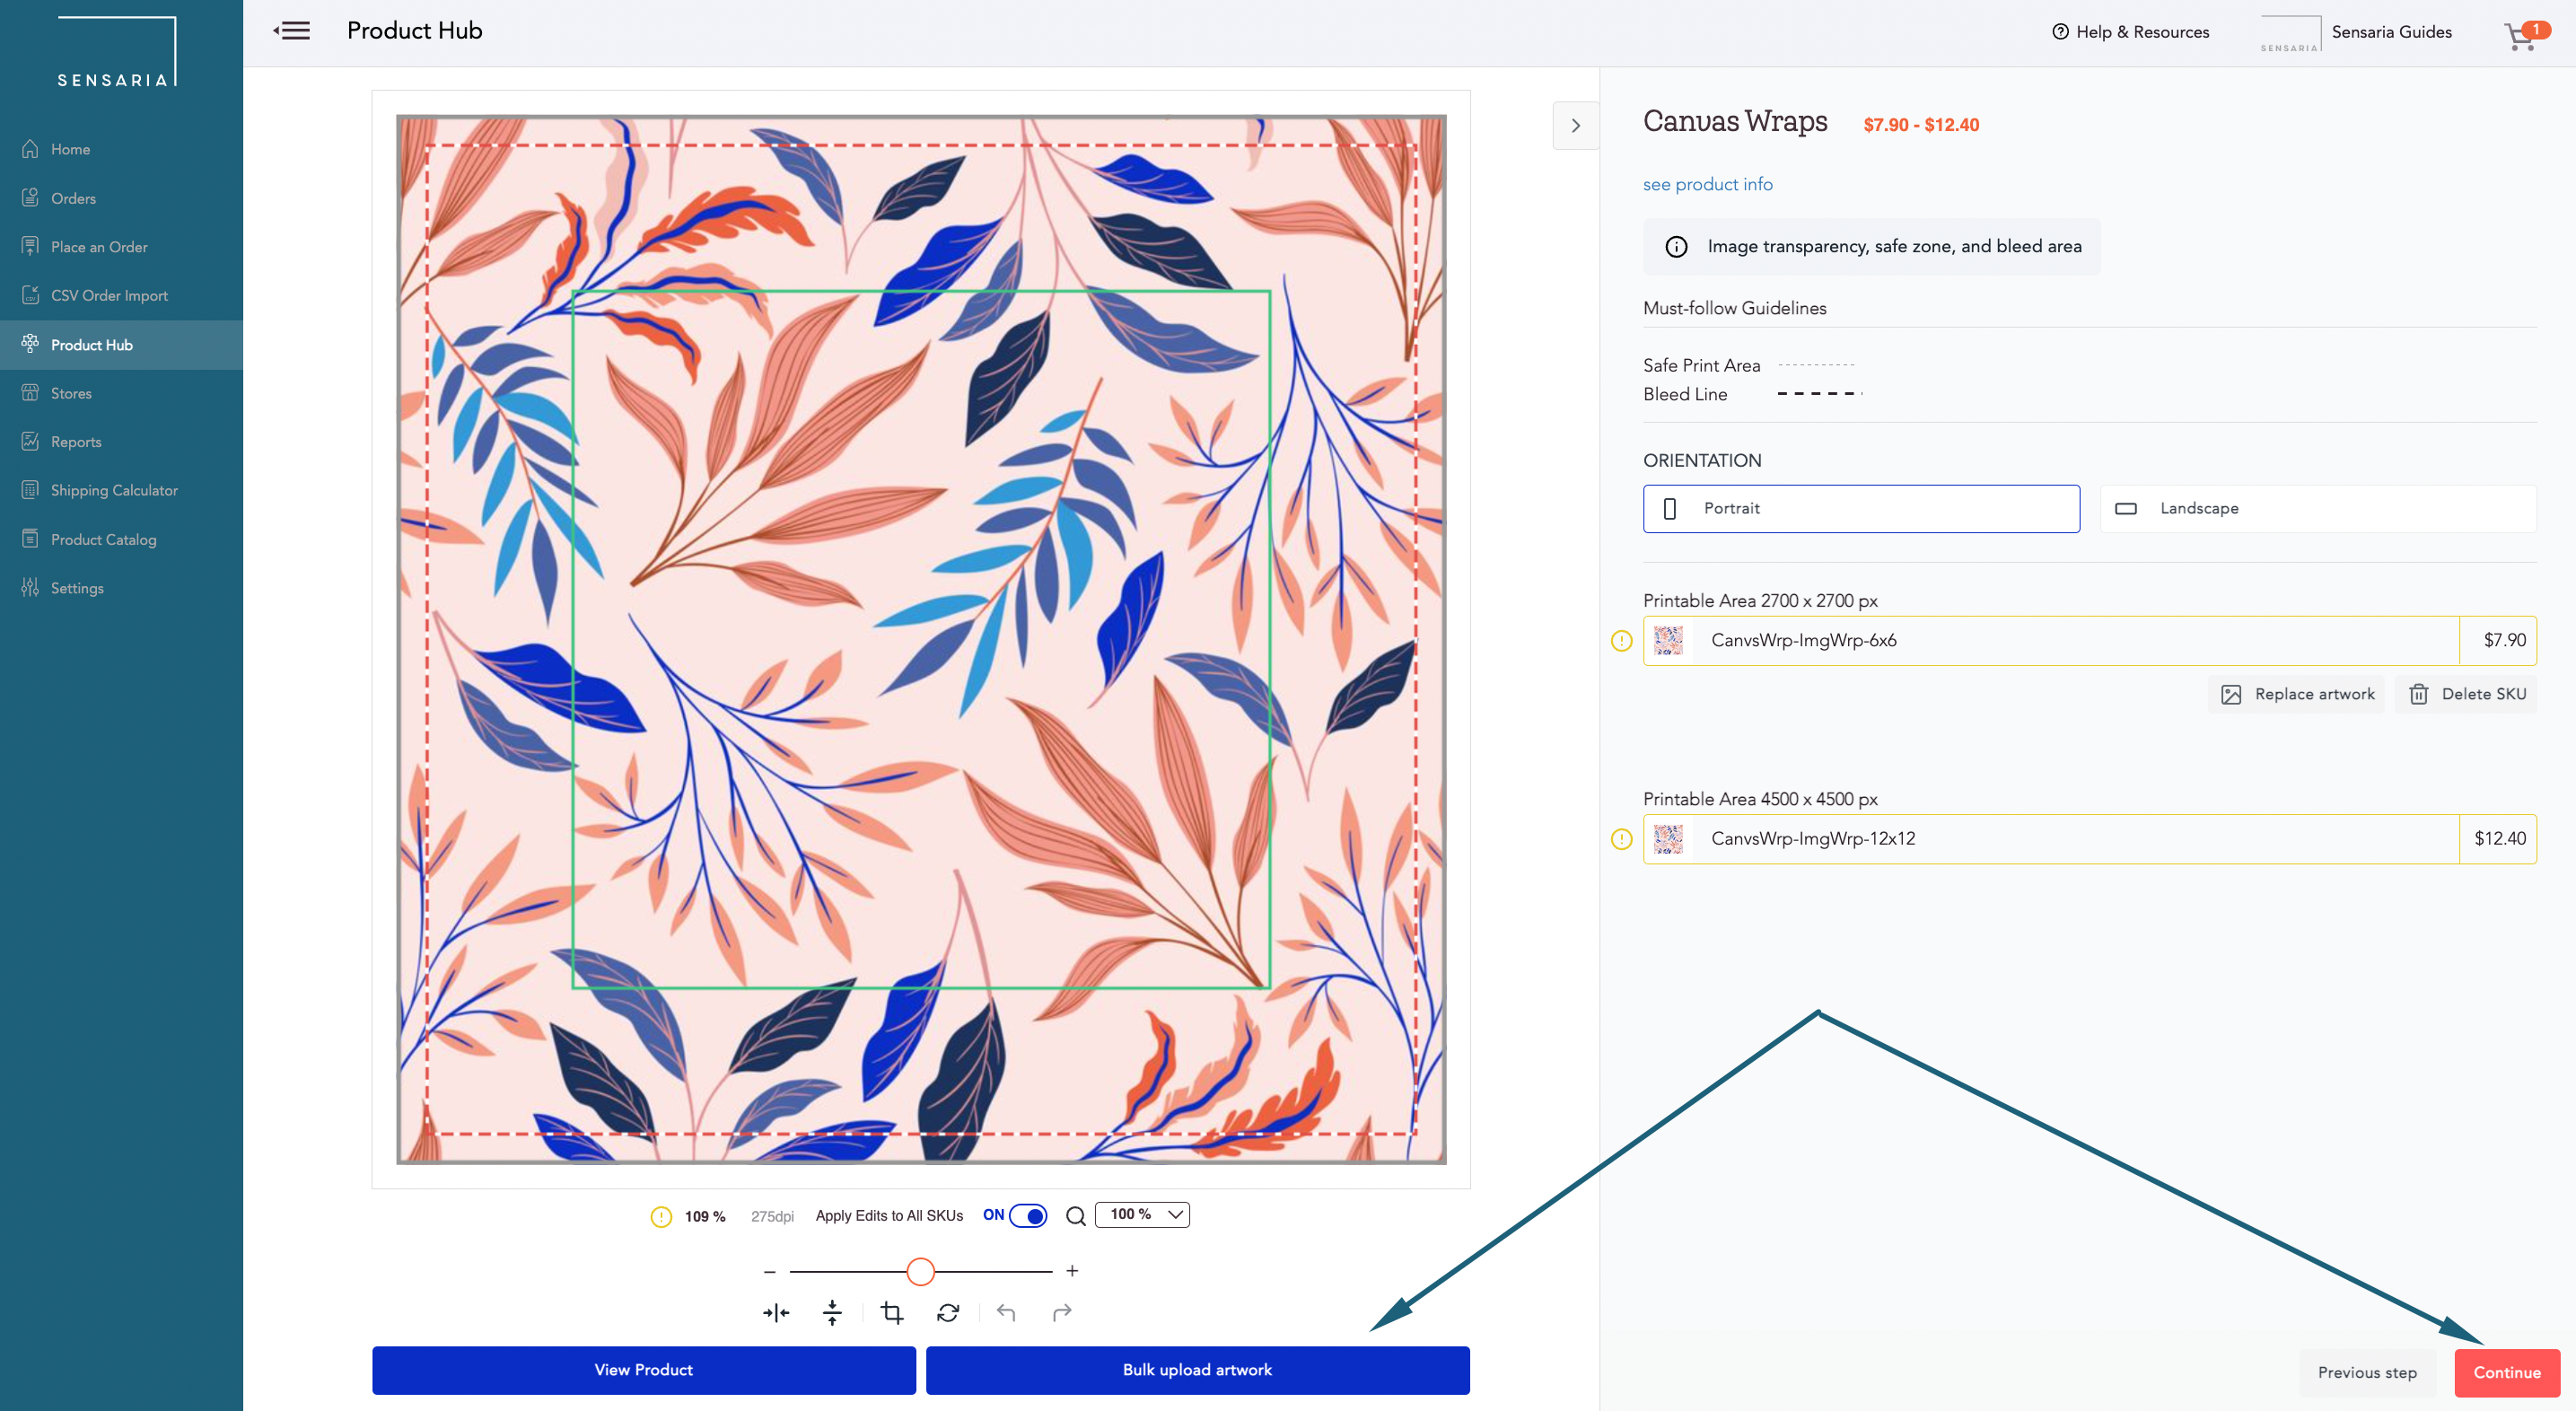
4. Our Image Editor page is where you can upload your artwork design to your product using the Bulk upload artwork button.
- Here, you can organize and edit how your design looks on each SKU product that you've selected for the product.
After you're done editing your artwork on your product, click the Continue button.
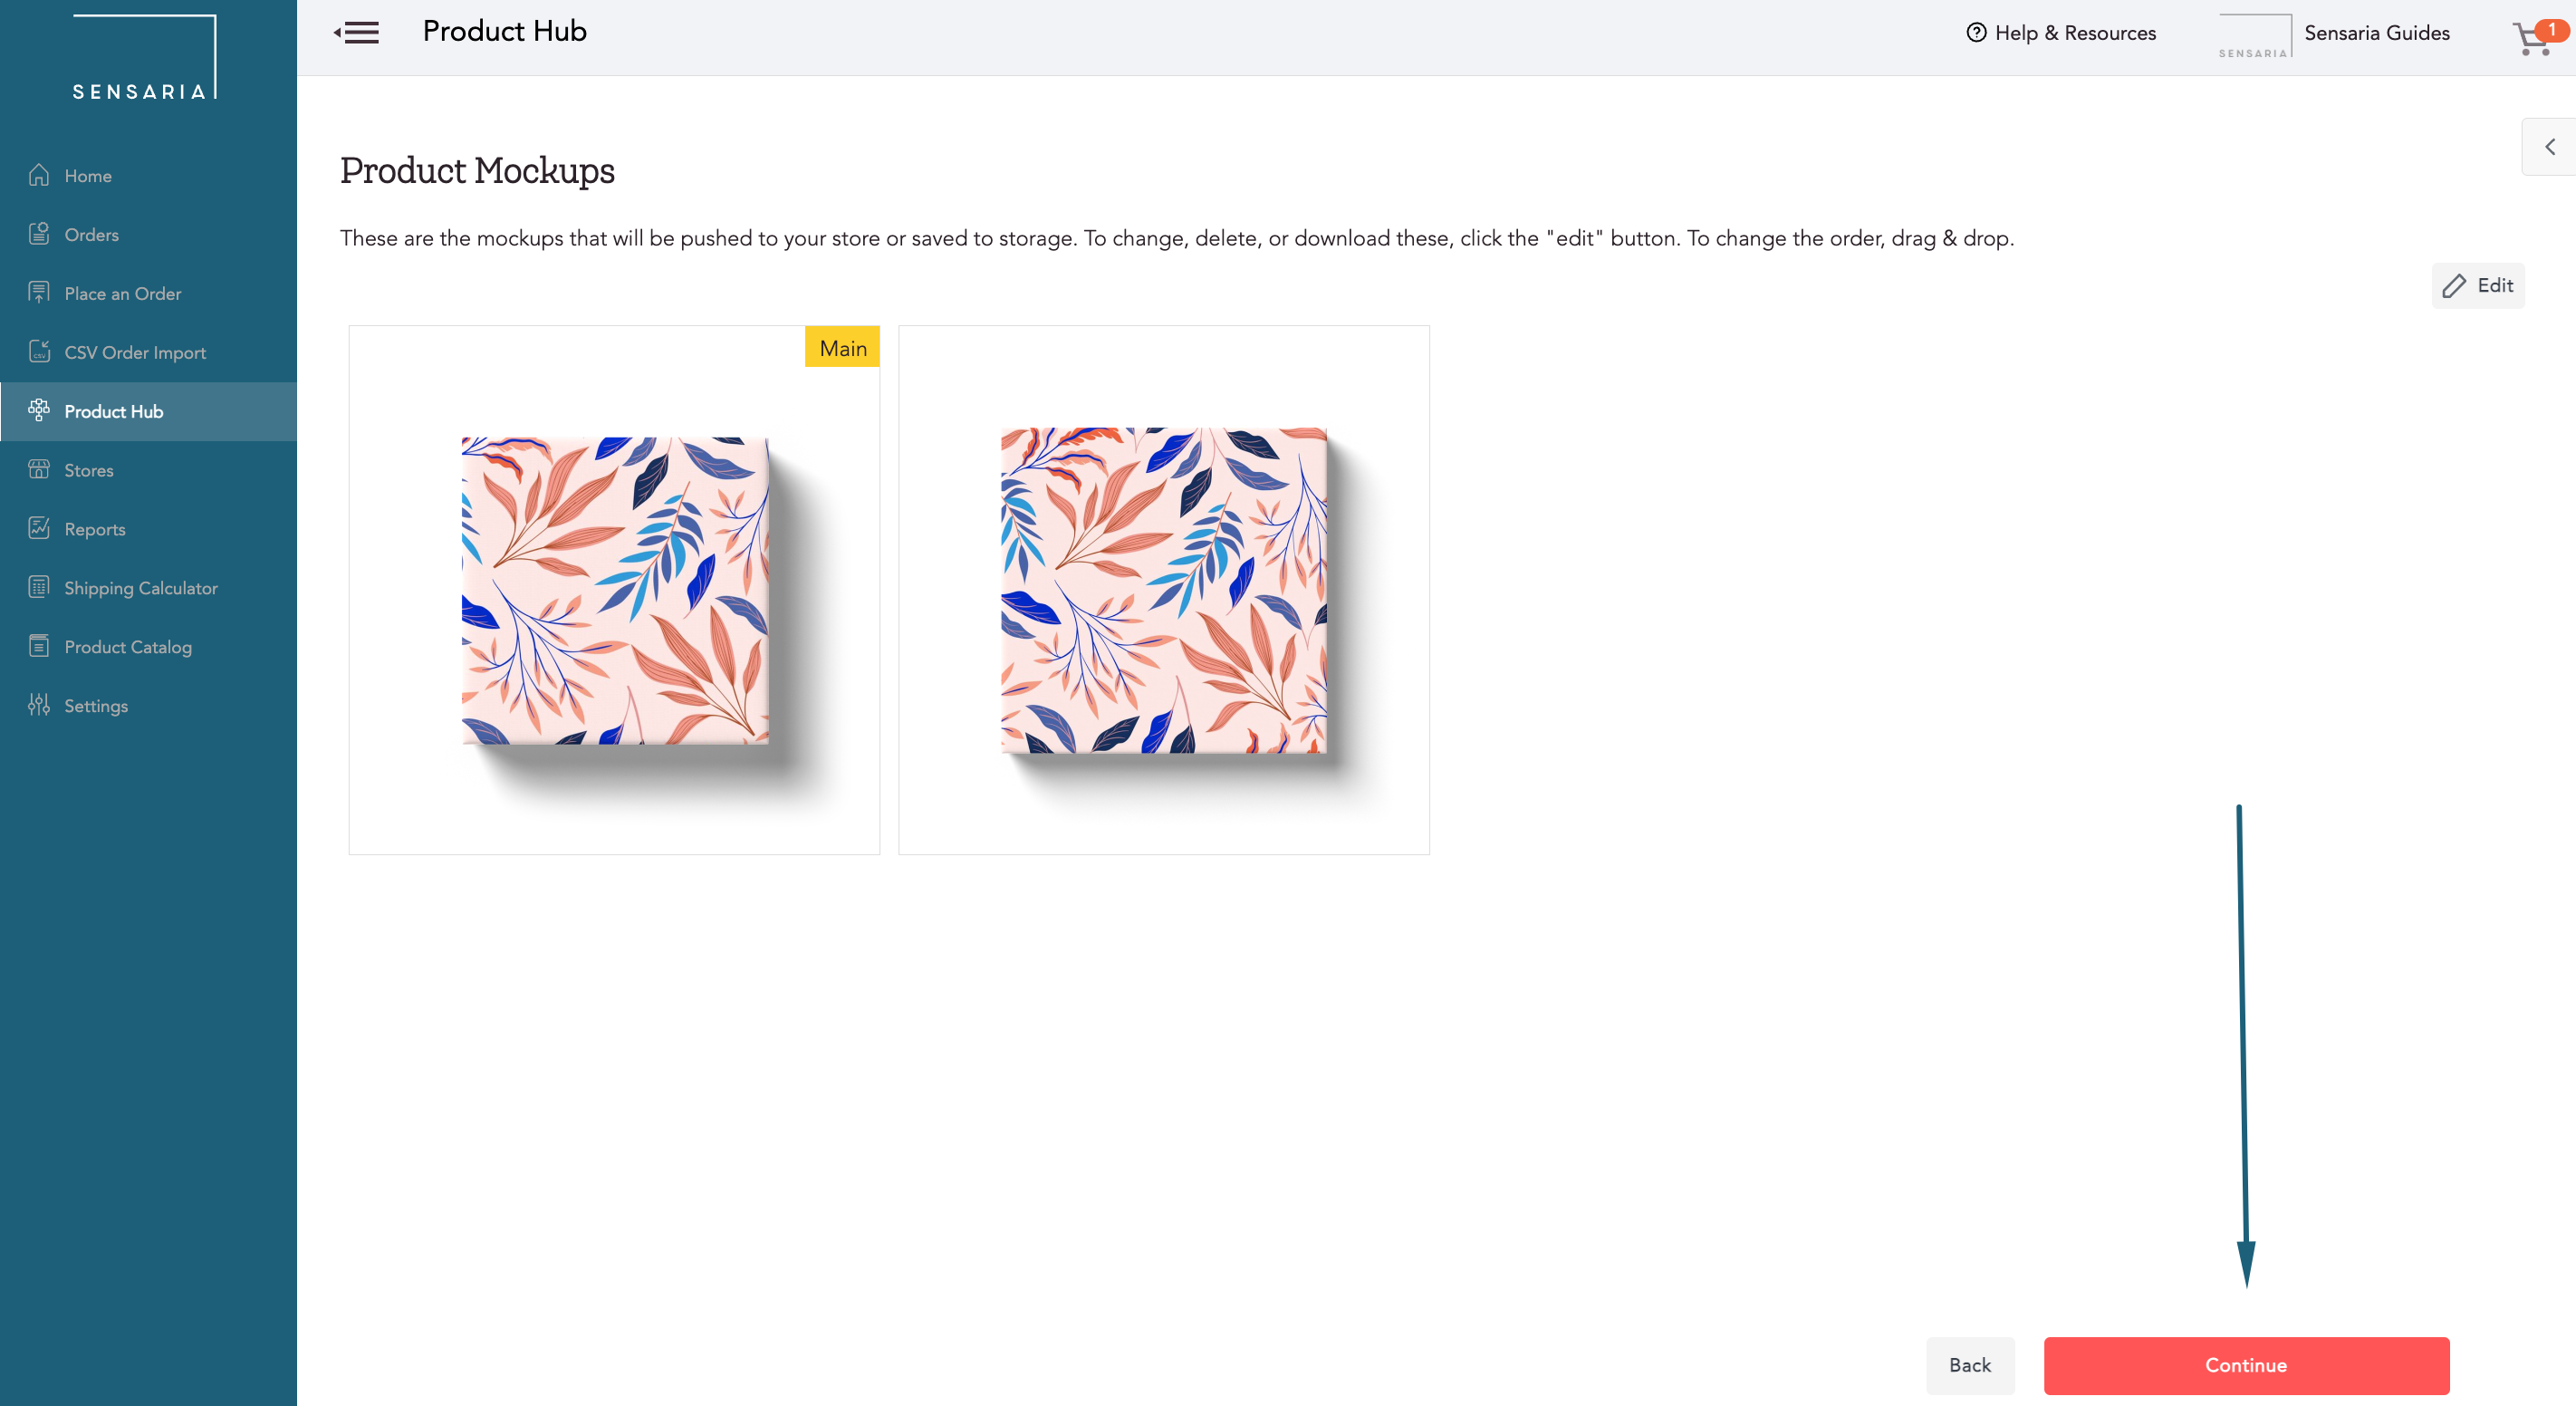
5. This will bring to the product mockup page to get a preview of your artwork design looks on your product.
- If you don't like how it looks or need to make any changes, you can click on the Back button to go back to the Image Editor page.
Click on the Continue button once you're satisfied.
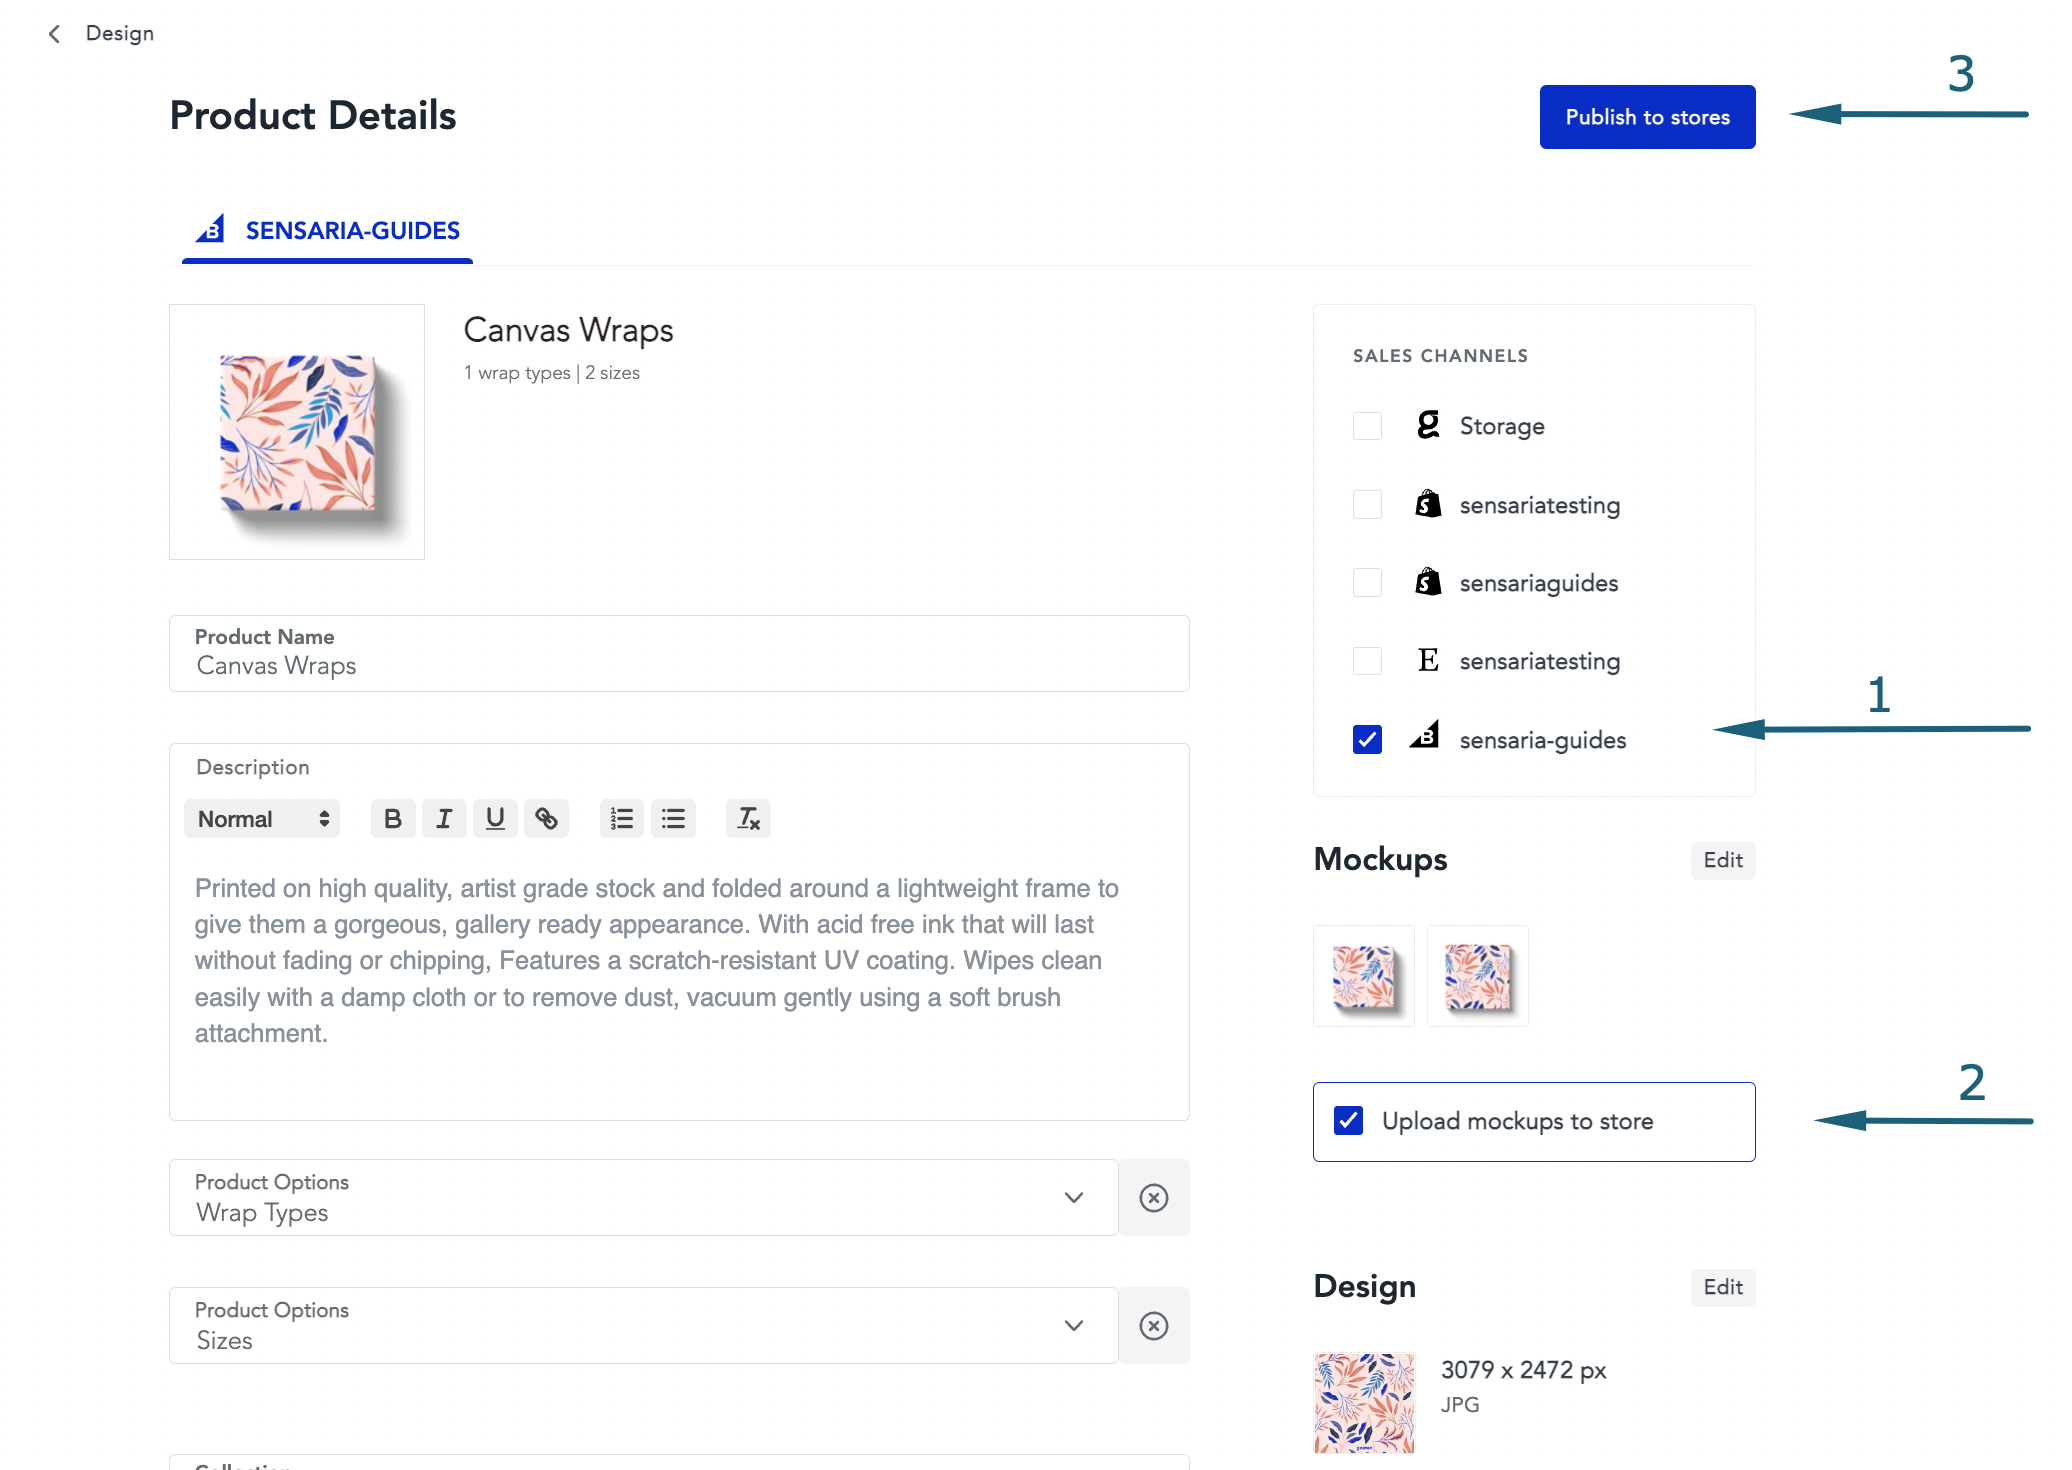
6. This is the Product Details page where you can rename your new product, add a description for the product, select different product options, push your product to your store as a draft, set your prices for the product, and manage your variants before publishing the product to your store.
- Suppose you have a product category required for your BigCommerce account. In that case, you'll need to use the Collection dropdown list to select the product collection. You must select at least one collection if this is required.
- You can select the Push to store as a draft option to publish the product as a draft so that you can make edits before making it public in your store.
- To create this product for your BigCommerce store, select your store in the Sales Channels section.
- Make sure to have the Upload mockups to store the option selected.
Once you're done making changes to your product details, click on the Publish to stores button to finalize the process.
7. Now, your product will be created for your BigCommerce store and seen in the Product Hub.
8. If you go to your BigCommerce store and preview the product in your store, your newly created product will be available and added to your Sensaria Product Hub and BigCommerce store.
For more details, please check out the following video tutorial:
Sync existing products
If you want to sync and add new variants to an already existing product listing in your BigCommerce store, please follow the steps below. Sensaria allows you to easily connect your store and sync products directly to and from Sensaria.
1. In BigCommerce, create/add any new variants for products to sync to Sensaria.
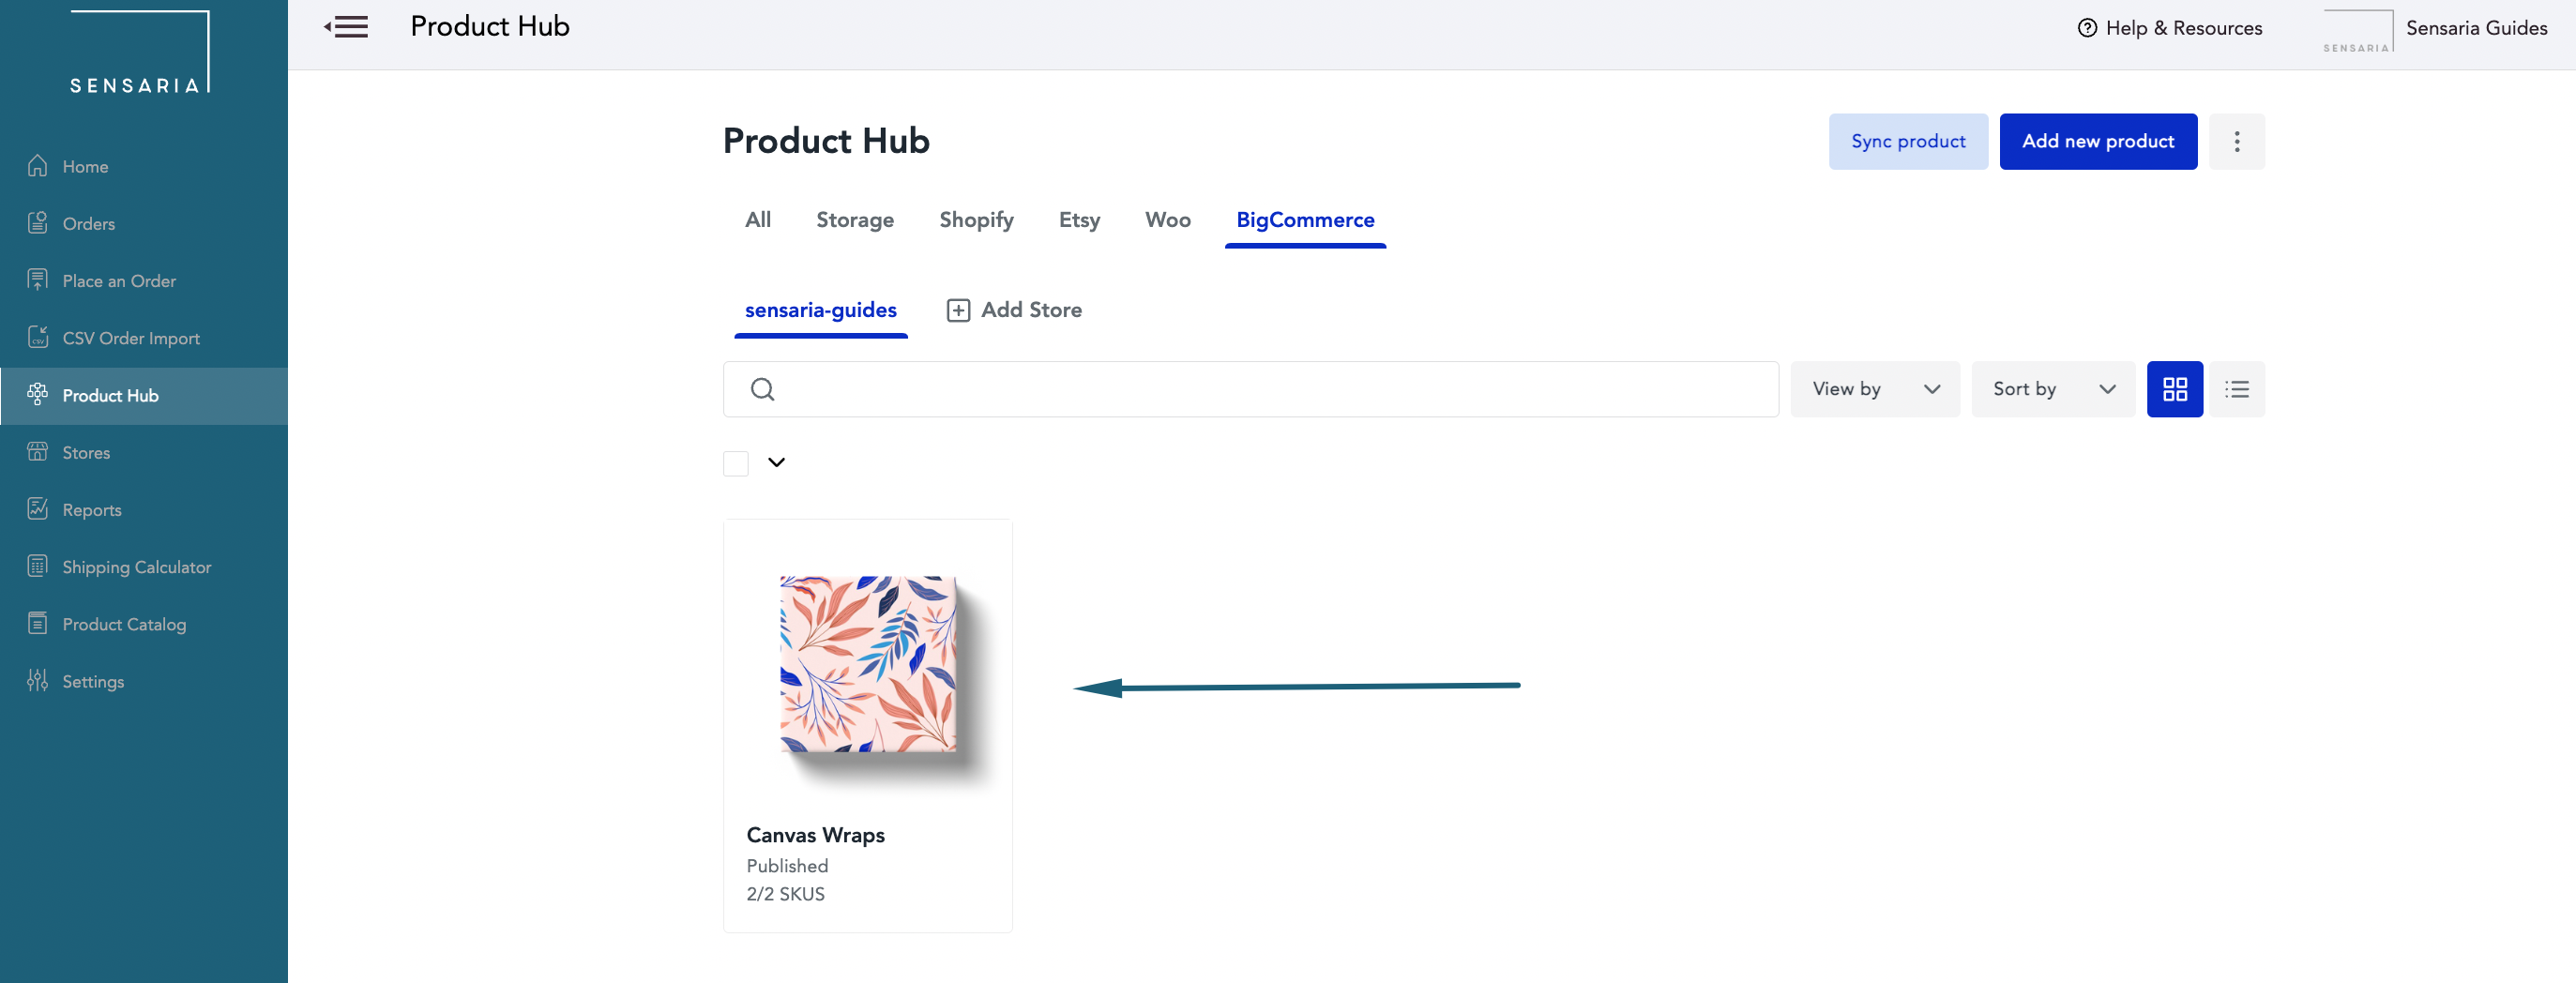
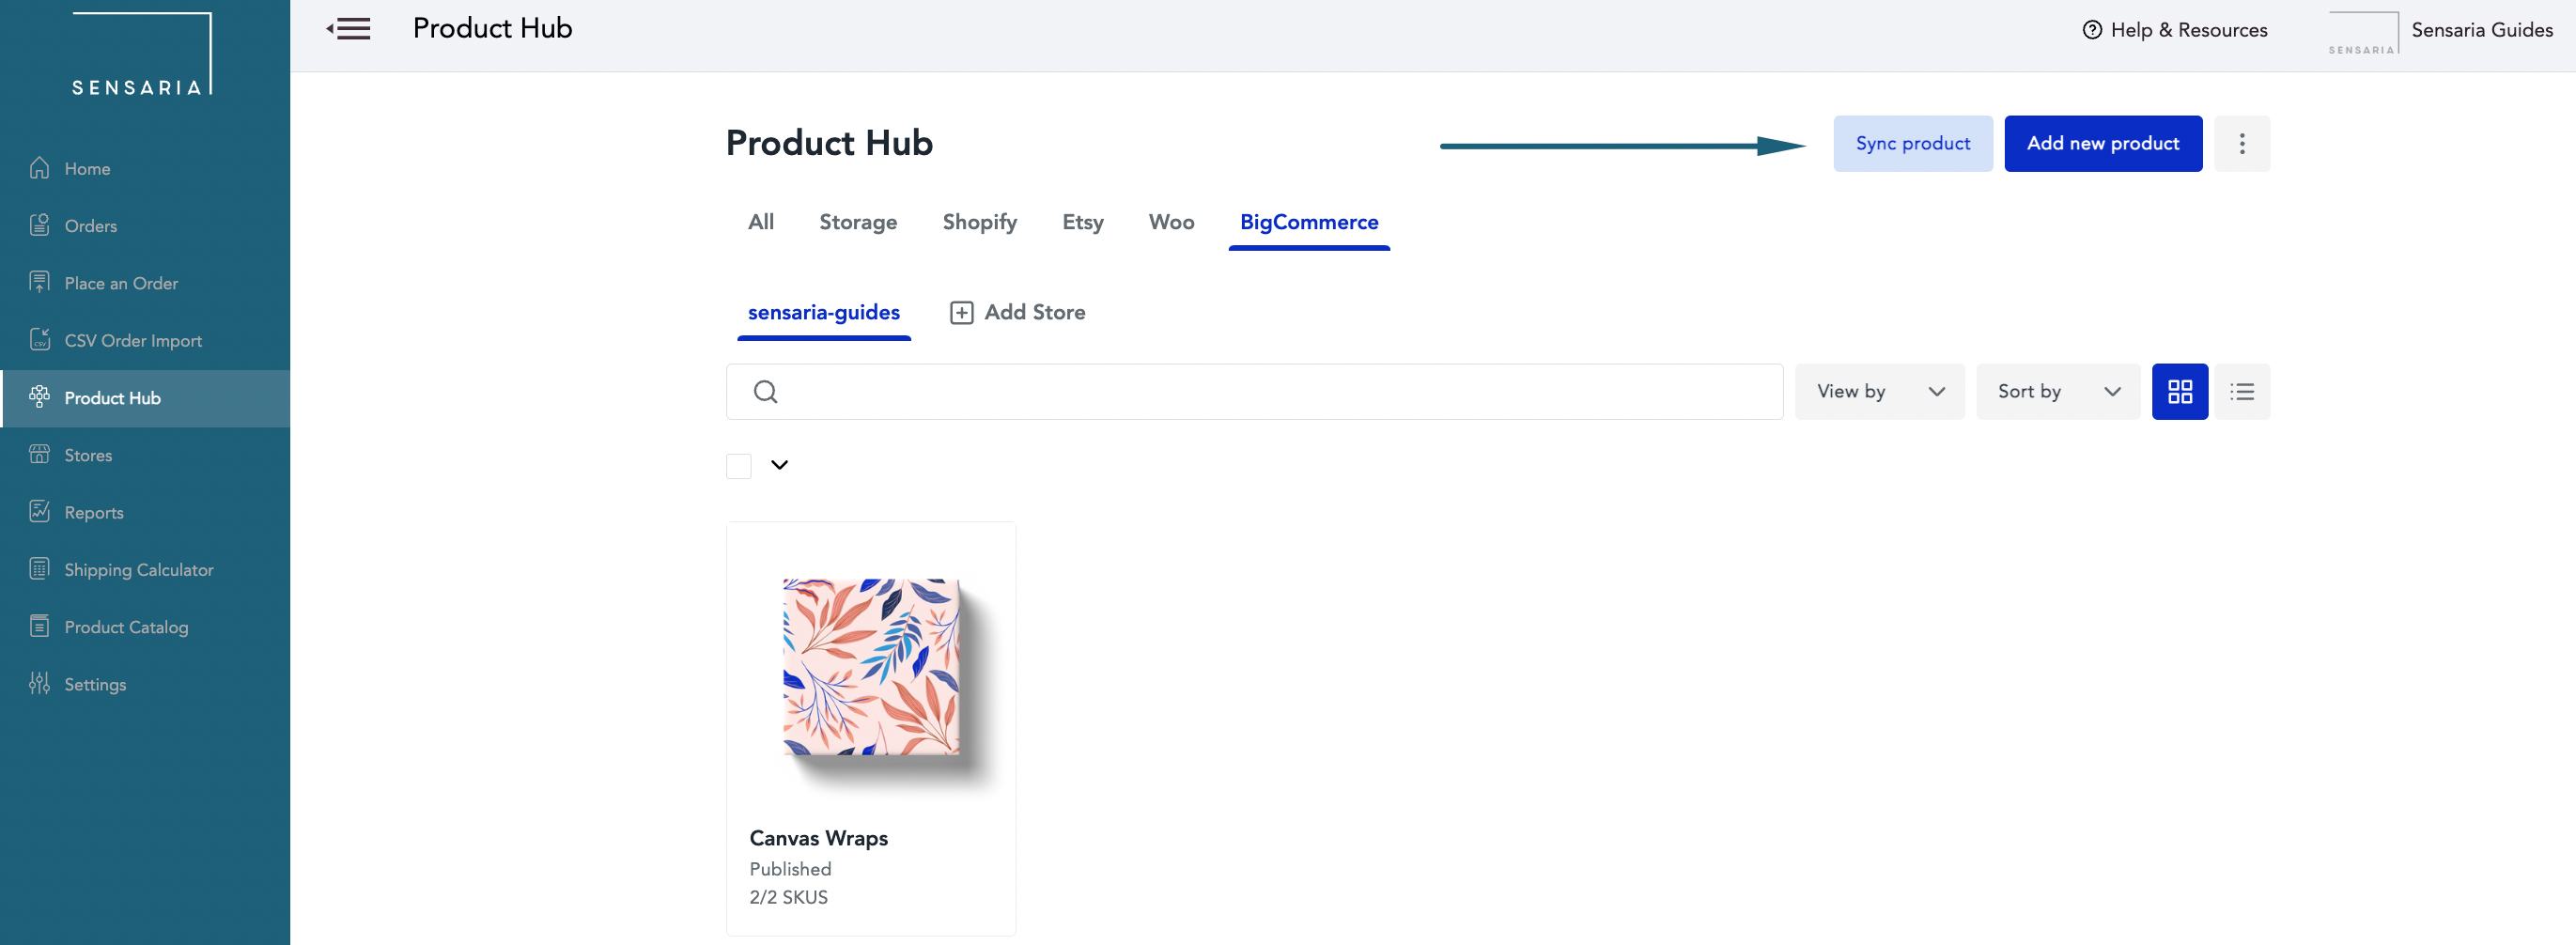
2. After saving those newly created variants, go into your Sensaria Product Hub for that BigCommerce store, click on the BigCommerce tab, and then click on the Sync product button.
3. Select the product from BigCommerce that you want to sync to Sensaria and click the Sync product button.
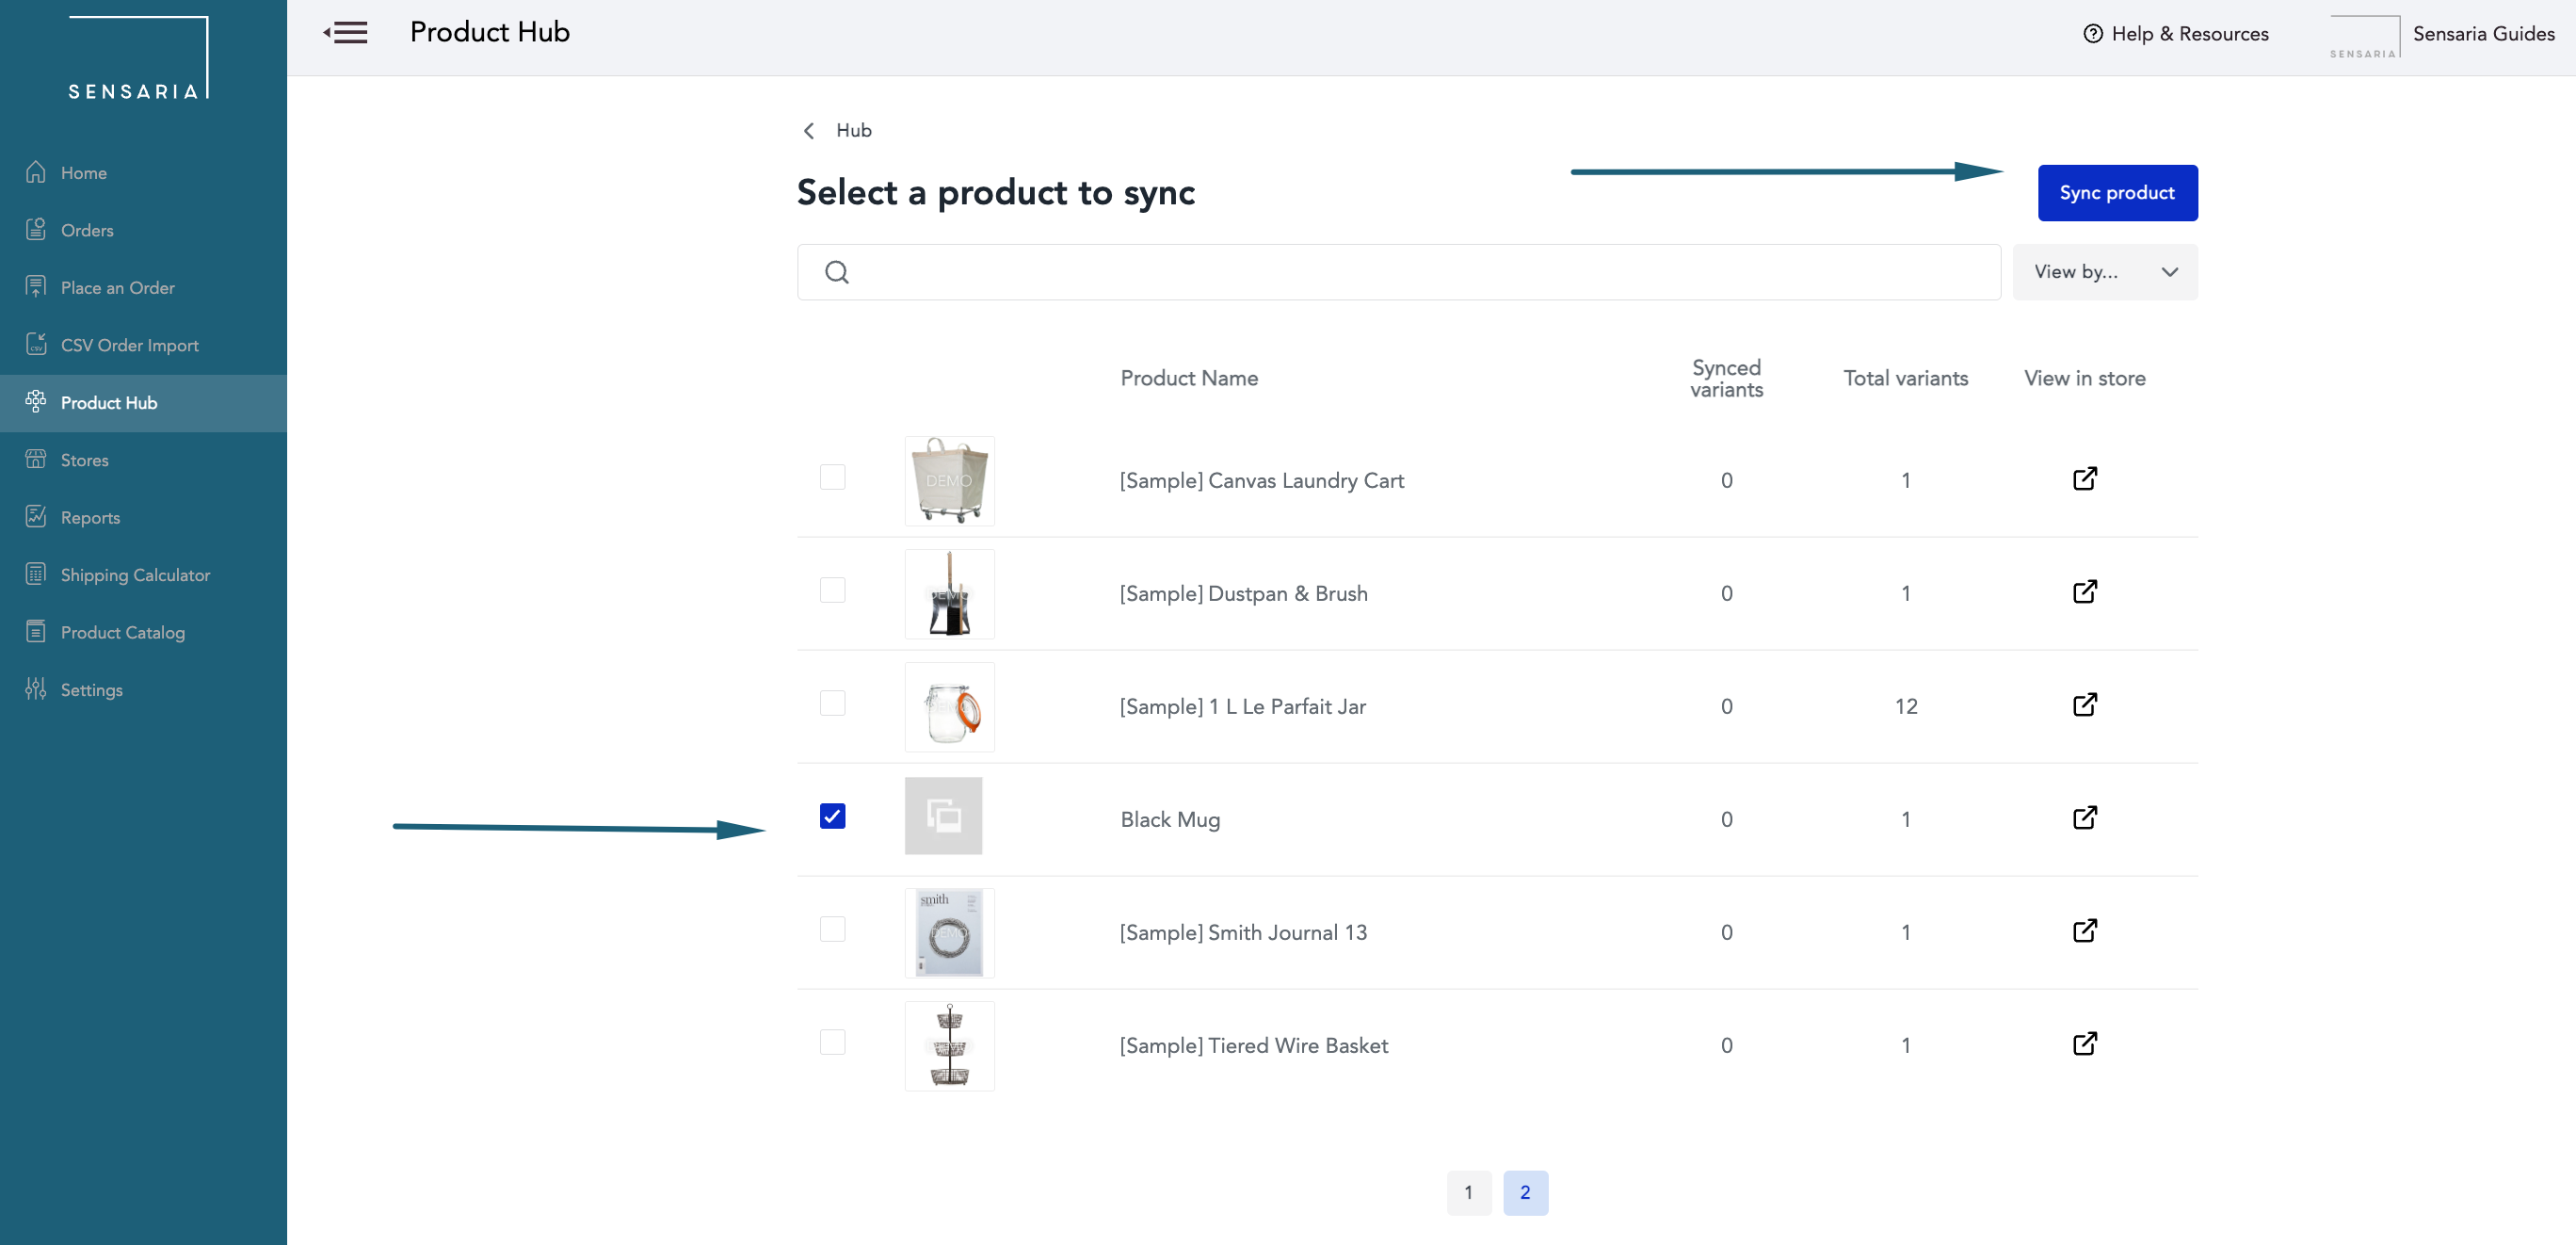
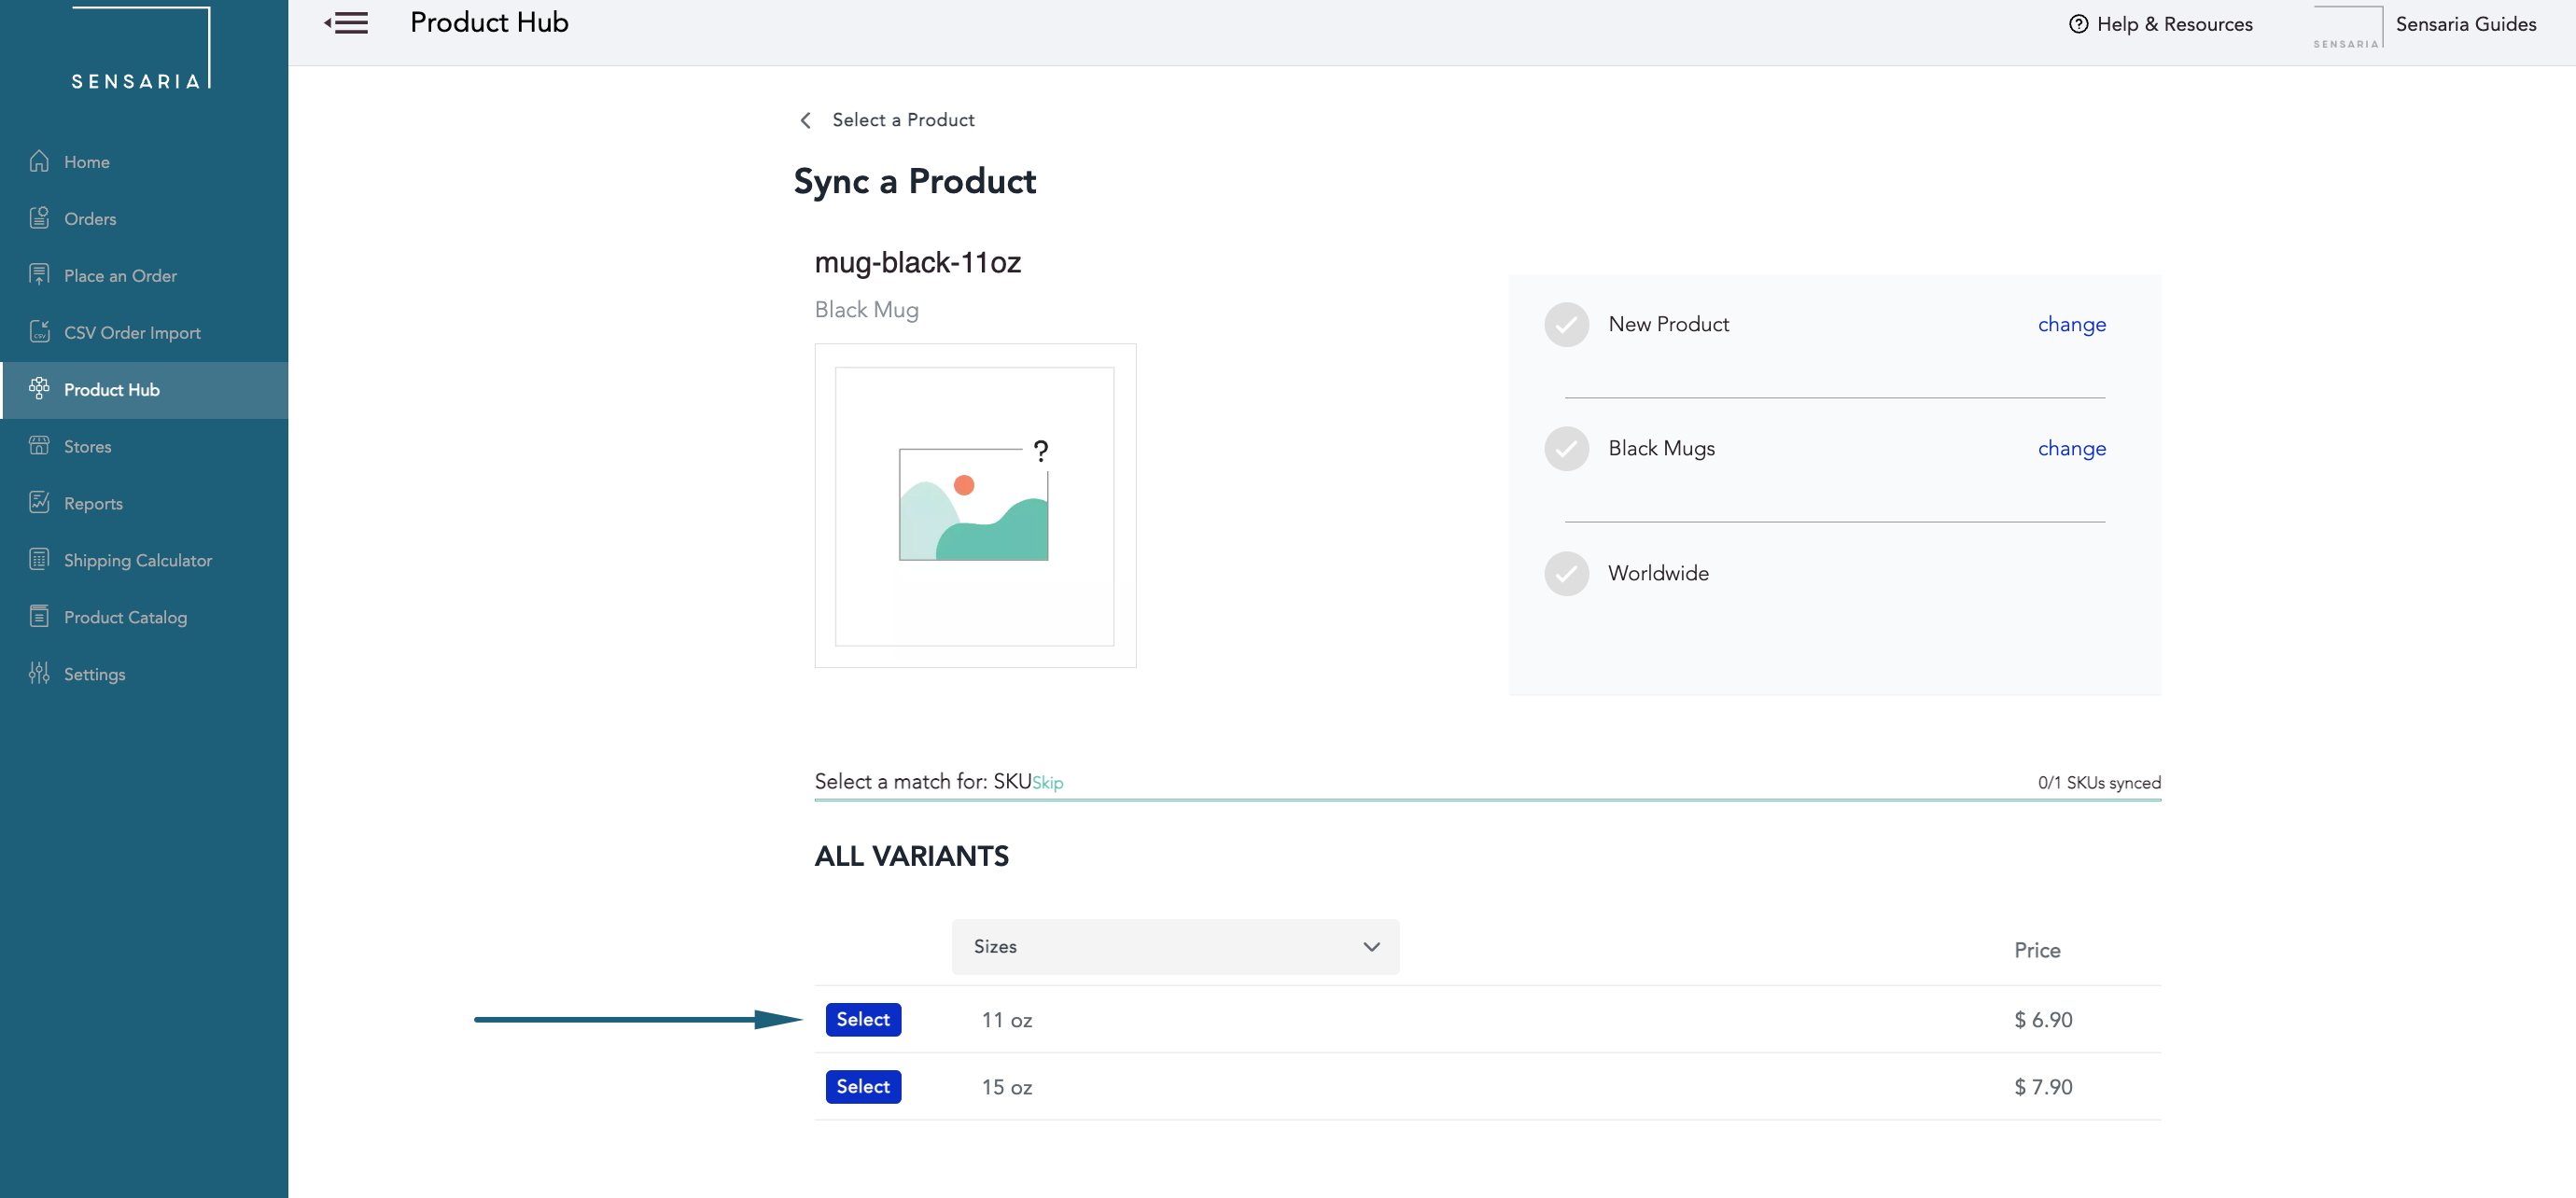
4. After selecting the product, follow the Sync a Product page's steps and select the product you connect to Sensaria.
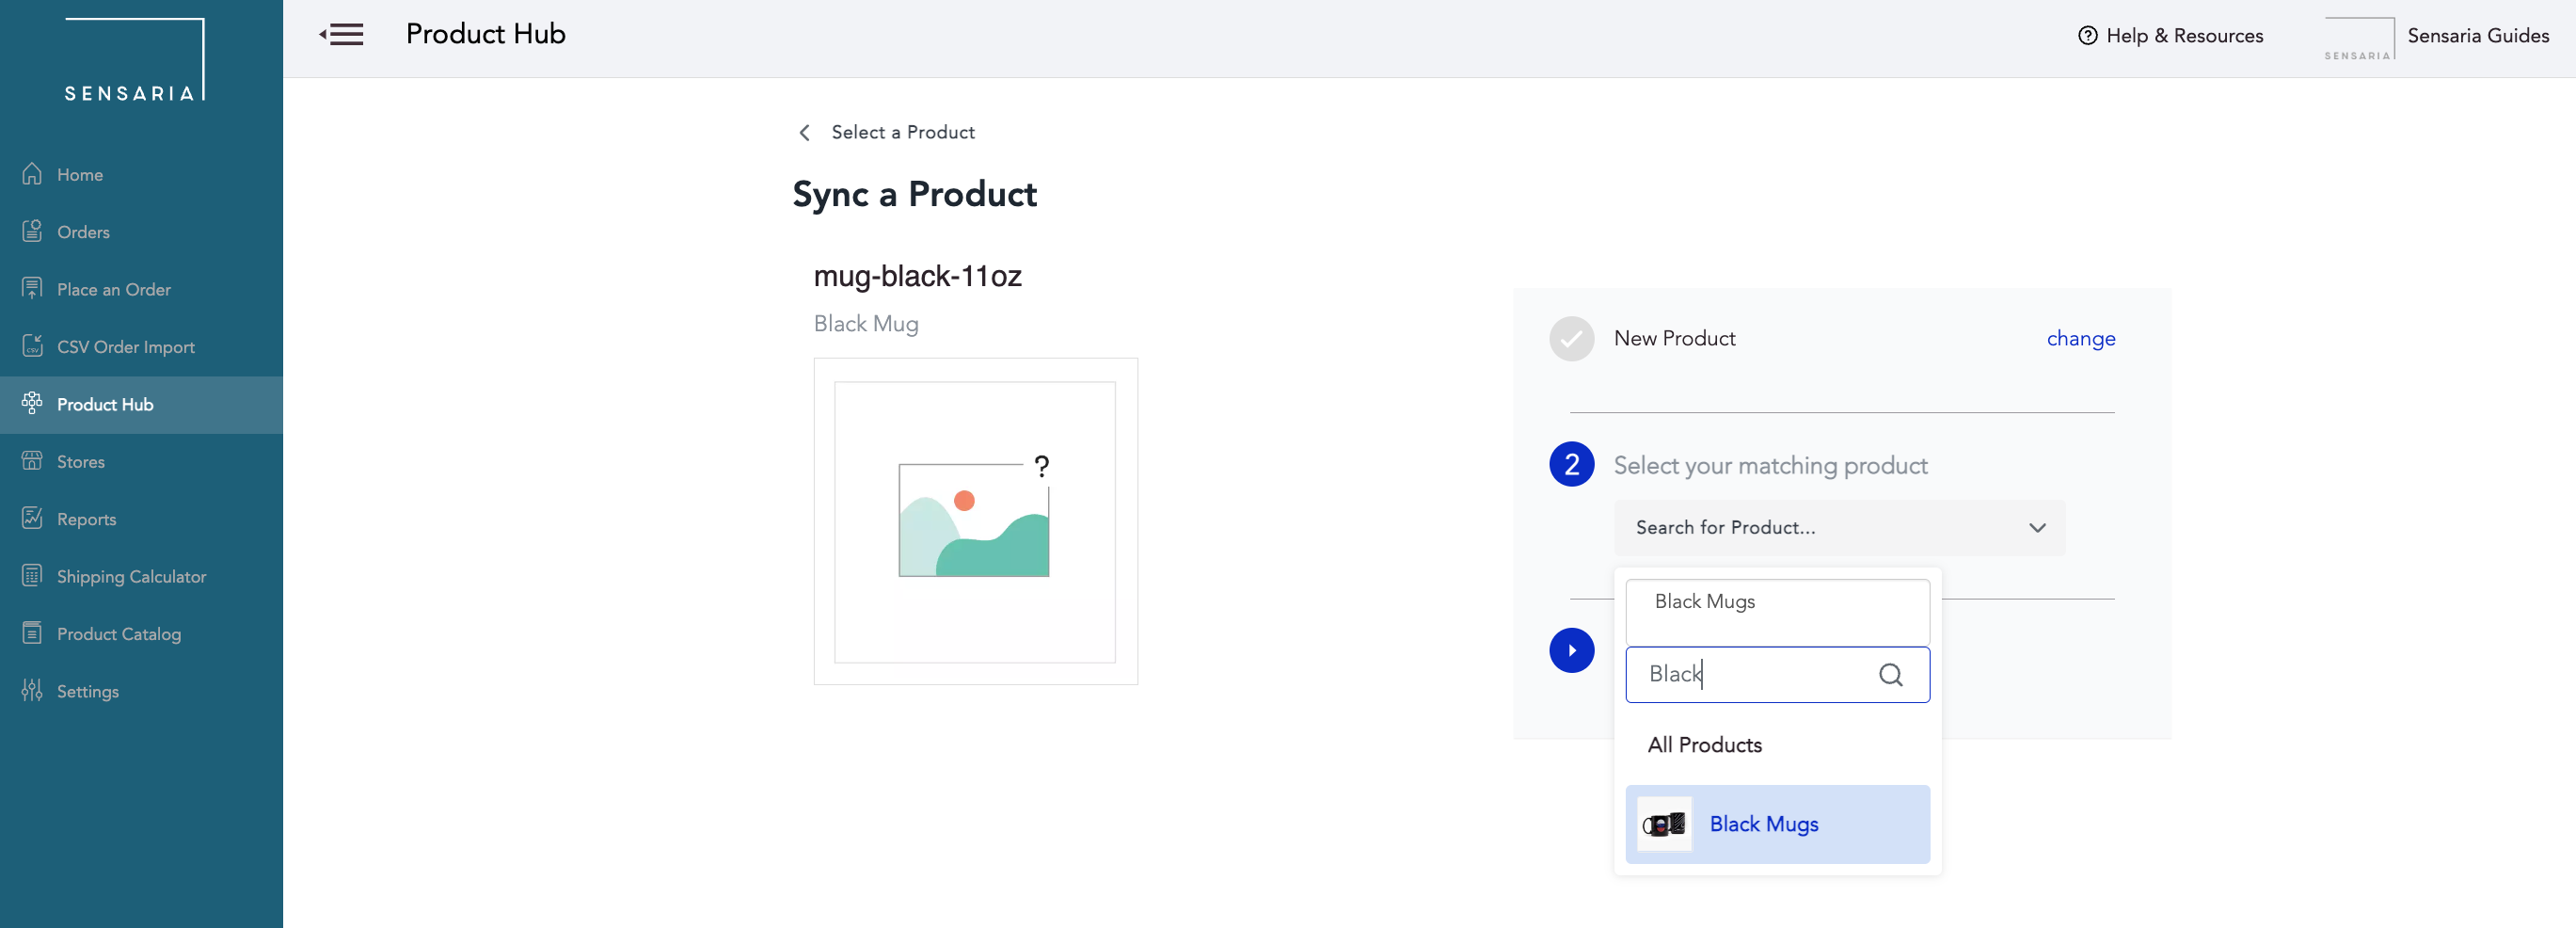
5. Select a matching product SKU that you want to connect to your BigCommerce product variant.
- Repeat this step for each variant, or you can use the Skip option if you want to leave any of them out of the syncing process.
- This will sync your BigCommerce product to the matched product selected in Sensaria.
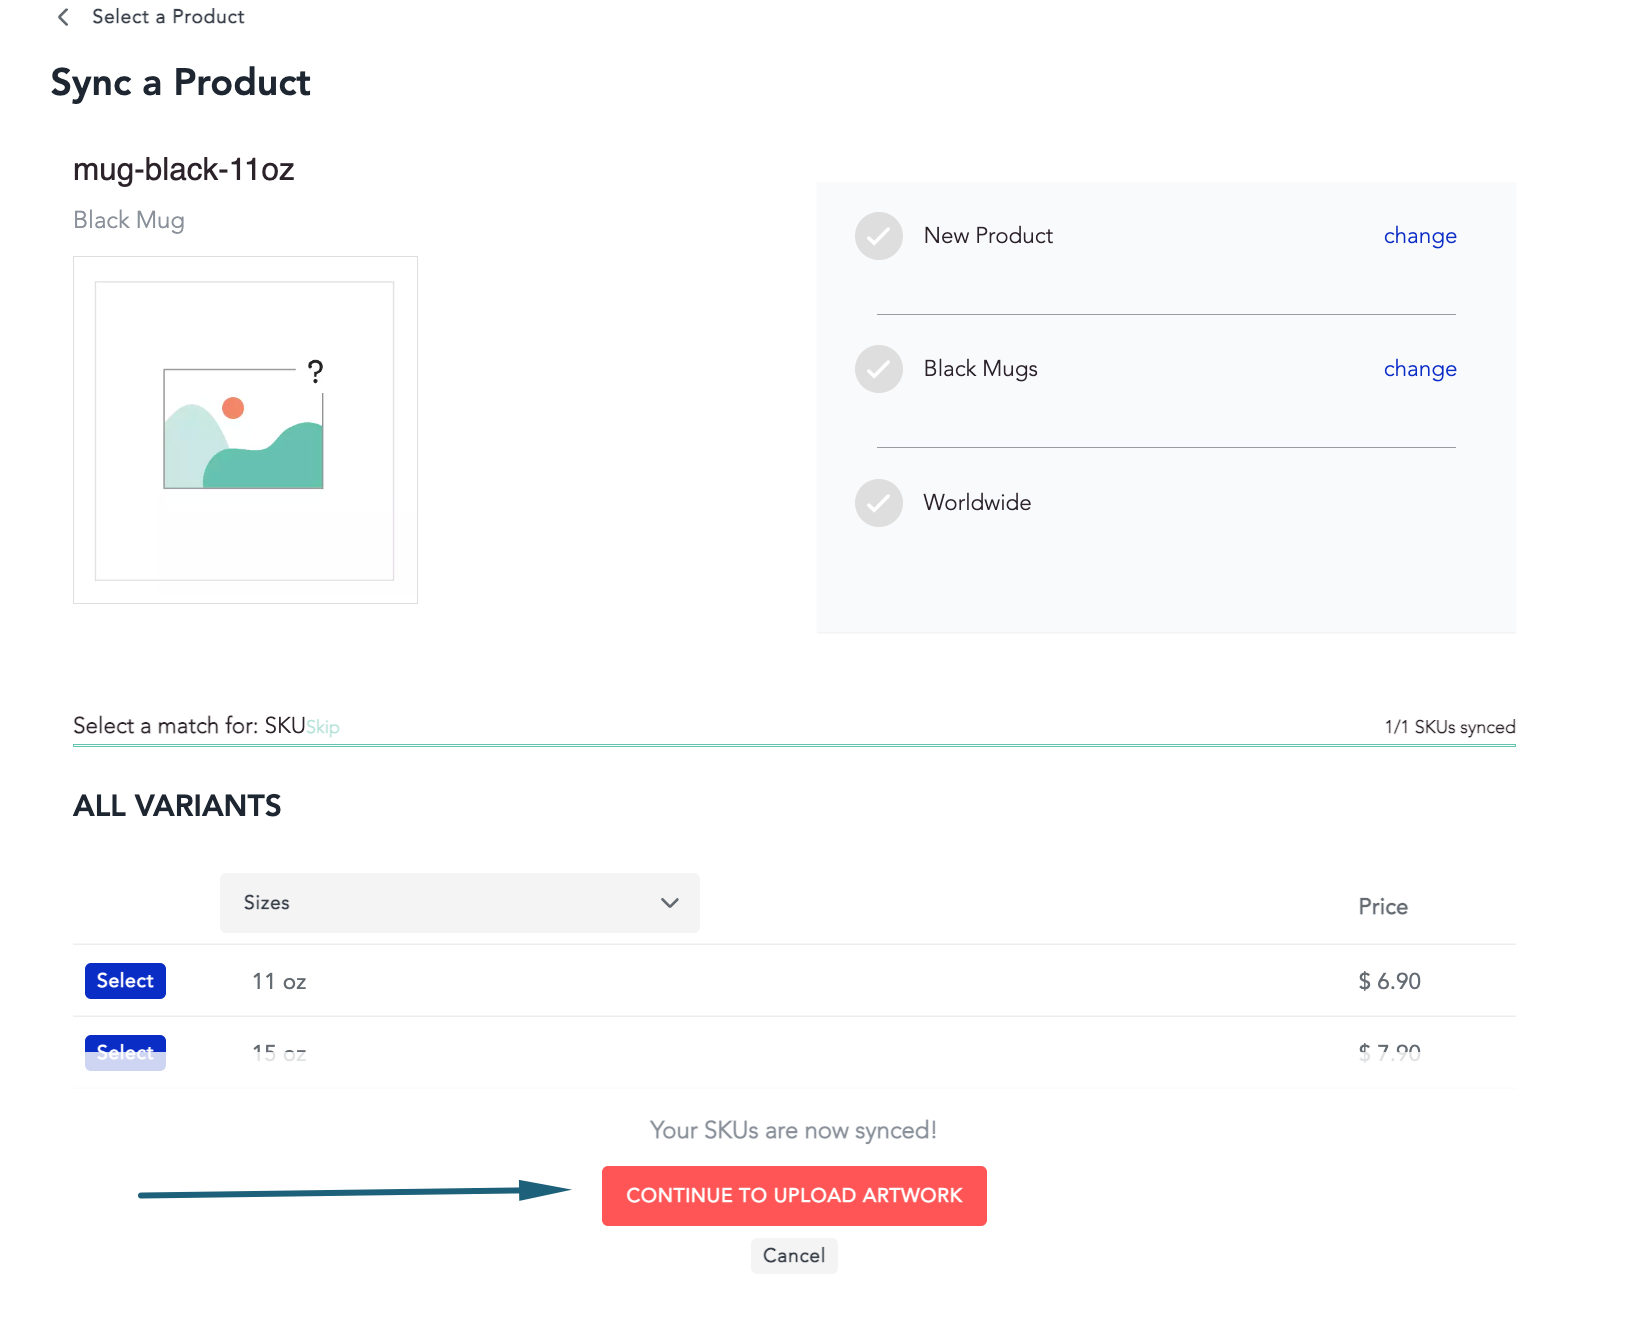
6. Once you've connected the variants, click on the Continue to upload artwork button to design the product, and then you can go through with the rest of the syncing process.
To see our short video tutorial about syncing your existing products, please check out the video below:
Edit Products
You can change the name and the description of the product in your BigCommerce store directly or by editing the product in Sensaria and going all the way to the Product Details page.
Additionally, you can adjust the image or add a new image altogether while editing. The design page is all yours!
Setting up BigCommerce Shipping
Setting up shipping for BigCommerce is done all within your BigCommerce store account. You will still have to pay for our shipping costs for the products that are being ordered, but you can set up the shipping for your customers however you want.
We highly recommend you to check out BigCommerce's existing documentation on how to set up shipping, but we'll briefly cover what you can do below as well.
Set up shipping in BigCommerce
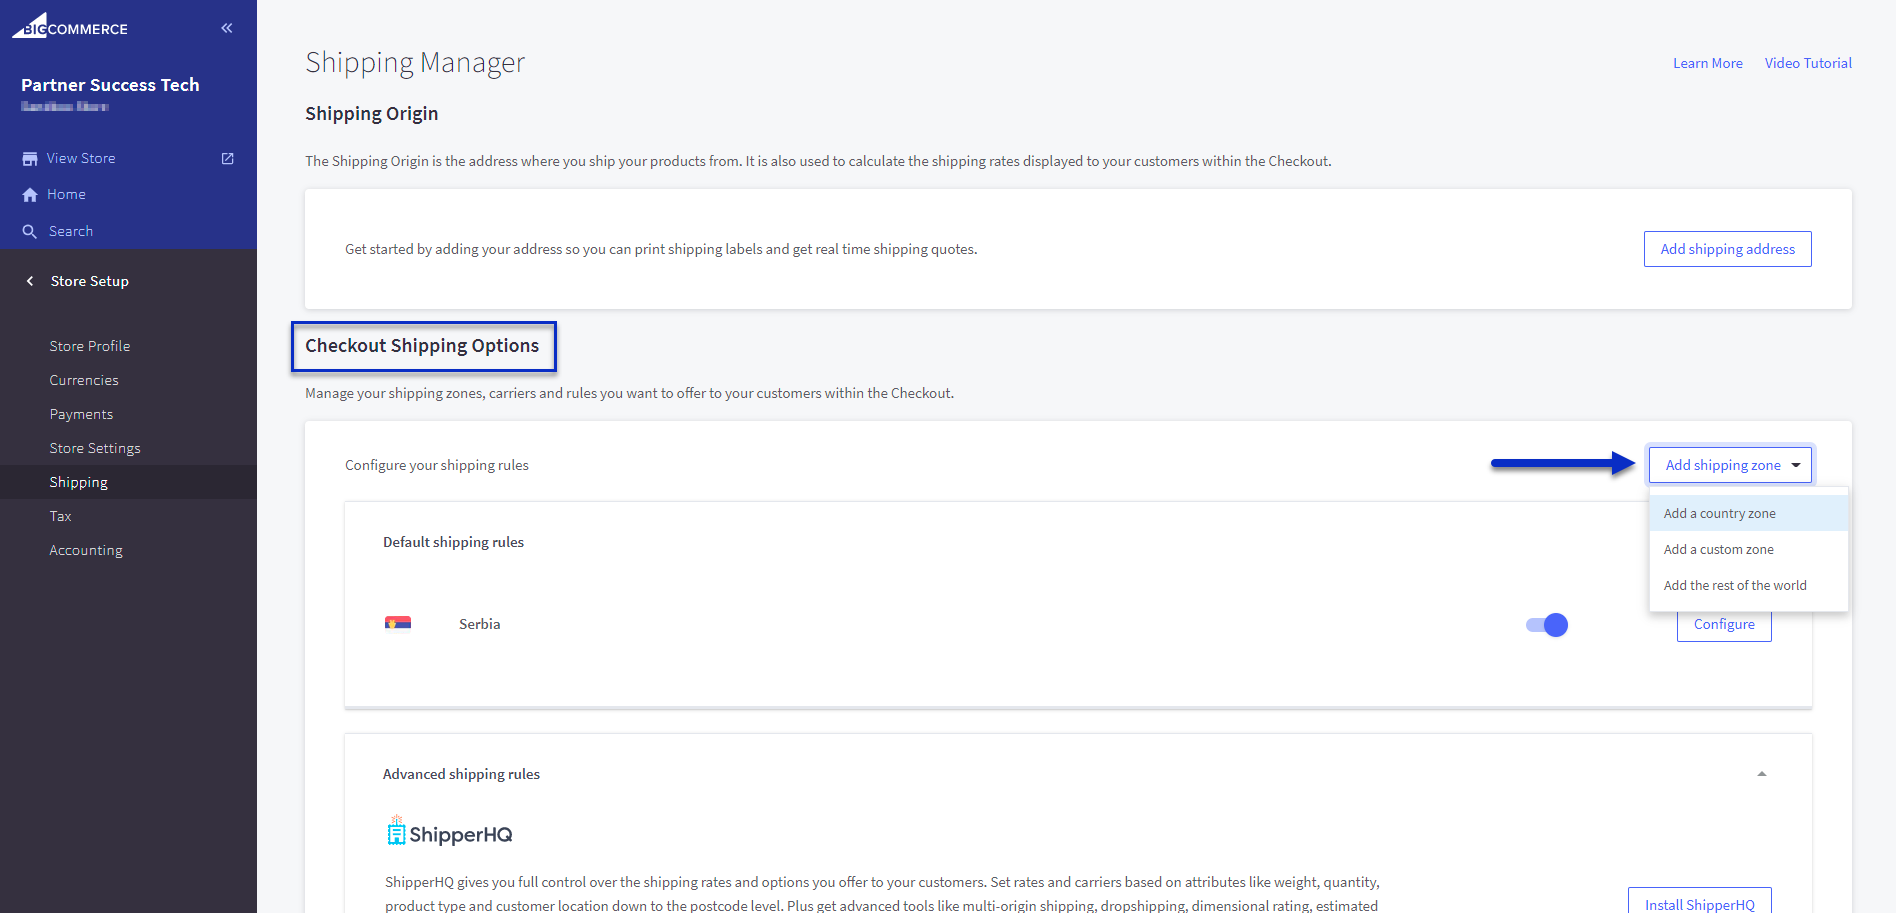
1. Navigate to the Shipping page under the Store Setup section on the left-hand side of your BigCommerce interface.
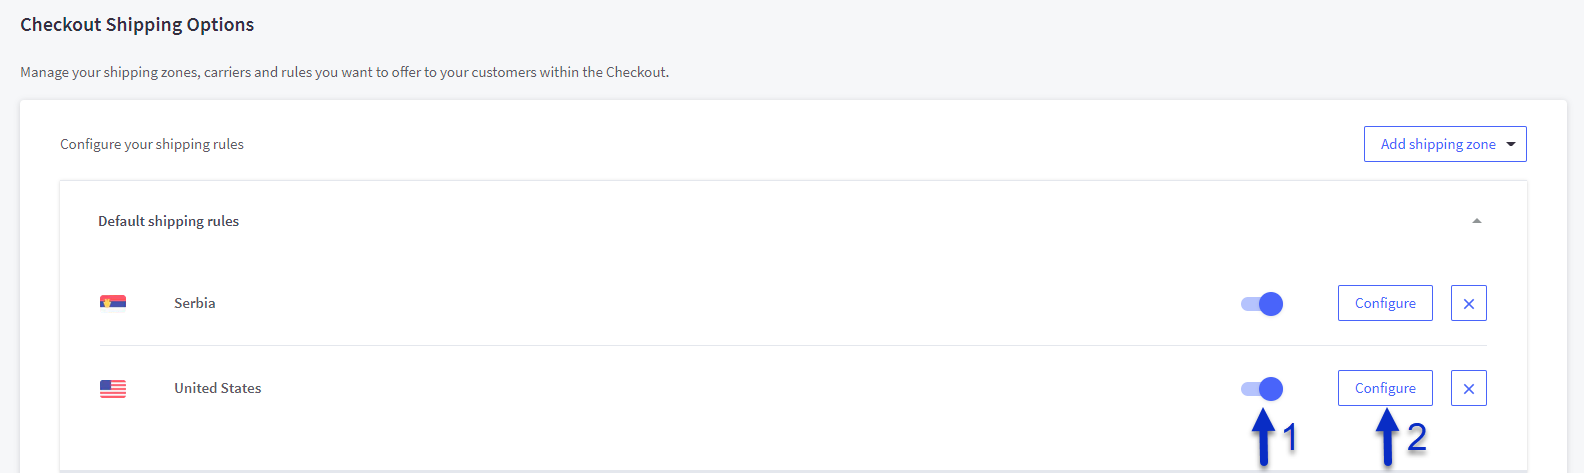
On this page and under the Checkout Shipping Options, select the Add shipping zone drop, and then choose to add a country zone. If you want to select multiple countries in one zone, you will choose a custom zone.
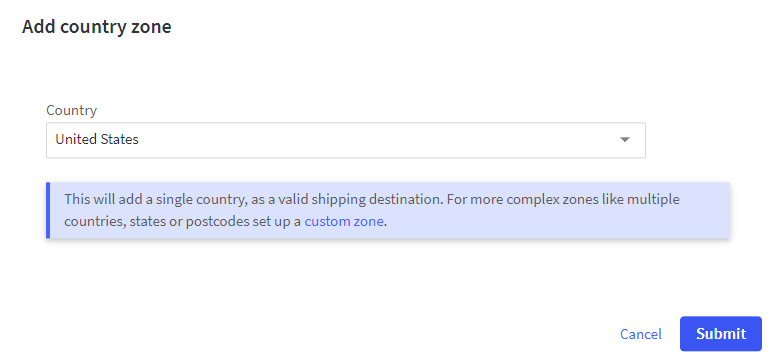
2. You'll see a pop-up that lets you select the country you want to ship to. After selecting the country, click on the Submit button.
3. Once you've added your shipping zone, make sure to enable it and then click the Configure button.
4. Here, you have multiple ways to set up your shipping for your products and orders. Setting up these shipping options will change how your customer will pay you for shipping.
Please be aware that these shipping prices that you set in BigCommerce can help offset the Sensaria shipping costs that you pay us for the production and shipping of your orders.
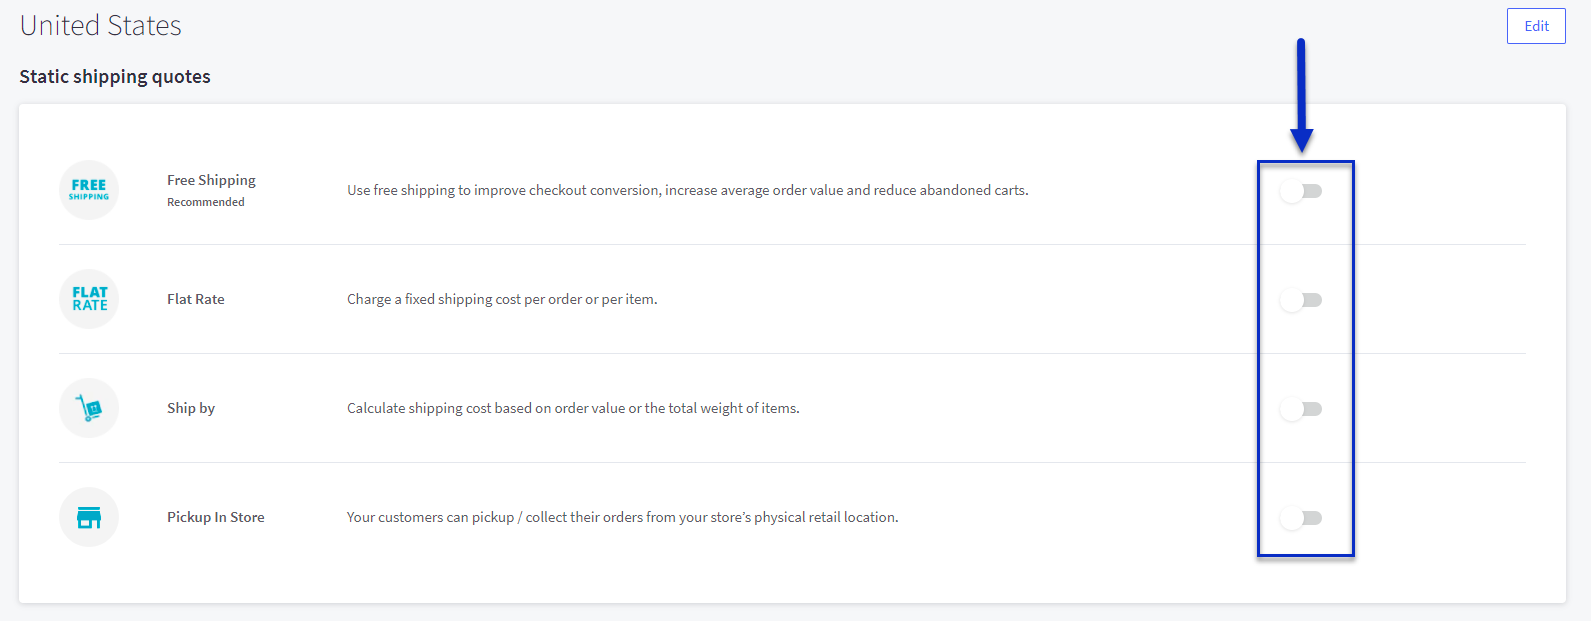
You can choose to enable the following:
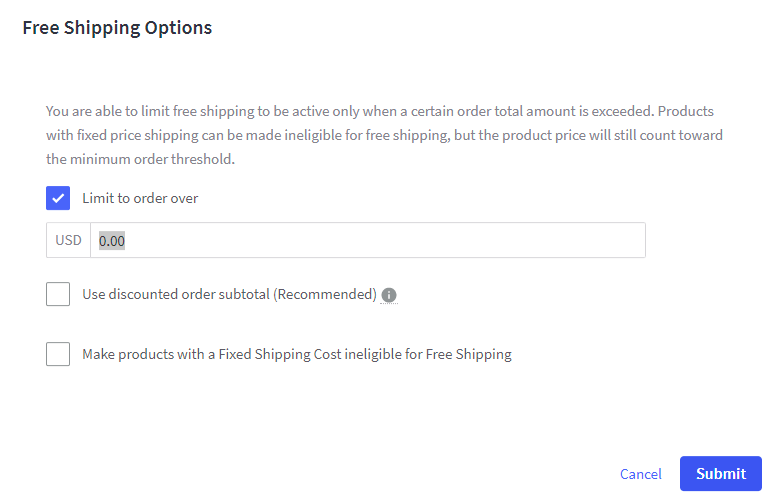
Free Shipping
You can offer your customers free shipping meaning your customer won't have to pay any shipping costs. This does not mean you, as a partner, pays no shipping. You would still have to pay Sensaria's shipping costs when we fulfill your orders.
If you plan to include free shipping in any way, we recommend that you update your product prices to accommodate that your customers are not paying for shipping.
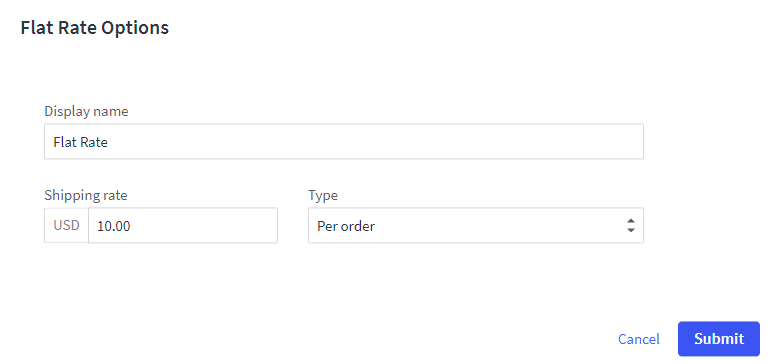
Flat Rate Shipping
You can set a flat rate shipping price for all your orders, and this will be charged to your customers when they place an order through your store.
Including flat shipping rates can help offset the Sensaria shipping costs when you pay us when we fulfill your orders.
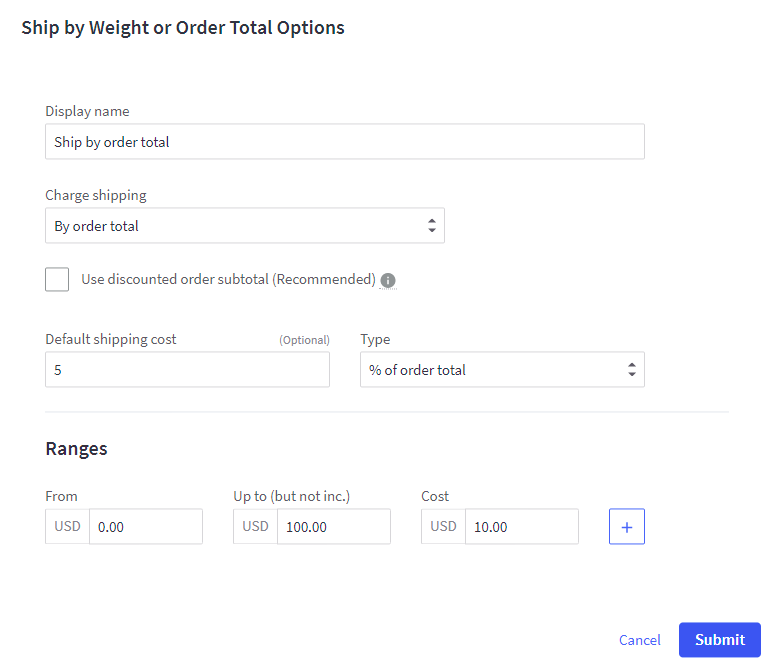
Weight or Order Total Based Shipping
You can choose to set the shipping costs based on the order weight or the order total.
- Setting your shipping costs based on the weight will charge your customers with shipping depending on the weight of the order. We don't necessarily recommend this option as the weight for orders can vary.
- Setting your shipping costs based on the order total will charge your customers with shipping depending on the total cost of their order.
Including these rates can help offset the Sensaria shipping costs you pay us when we fulfill your orders.
5. After you're done setting up your shipping option, you would click on the Submit button, and this applies the shipping option to your entire store.
Regardless of how you set up your shipping in BigCommerce, you are still responsible for paying Sensaria's shipping costs for your orders. Setting up your shipping in BigCommerce helps you cover Sensaria's shipping costs when orders are processed.
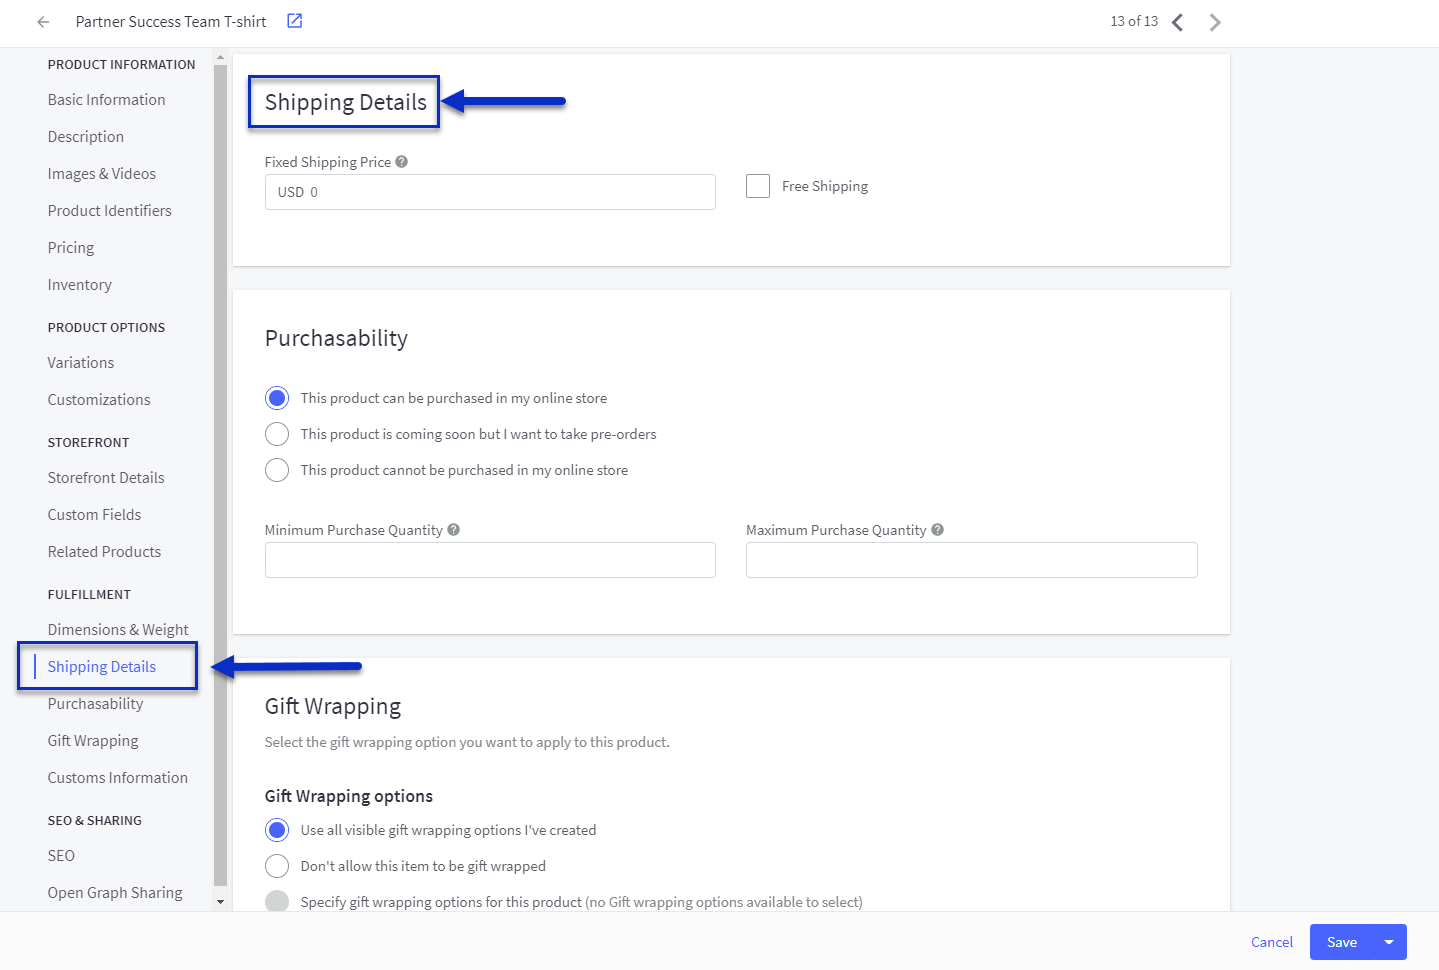
As a side note, you can set up the product shipping costs for individual products when editing the product in BigCommerce. This can be done in the Shipping Details section when editing a product in BigCommerce.